AI: Xbot
xbot-trained-v1: local language model for XBot
XorMon offers its own language model for XBot, xbot-trained-v1, for installations that must not send
any data to a cloud provider.
It is Qwen3.5-9B fine-tuned on XorMon's own tools. It runs on your server in
Ollama. Ollama is only the program that runs the model; the model itself is not in
Ollama's catalog, you download it from us.
What you need
- XorMon 2.4.0 or newer with the XBot agent running, see Install the XBot agent.
- A server with an NVIDIA GPU with at least 16 GB of memory (tested on an RTX PRO 2000 16 GB), Linux with
systemd, the NVIDIA driver installed (
nvidia-smimust list the card) and about 25 GB of free disk space.
The model alone takes about 10 GB of GPU memory, the rest is used by the long instructions XBot sends. Without a GPU the model runs, but answers take minutes. - Ollama 0.34.4 or newer.
- Root access on the GPU server (all commands below run as root or with
sudo). - Network: XorMon must reach port 11434 on the GPU server.
Download
Download xbot-trained-v1.
The download contains:
model-12m4b-q8_0.gguf: the model (9 786 060 160 bytes)Modelfile: how Ollama creates the modelxbot-warmup.json: a first request that loads XBot's instructions and its 41 tools into memorySHA256SUMS: checksums
Copy the files into one directory on the GPU server, e.g. /opt/xbot-trained-v1, and check them there:
cd /opt/xbot-trained-v1
sha256sum -c SHA256SUMS
Every line must end with OK.
1. Install Ollama
If Ollama is not installed yet (see ollama.com/download):
curl -fsSL https://ollama.com/install.sh | sh
ollama --version
The installer creates the service ollama.service. The version must be 0.34.4 or newer.
2. Configure the Ollama service
Do not edit ollama.service itself: an Ollama upgrade overwrites it. Put the settings into an override file:
mkdir -p /etc/systemd/system/ollama.service.d
cat > /etc/systemd/system/ollama.service.d/override.conf <<'EOF'
[Service]
Environment="OLLAMA_HOST=0.0.0.0:11434"
Environment="LLAMA_ARG_CHECKPOINT_MIN_SPACING_NT=1024"
Environment="OLLAMA_GO_TEMPLATE=1"
Environment="OLLAMA_KEEP_ALIVE=-1"
Environment="OLLAMA_MAX_LOADED_MODELS=1"
Environment="OLLAMA_NUM_PARALLEL=1"
Environment="OLLAMA_FLASH_ATTENTION=1"
Environment="OLLAMA_KV_CACHE_TYPE=q8_0"
EOF
systemctl daemon-reload
systemctl restart ollama
systemctl show ollama -p Environment
The last command must print all the variables above. If it does not, the service does not use them: the model is unloaded after a while, or XBot's long instructions are cut off.
What the settings do:
OLLAMA_HOST=0.0.0.0:11434: Ollama listens on all addresses of the server, so XorMon can reach it. Ollama has no password: anybody who reaches the port can use the model. Allow port 11434 only from the XorMon server (see Security). If XorMon runs on the same server, use127.0.0.1:11434instead.LLAMA_ARG_CHECKPOINT_MIN_SPACING_NT=1024: Ollama reuses the already processed instructions between questions instead of reading them again. Without it every question is slower.OLLAMA_GO_TEMPLATE=1: Ollama uses the template from the Modelfile. Without it, the model gets its input in a different form than it was trained on and answers badly.OLLAMA_KEEP_ALIVE=-1: the model stays in GPU memory permanently.OLLAMA_MAX_LOADED_MODELS=1andOLLAMA_NUM_PARALLEL=1: one copy of the model, one question at a time. More copies do not fit into the GPU memory.OLLAMA_FLASH_ATTENTION=1andOLLAMA_KV_CACHE_TYPE=q8_0: save GPU memory. Needed on a 16 GB card; on a card with 24 GB or more you can leave both lines out.
3. Create the model
cd /opt/xbot-trained-v1
ollama create xbot-trained-v1 -f Modelfile
ollama list
The name must be exactly xbot-trained-v1 (a tag such as xbot-trained-v1:latest is fine).
XorMon recognises the model by this name and sends it the instructions in the form it was trained on. Under any other
name the model gets XorMon's generic instructions and answers badly.
The Modelfile sets the model's template and a context of 65 536 tokens. Do not lower the context: XBot's instructions would be cut off and the model would not see its tools.
4. Load the instructions after every start (warm-up)
The first question after a start is slow, because the model has to read XBot's long instructions and the descriptions of its 41 tools. A warm-up request does this right after the server starts, so the first real question is fast.
Copy the warm-up request and create the script:
install -d /usr/local/share/xbot-trained-v1
cp /opt/xbot-trained-v1/xbot-warmup.json /usr/local/share/xbot-trained-v1/
cat > /usr/local/bin/xbot-trained-v1-warmup.sh <<'EOF'
#!/bin/bash
for _ in $(seq 1 60); do
  curl -sf http://127.0.0.1:11434/api/version >/dev/null && break
  sleep 1
done
curl -sf http://127.0.0.1:11434/api/chat \
  -H "Content-Type: application/json" \
  --data-binary @/usr/local/share/xbot-trained-v1/xbot-warmup.json \
  -o /var/lib/xbot-trained-v1-warmup.json
EOF
chmod 755 /usr/local/bin/xbot-trained-v1-warmup.sh
Create the service that runs it after Ollama starts:
cat > /etc/systemd/system/xbot-trained-v1-warmup.service <<'EOF'
[Unit]
Description=Warm up xbot-trained-v1 after Ollama starts
After=ollama.service
Requires=ollama.service

[Service]
Type=oneshot
ExecStart=/usr/local/bin/xbot-trained-v1-warmup.sh
RemainAfterExit=yes

[Install]
WantedBy=multi-user.target
EOF
systemctl daemon-reload
systemctl enable --now xbot-trained-v1-warmup.service
Check:
ollama psThe model xbot-trained-v1 must be listed with 100% GPU, context 65536 and UNTIL
Forever. If PROCESSOR shows a CPU share, the model did not fit into the GPU memory and answers are slow.
The warm-up runs when the server starts. After you restart only Ollama, run it by hand:
systemctl restart xbot-trained-v1-warmup.service5. Connect XorMon
UI ➡ Settings ➡ Application ➡ AI ➡ XBot AI Chat:
- LLM Provider: Ollama (self-hosted)
- Endpoint:
http://<gpu-server>:11434/api/chat(http://<gpu-server>:11434works too) - Model:
xbot-trained-v1 - API Key: leave empty
Save, then press Test. The test question "How many devices does XorMon monitor?" must report that the answer matches XorMon.
Security
- Ollama has no user accounts or passwords. Allow port 11434 only from the XorMon server, never from the internet. Example with ufw:
ufw allow from <xormon-ip> to any port 11434 proto tcp
ufw deny 11434/tcp- The model receives only the results of XBot's tools, read with the asking user's rights. Nothing leaves your network.
Updating to a new model version
Download the new files, check them with sha256sum -c SHA256SUMS, then create the model again under the
same name and warm it up:
cd /opt/xbot-trained-v1
ollama create xbot-trained-v1 -f Modelfile
systemctl restart ollama
systemctl restart xbot-trained-v1-warmup.service
Nothing changes in XorMon.
Troubleshooting
- Answers are slow,
ollama psshows a CPU share: the model does not fit into GPU memory. Check that the two memory-saving lines are in the override file and that no other model is loaded (ollama ps). - The first question after a restart is slow: run the warm-up (step 4).
- The model answers without using XorMon's data, or answers badly: check the model name in XorMon
(exactly
xbot-trained-v1) and thatsystemctl show ollama -p EnvironmentlistsOLLAMA_GO_TEMPLATE=1. - XorMon cannot connect: on the XorMon server run
curl http://<gpu-server>:11434/api/version. No answer means a firewall, a wrong address, orOLLAMA_HOSTset to 127.0.0.1. - Logs: Ollama:
journalctl -u ollama; XorMon:server-nest/logs/pyxbot-agent.logandserver-nest/logs/pyxbot-agent-error.log.
XorMon 2.4.0 brings significantly enhanced XBot, an AI chat built into XorMon.
You ask in plain language ("Which VMs used the most CPU yesterday?", "Show the capacity of all storage pools in TB") and XBot answers with tables, values, graphs and links to the pages in XorMon.
How it works
- XBot is an agent: the language model (LLM) decides which XorMon tools to call, and the tools read the data through XorMon's public API with the rights of the user who asks. The model never scans the XorMon database and never sees objects the user may not see.
- Numbers, units and object names in an answer come from XorMon, not from the model.
Before an answer is shown, XBot checks it against what was actually read, and says so when a part of the question could not be answered. - The same tools are offered to external AI clients over MCP, see MCP.
Install the XBot agent
The AI chat and MCP run in the XBot agent, a Python service that XorMon starts next to itself (it listens only on 127.0.0.1:8610).
- Docker image: the agent is included since v2.4.0, nothing to do
- XorMon appliance: all included since v2.4.0, nothing to do
- Linux installation: install necessary Python modules, then restart XorMon.
- UI ➡ Settings ➡ Application ➡ AI.
If the agent is missing or not running, the page says so and shows the reason.
The MCP card also lists the available tools ("Tools: N tools available"). - Logs:
server-nest/logs/pyxbot-agent.logandserver-nest/logs/pyxbot-agent-error.log.
Connect a language model
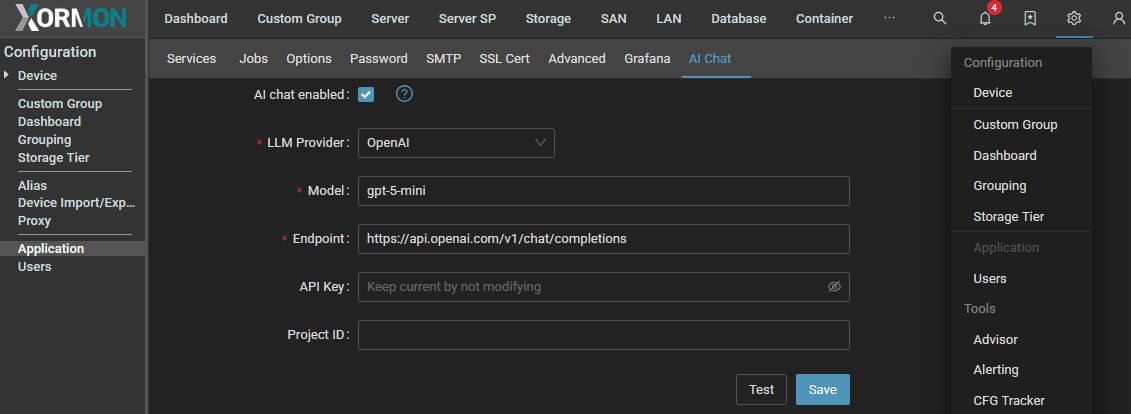
UI ➡ Settings ➡ Application ➡ AI ➡ XBot AI Chat: switch on "AI chat enabled", choose the provider, endpoint, API key and model, Save, then press Test (it checks that the chat can use the model).
Supported providers: Anthropic (Claude), OpenAI, Ollama (self-hosted), DeepSeek and WatsonX. The model must support tool calling.
Which model to choose: you do not need the most expensive one
XBot does the reading, filtering and computing in its own code. The model chooses the tools and writes the sentences. That is why a small, fast model is enough for most questions:
- Recommended start: a small or mid-size model, e.g. Claude Haiku 4.5 or Claude Sonnet.
In our tests the answers of Haiku and Sonnet were equally good. - Large models (e.g. Claude Opus) cost several times more per question and are rarely needed for monitoring questions.
- Self-hosted (Ollama): your data stays on your premises. Use a model with reliable tool calling; small local models answer less reliably.
Data and security
- The model receives only the results of the tools, read with the asking user's rights, never the database.
- The API key of the model provider is stored in XorMon's settings and is never shown again after saving.
- The agent listens only on the local interface (127.0.0.1); external clients use MCP through XorMon's HTTPS API with a user API key.
XorMon offers its XBot tools over the Model Context Protocol (MCP).
An AI client you already use, such as Cursor, VS Code with GitHub Copilot, Claude Code, Claude Desktop or Codex, can then ask XorMon about your infrastructure. It sees exactly what your XorMon user may see.
What you need
- The XBot agent installed and running: MCP's tools run in the XBot agent, a Python service XorMon starts next to itself.
The Docker image and XorMon appliance include it; a Linux installation needs it installed once, see Install the XBot agent.
MCP needs no LLM key in XorMon: your client brings its own model. - MCP switched on: UI ➡ Settings ➡ Application ➡ AI ➡ MCP enabled. An administrator does this once.
- The server address:
https://<xormon>/api/public/v1/llm/mcp. The same settings page shows it ready to copy under Client JSON. - Your own API key: User profile ➡ API Keys. The key acts with your user's rights, so every person should use their own.
The client sends the key in the HTTP header apiKey.
Tools
About 40 tools cover objects and search, metrics, alerts and health, relations and topology, results and selections, and help. The current list with a description of every tool is in UI ➡ Settings ➡ Application ➡ AI (MCP ➡ Tools ➡ show), and every MCP client lists them after it connects.
Two ways to connect
- Direct. The client calls the address itself and sends the
apiKeyheader. This needs a certificate the client trusts, see Certificate. - Through mcp-remote. A small bridge the client starts on your computer (
npx mcp-remote, it needs Node.js). Use it for Claude Desktop, and for any client while XorMon still has its default self-signed certificate.
Cursor
File ~/.cursor/mcp.json (all projects) or .cursor/mcp.json (one project):
{
  "mcpServers": {
    "xormon": {
      "url": "https://<xormon>/api/public/v1/llm/mcp",
      "headers": { "apiKey": "<your-api-key>" }
    }
  }
}
This is the Client JSON from the XorMon settings page. With the default self-signed certificate, put the mcp-remote form from Claude Desktop into the same file instead.
Cursor documentation: https://cursor.com/docs/mcp
VS Code with GitHub Copilot
File .vscode/mcp.json in the workspace, or run MCP: Open User Configuration for all workspaces. VS Code asks for the key once and keeps it out of the file:
{
  "inputs": [
    { "type": "promptString", "id": "xormon-api-key", "description": "XorMon API key", "password": true }
  ],
  "servers": {
    "xormon": {
      "type": "http",
      "url": "https://<xormon>/api/public/v1/llm/mcp",
      "headers": { "apiKey": "${input:xormon-api-key}" }
    }
  }
}
Use the tools in Copilot Chat in Agent mode. With the default self-signed certificate, define the server as "type": "stdio" with the command, args and env from Claude Desktop.
VS Code documentation: https://code.visualstudio.com/docs/agent-customization/mcp-servers
GitHub Copilot in Visual Studio and JetBrains IDEs
- Visual Studio 2022 17.14 or later: file
%USERPROFILE%\.mcp.json(all solutions) or.mcp.jsonin the solution folder, with the same"servers"block as for VS Code and the key written into"headers". - JetBrains IDEs: open
mcp.jsonfrom the Copilot settings. The headers go underrequestInit:
{
  "servers": {
    "xormon": {
      "url": "https://<xormon>/api/public/v1/llm/mcp",
      "requestInit": { "headers": { "apiKey": "<your-api-key>" } }
    }
  }
}
Documentation: https://learn.microsoft.com/en-us/visualstudio/ide/mcp-servers and https://docs.github.com/en/copilot/how-tos/provide-context/use-mcp/extend-copilot-chat-with-mcp (also covers Eclipse and Xcode).
Claude Code
claude mcp add --transport http xormon https://<xormon>/api/public/v1/llm/mcp --header "apiKey: <your-api-key>"Check it with claude mcp list. With the default self-signed certificate, add the server through mcp-remote instead, so the setting applies to this server only:
claude mcp add --env NODE_TLS_REJECT_UNAUTHORIZED=0 --transport stdio xormon -- npx -y mcp-remote https://<xormon>/api/public/v1/llm/mcp --header apiKey:<your-api-key> --transport http-onlyClaude Code documentation: https://code.claude.com/docs/en/mcp
Claude Desktop
Open UI ➡ Settings ➡ Developer ➡ Edit Config. The file is ~/Library/Application Support/Claude/claude_desktop_config.json on macOS and %APPDATA%\Claude\claude_desktop_config.json on Windows:
{
  "mcpServers": {
    "xormon": {
      "command": "npx",
      "args": [
        "-y", "mcp-remote",
        "https://<xormon>/api/public/v1/llm/mcp",
        "--header", "apiKey:<your-api-key>",
        "--transport", "http-only"
      ],
      "env": { "NODE_TLS_REJECT_UNAUTHORIZED": "0" }
    }
  }
}
Leave out the env line once XorMon has a trusted certificate. Then quit Claude Desktop completely and start it again. Claude's Connectors (Customize ➡ Connectors) cannot reach XorMon, see Not supported.
Documentation: https://modelcontextprotocol.io/docs/develop/connect-local-servers and https://github.com/geelen/mcp-remote
Codex (CLI and IDE extension)
The Codex CLI and its VS Code extension share ~/.codex/config.toml:
[mcp_servers.xormon]
url = "https://<xormon>/api/public/v1/llm/mcp"
env_http_headers = { "apiKey" = "XORMON_API_KEY" }
Codex reads the key from the environment variable XORMON_API_KEY. To keep the key in the file instead, write http_headers = { "apiKey" = "<your-api-key>" }.
With the default self-signed certificate:
[mcp_servers.xormon]
command = "npx"
args = ["-y", "mcp-remote", "https://<xormon>/api/public/v1/llm/mcp", "--header", "apiKey:<your-api-key>", "--transport", "http-only"]

[mcp_servers.xormon.env]
NODE_TLS_REJECT_UNAUTHORIZED = "0"
On Windows, write command = "C:\\Program Files\\nodejs\\npx.cmd".
Codex documentation: https://learn.chatgpt.com/docs/extend/mcp?surface=cli
Other clients
- A client that calls an address with its own headers: use the address and the
apiKeyheader. - A client that starts a local command:
npx -y mcp-remote https://<xormon>/api/public/v1/llm/mcp --header apiKey:<your-api-key> --transport http-only
Certificate
XorMon's default certificate is self-signed and issued for localhost. A client that connects by IP address or host name refuses it.
- Recommended: upload a certificate issued for the name you use to reach XorMon (UI ➡ Settings ➡ Application ➡ SSL Cert). The direct configurations then work as they are.
- Otherwise: connect through mcp-remote with
NODE_TLS_REJECT_UNAUTHORIZED=0. This switches off certificate checking for that bridge only. Use it only in a network you trust.
Windows notes
- Install Node.js LTS from https://nodejs.org/. It provides
npx. - Some clients need the full path
C:\Program Files\nodejs\npx.cmd; Codex does. - Write the header without a space:
apiKey:<your-api-key>. Cursor, Codex and Claude Desktop on Windows break arguments that contain spaces.
Not supported
Cloud connectors, that is Claude Connectors (claude.ai, Customize ➡ Connectors) and ChatGPT connectors, call the server from the vendor's cloud.
A XorMon in your company network is not reachable from there, and these connectors do not offer the apiKey header.
Use a client that runs on your computer.
Security
- The key acts with your XorMon rights. Do not share it, and do not commit configuration files that contain it.
- Keep the key out of the file where the client allows it: VS Code
inputs, Codexenv_http_headers. - Remove keys you no longer use: User profile ➡ API Keys.
Upgrading from 2.3.x to 2.4.0
The MCP endpoint keeps its address (/api/public/v1/llm/mcp) and the apiKey header, but since 2.4.0 it serves the XBot agent's tools (about 40) instead of the 12 tools of the older built-in server.
- Restart or reconnect your MCP client once after the upgrade, so it loads the new tool list.
- MCP now needs the XBot agent installed and running on the XorMon server. If UI ➡ Settings ➡ Application ➡ AI shows "Tools unavailable", the agent is not running.
- When MCP is switched off, the endpoint answers 503 (before: 400).
Check the connection
- UI ➡ Settings ➡ Application ➡ AI shows Tools: N tools available when XorMon lists its MCP tools; show lists them.
The Test button on that page checks the AI chat's model, not MCP. - From a terminal on macOS or Linux (
-kskips the certificate check for this test only):
curl -k -X POST https://<xormon>/api/public/v1/llm/mcp -H "apiKey: <your-api-key>" -H "Content-Type: application/json" -H "Accept: application/json, text/event-stream" -d '{"jsonrpc":"2.0","id":1,"method":"tools/list"}'A JSON list of tools means the address and the key work.
- 401 "Missing API key" or "Bad or expired API key": the key is missing, mistyped or expired.
- 406 "Not Acceptable": the client must accept both
application/jsonandtext/event-stream. - 503: MCP is switched off in XorMon.
- Client side:
claude mcp listin Claude Code; Claude Desktop writesmcp*.logto~/Library/Logs/Claude(macOS) or%APPDATA%\Claude\logs(Windows).
Model Context Protocol (MCP) Server
The product allows you to enable an integrated MCP (Model Context Protocol) Server, which provides secure and controlled sharing of all available internal tools with external AI chat systems.Once the MCP Server is enabled, external AI clients can access the complete toolset while still operating within defined security and permission boundaries.
This feature simplifies automation and integration by allowing AI-driven workflows to interact directly with your product’s capabilities, while maintaining a clear separation between internal logic and external interfaces.
Enabling the MCP Server can be done through UI ➡ Settings ➡ Application ➡ AI Chat and requires no additional deployment steps.
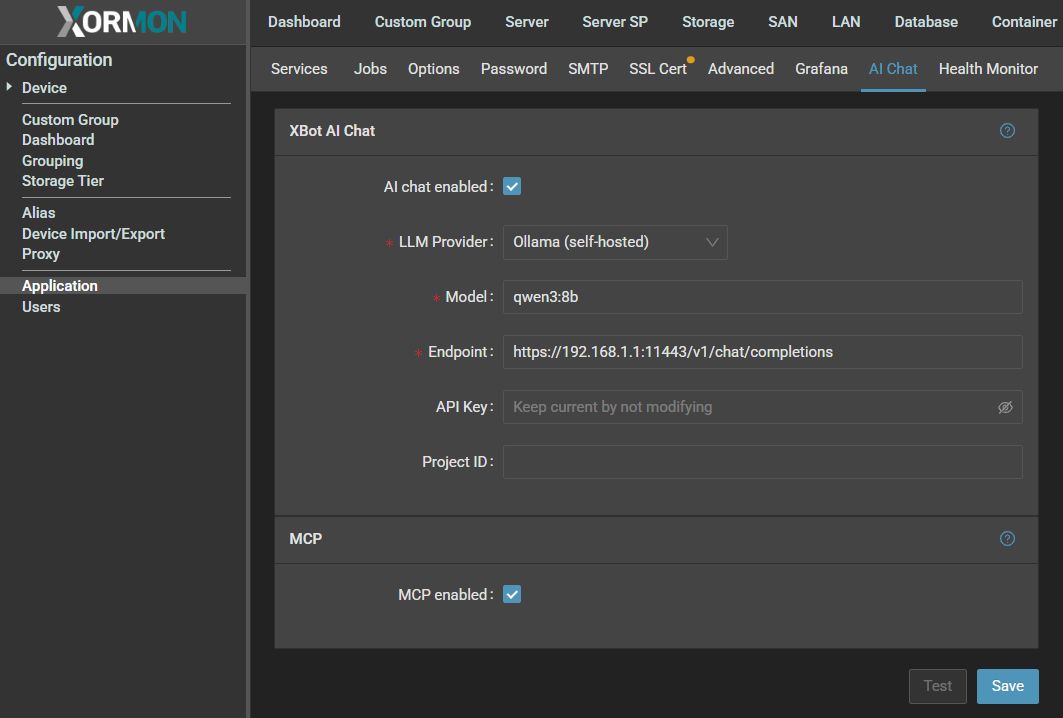 |
XorMon allows you to seamlessly connect your own Large Language Model (LLM) or third-party providers (such as OpenAI) directly into the platform.
This enables you to leverage the power of conversational AI while giving the model controlled access to XorMon’s data and capabilities.
Please note that XorMon v2.4.0 (Sep 2026) features a significantly enhanced AI agent.
How It Works
XorMon uses a tool calling mechanism that exposes selected application functions to the LLM. Instead of granting direct access to raw data, the model interacts with XorMon through predefined tools. These tools can query data, perform actions, and return structured results, which the LLM can then interpret and present to the user in a natural, conversational format.In practice, this means:
You can connect your own hosted model or integrate with a provider like OpenAI.The LLM can call only the functions you explicitly expose.
Results are returned in a structured way, ensuring reliable and safe integration.
The model handles presentation, while XorMon ensures secure and accurate data retrieval.
Benefits
- Flexibility – Choose any LLM provider or use your own deployment.
- Security – Fine-grained control over which functions the model can call.
- Consistency – Data always comes from XorMon’s verified sources.
- Seamless UX – Users interact naturally with the model while getting precise results.
Example Use Cases
Querying your infrastructure to see which servers or virtual machines are running, their state, and health status.Searching and filtering resources based on parameters like WWN, alerts, or performance metrics.
Formatting output into user-friendly structures, such as CSV files, for further analysis.
Tested LLM models
- Ollama
- OpenAI
- Deepseek
- WatsonX
Security implications
The attached AI does not scan the XorMon database.It is only used for translating words and sentences into queries and providing the output.
Configuration
 |