User and Access Management
Users / Groups / ACLs
Users, user groups, and access control lists (ACLs) are used to manage user permissions, control access, and provide sharing capabilities within groups.User permissions
Administrators
User "xormon" and group "Admin" are built-in identities which cannot be modified or deleted.
The user "xormon" and users in the "Admin" group have full administrator access and can configure all aspects of XorMon.
They can configure application settings, create user accounts and assign ACLs, upgrade the application, upload license files, or set up certificates for HTTPS.
Users assigned to "Admin" group have full administrator access to XorMon and all devices, regardless of what other groups they may be assigned.
Device managers
A user group can be created as a Device manager group.
Users in Device manager groups can add, edit and delete monitored devices in XorMon.
Management access can be assigned to all devices or restricted to selected device types.
Users
Regular users can view monitored devices and use various XorMon tools such as Dashboards, Custom Groups, Device Groups, Alerting, Reporter, Exporter, and many others.
Read-only users
Read-only users have limited access to XorMon tools.
They can only view other content created by regular users and shared within the group.
The only exception is dashboards. Users with read-only rights can create personal dashboards and place charts of their choice on them.
Access control
ACLs (Access Control Lists) define which devices can users access in XorMon.
Granularity can be set to entire device classes, individual devices, or selected items such as VMs and Volumes.
ACLs are set at the user group level.
ACLs are applied in all views and in all tools within XroMon.
Device managers
Device manager groups inherit the ACL settings for the devices the group can manage.
Group sharing
Users can utilize various tools in XorMon, such as Dashboards, Alerts, Reports, and many others.
These tools can be used as personal or shared with a group.
Personal tools are only accessible to the user who created them.
Shared tools are accessible to the group, and all users in the group can view, edit or delete them.
For more details see Group sharing
These tools can be used as personal or shared with a group.
Personal tools are only accessible to the user who created them.
Shared tools are accessible to the group, and all users in the group can view, edit or delete them.
For more details see Group sharing
Examples
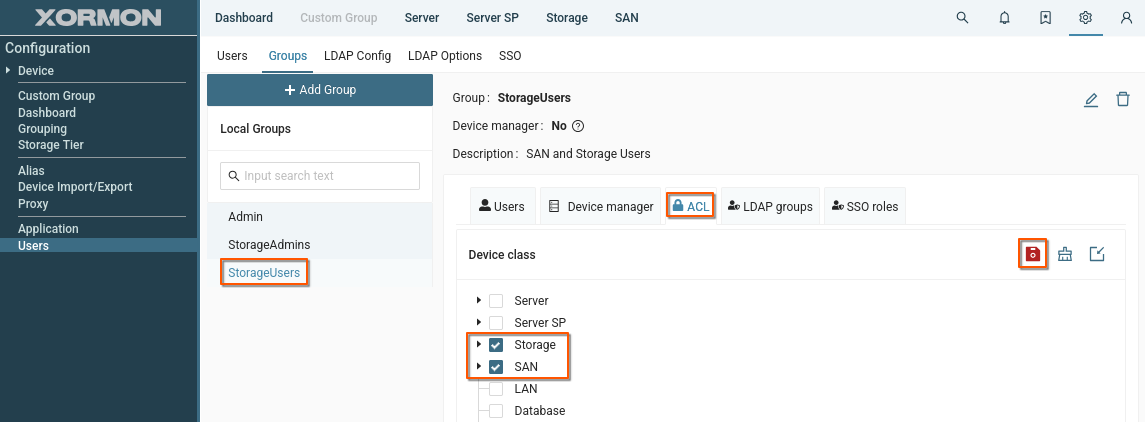
User group and ACLs
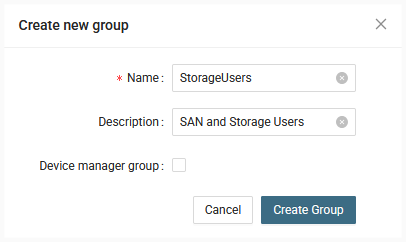
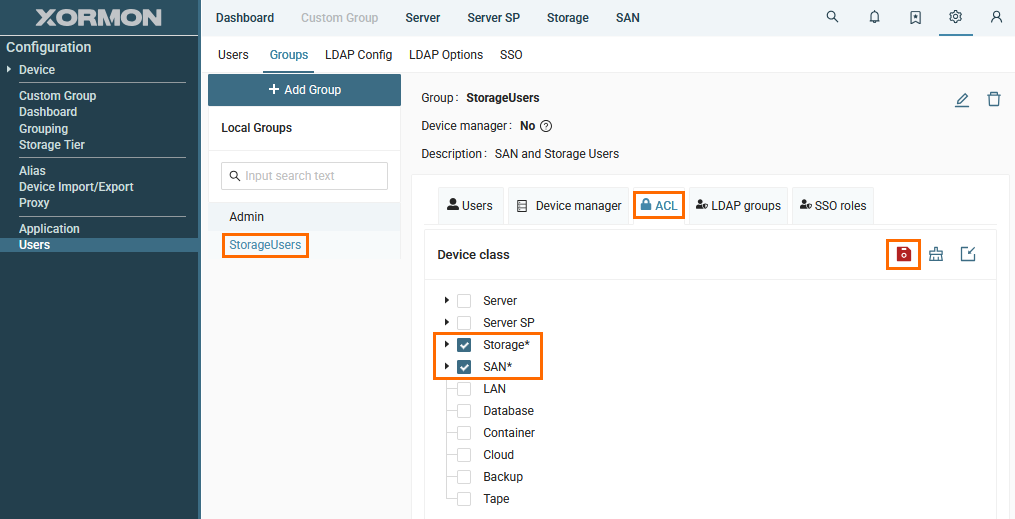
Create user group "StorageUsers" with access to all Storage and SAN devices
Procedure:
Procedure:
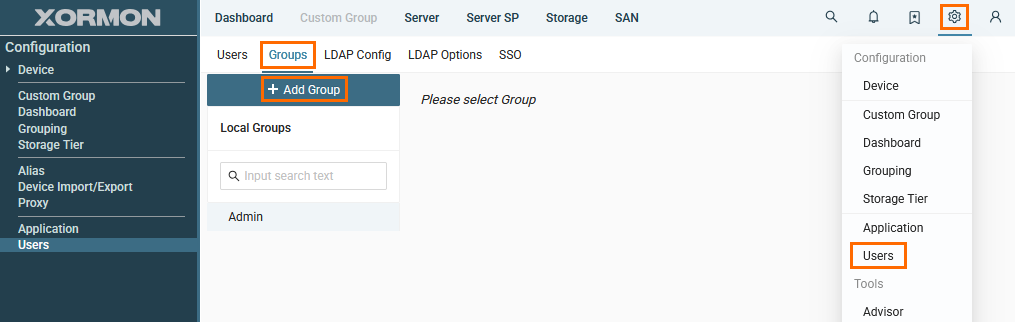
- Go to Settings -> Users
- Switch to tab "Groups"
- Click "+ Add Group"
- Fill in group information and click "Create Group
- Go to newly created group
- Switch to "ACL" tab
- Select "Storage" and "SAN"
- Save the configuration
Device manager group
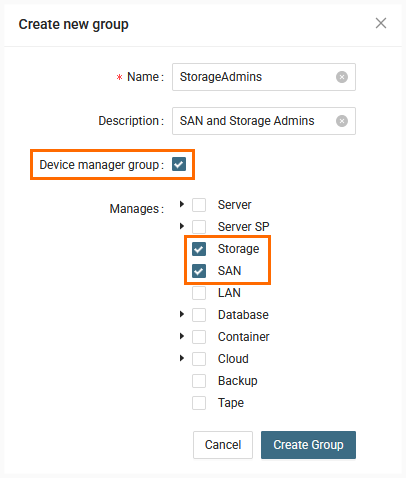
Create Device manager group "StorageAdmins" for Storage and SAN devices
Procedure:
Procedure:
- Go to Settings -> Users
- Switch to tab "Groups"
- Click "+ Add Group"
- Fill in group information
- Click "Device manager group" checkbox
- Select "SAN" and "Storage"
- Click "Create Group"
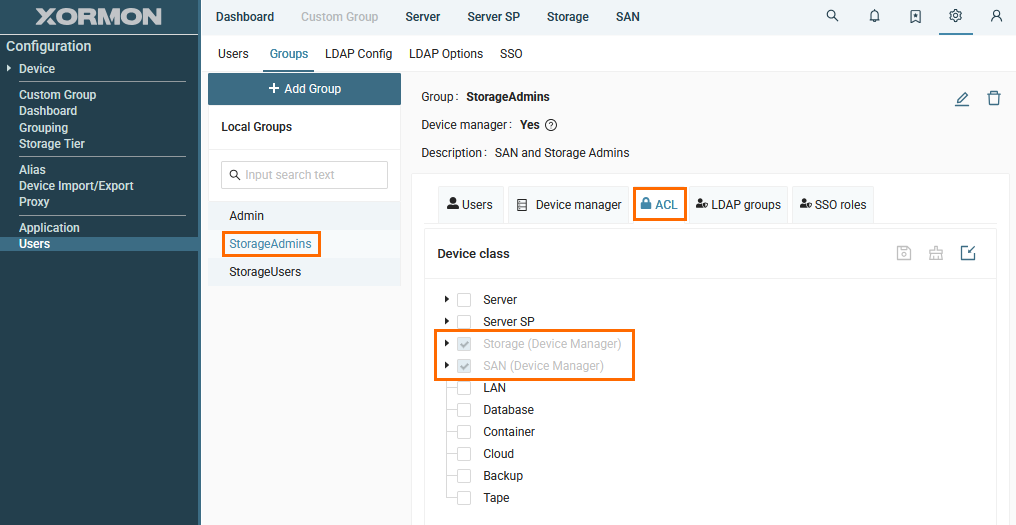
- Go to newly created group
- Switch to "ACL" tab
Note that ALC settings for "SAN" and "Storage" have been inherrited from the Device manager settings and cannot be modified.
You can configure other ACLs for the group, if needed.
You can modify Device manager access in "Device manager" tab.
Regular user
Create user "JaneDee" and add to "StorageUsers" group
Procedure:
Procedure:
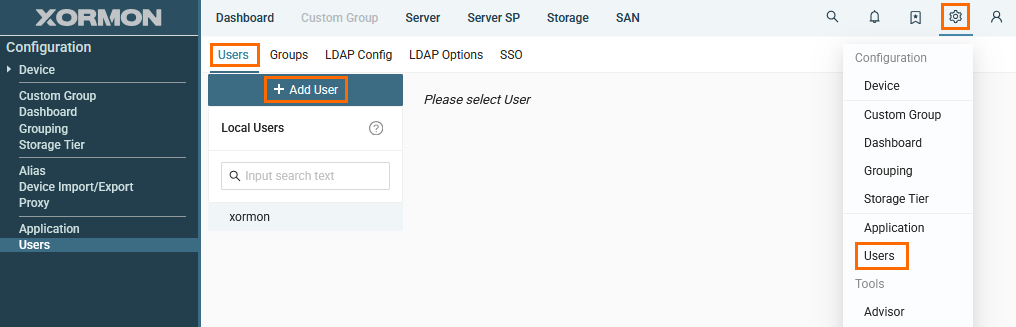
- Go to Settings -> Users
- Switch to tab "Users"
- Click "+ Add User"
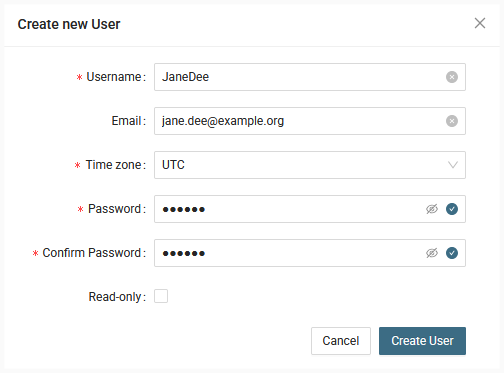
- Fill in user information and click "Create User"
- Go to newly created user
- Select "StorageUsers" and click the right arrow to assign selected group(s) to the user
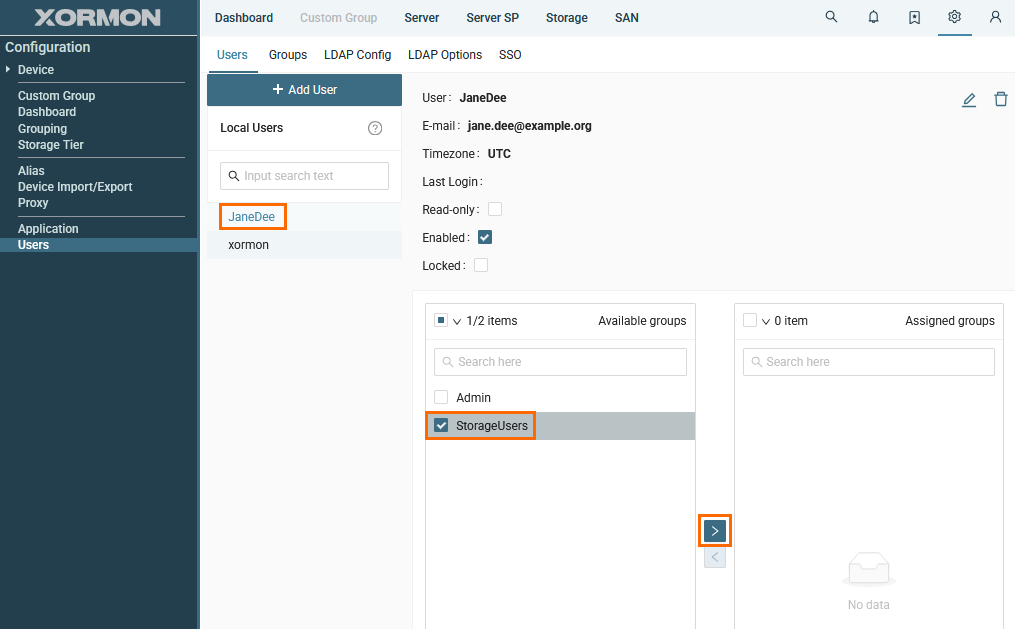
- Sign in as the new user and observe the limited access to monitored devices and application settings in the user interface
Read-only user
Create read-only user "JohnDoe"
Procedure:
Procedure:
- Go to Settings -> Users
- Switch to tab "Users"
- Click "+ Add User"
- Fill in user information
- Click "Read-only" checkbox
- Click "Create User"
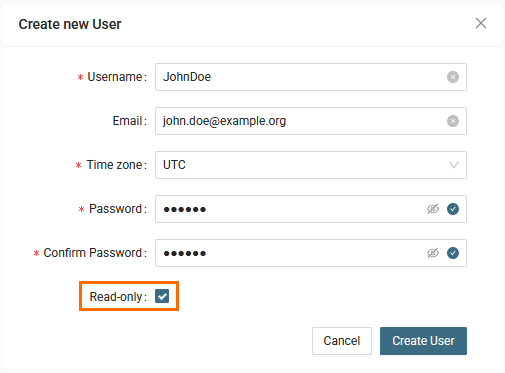
- Add user to a group
- Sign in as the new user and observe user the limitations in the user interface.
More information in Group sharing
Group sharing
Some tools in XorMon support sharing within a user group.Users can decide whether they want to use a tool privately or share it with a group of users.
Private tools are only available to the user who created them.
Shared tools are available to all users in the group.
Users in the group can use, edit, and delete tools.
For example:
User Jane Dee, who is part of the StorageUsers group, creates a report called "DB volumes performance overview."
She decides to share the report with the group.
All members of the StorageUsers group will see the report in the report list and can run and edit it.
If any user deletes the report, it will be deleted for all users in the group.
Tools supporting group sharing
- Dashboards
- Custom groups
- Storage groups
- Alerts - Performance, Anomaly, Ping
- Reporter
- Email groups
- CFG Tracker filters
Read-only users
Read-only users have limited access to XorMon tools.
They can only view other content created by regular users and shared with them within the group.
The only exception is dashboards.
Users with read-only rights can create personal dashboards and place charts of their choice on them.
They can only view other content created by regular users and shared with them within the group.
The only exception is dashboards.
Users with read-only rights can create personal dashboards and place charts of their choice on them.
Group sharing how-to
All examples assume that there are two users, JaneDee and JohnDoe, members of the StorageUsers group.- Shared dashboard
- Shared custom group
- Shared storage group
- Shared e-mail group
- Shared alert
- Shared report
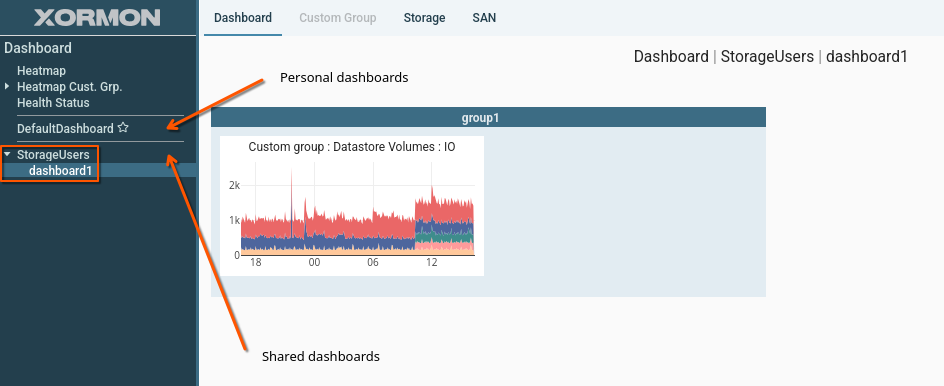
Shared dashboard
Place a graph on a dashboard shared within the user group.
Procedure:
Procedure:
- Sign in as JaneDee
- Select a graph to share
- Click the star to add the graph to a dashboard
- Select a group dashboard
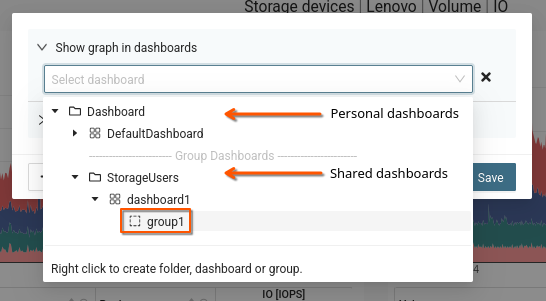
- Sign in as JohnDoe and find the the graph in shared dashboards
Shared custom group
Create a new custom group and share it within the group.
Procedure:
Procedure:
- Sign in as JaneDee
- Navigate to Settings -> Custom Group -> Storage
- Click "Add Custom Group"

- Fill out the form and select a group to share with
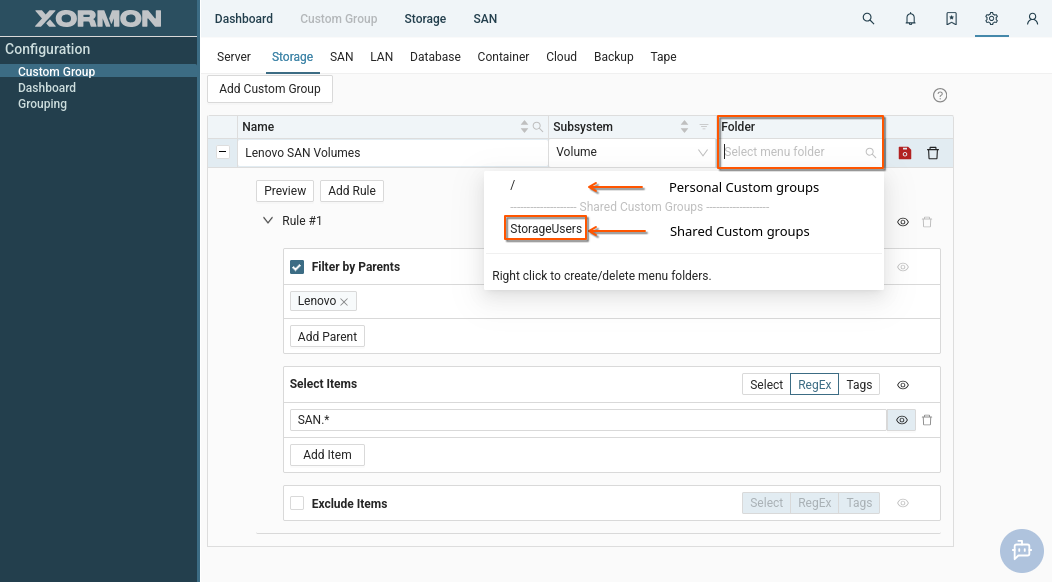
- Save custom group
- Log in as JohnDoe and see that you have access to the custom group
Shared storage group
Create a new storage group and share it within the group.
Procedure:
Procedure:
- Sign in as JohnDoe
- Navigate to Settings -> Grouping -> Storage
- Click "Add Group"
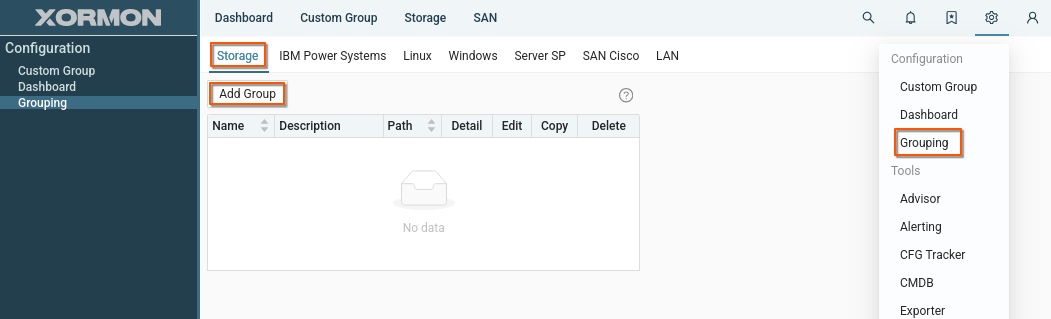
- Fill out the form and select a group to share with
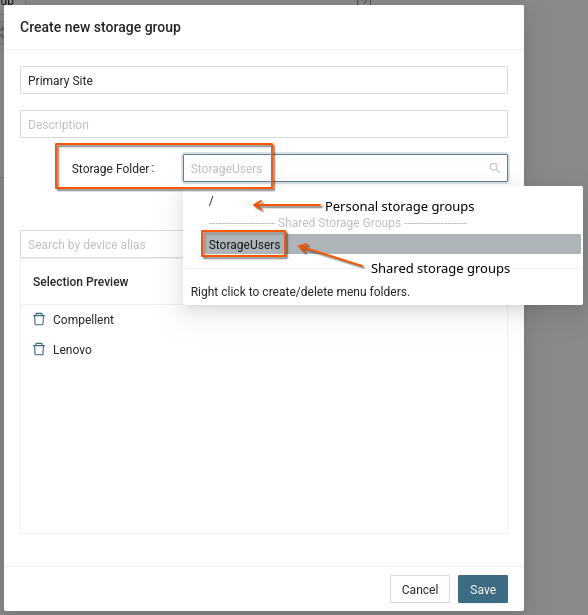
- Log in as JaneDee and see that you have access to the custom group

Shared e-mail group
Email groups are used to send messages, such as reports or alerts to users.
For shared tools, it is advisable to use shared email groups so that all users can manage the tool settings.
Create a shared email group.
Procedure:
For shared tools, it is advisable to use shared email groups so that all users can manage the tool settings.
Create a shared email group.
Procedure:
- Sign in as JaneDee
- Navigate to Settings -> Alerting -> Email
- Click "New Email Group"
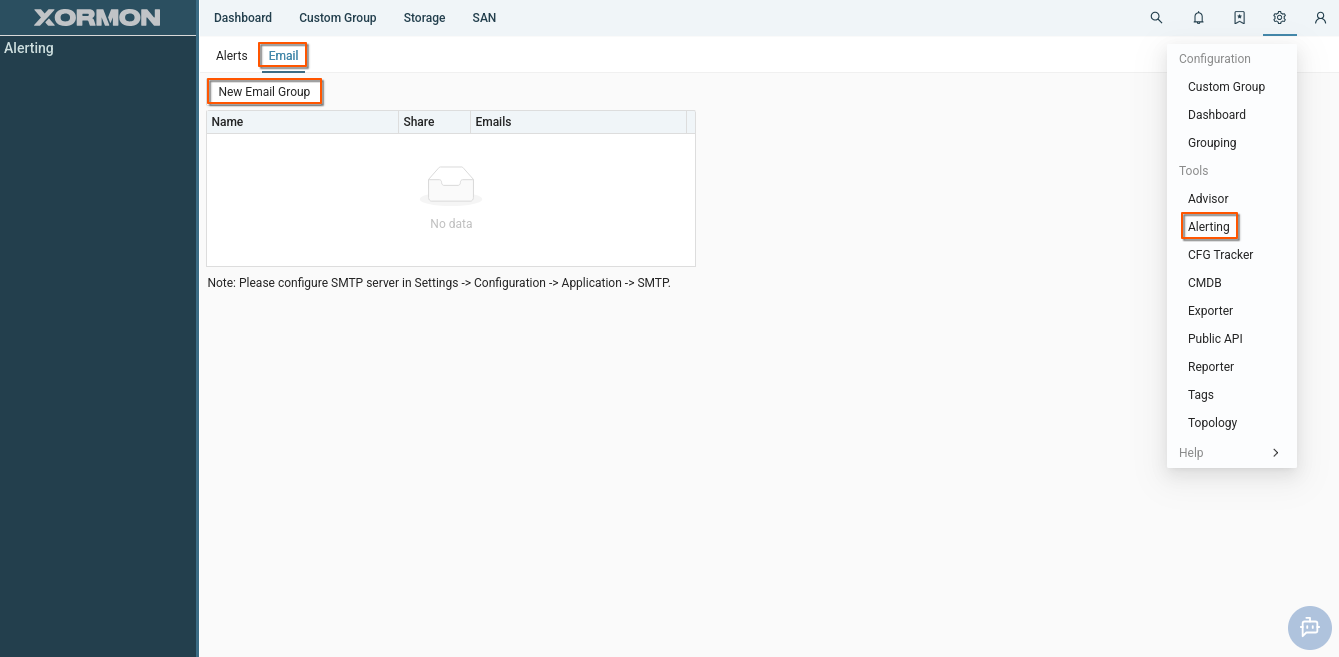
- Fill out the form and select a group to share with
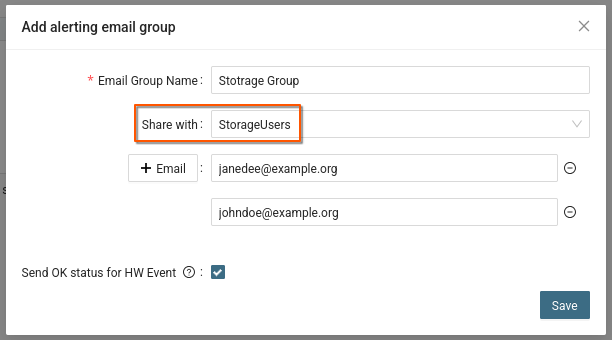
- Log in as JohnDoe and see that you have access to the email group and can edit it
Shared alert
Create new alert and share it with the group
Use the shared email group from the previous example as the target for alert messages.
Procedure:
Use the shared email group from the previous example as the target for alert messages.
Procedure:
- Sign in as JohnDoe
- Navigate to Settings -> Alerting -> Alert -> Performance
- Click "New Alert Group"
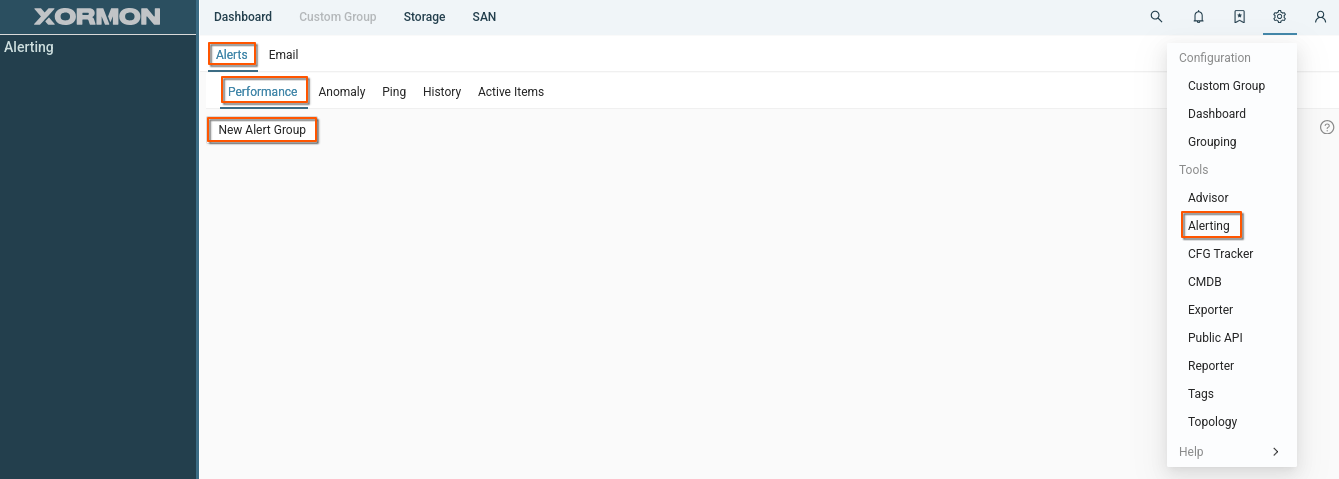
- Fill out the form and select a group to share with
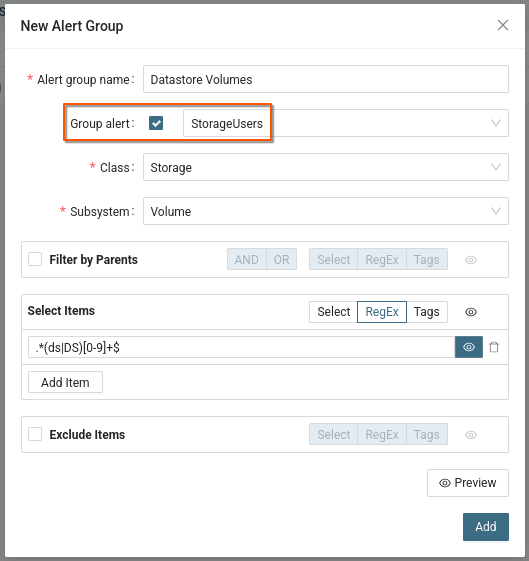
- Select the email group from previous example as the target for the new alert
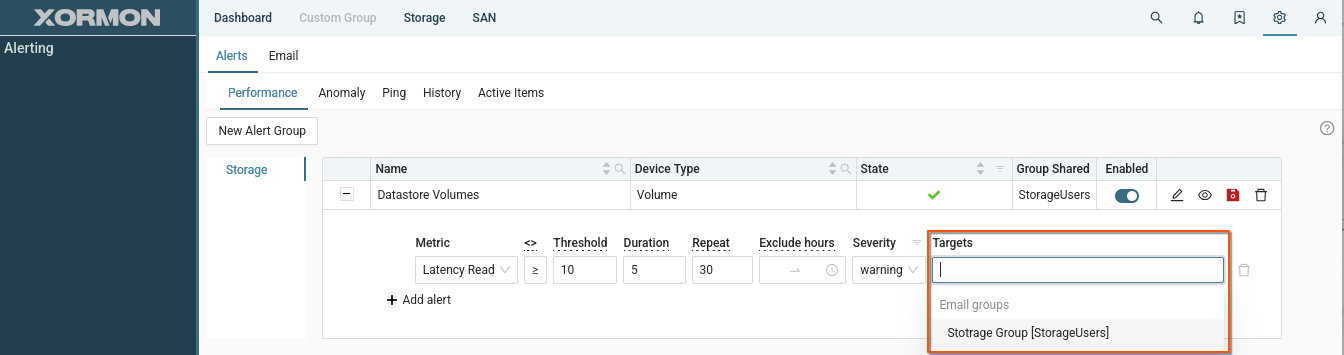
- Save alert group
- Log in as JaneDee and see that you have access to the alert and can modify it
Shared report
Create a new report and share it within the group.
Procedure:
Procedure:
- Sign in as JaneDee
- Navigate to Settings -> Reporter -> Reports
- Click "Create New Report"
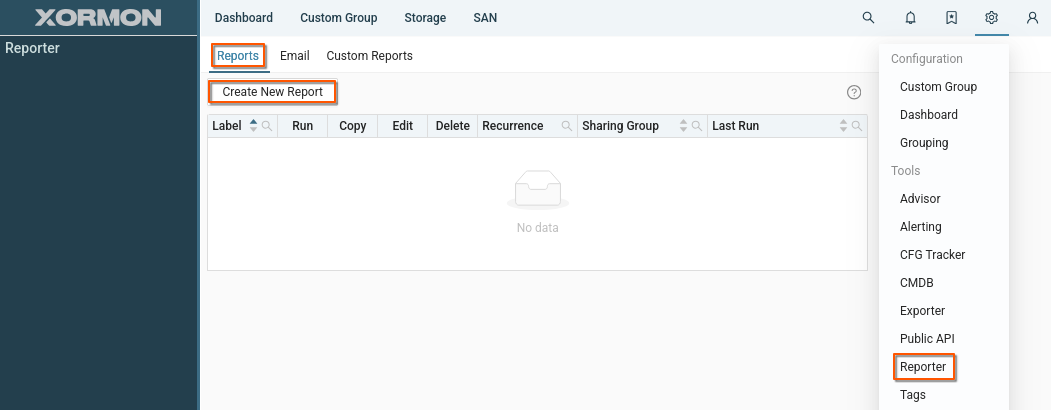
- Fill out the form and select a group to share with
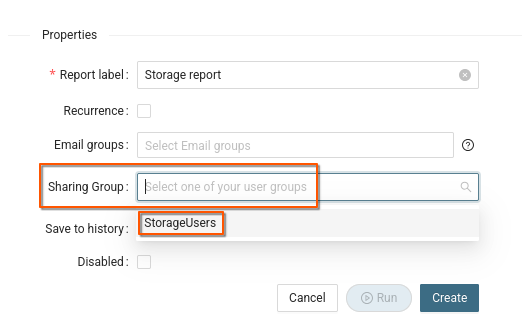
- Click "Create"
- Log in as JohnDoe and see that you have access to the report

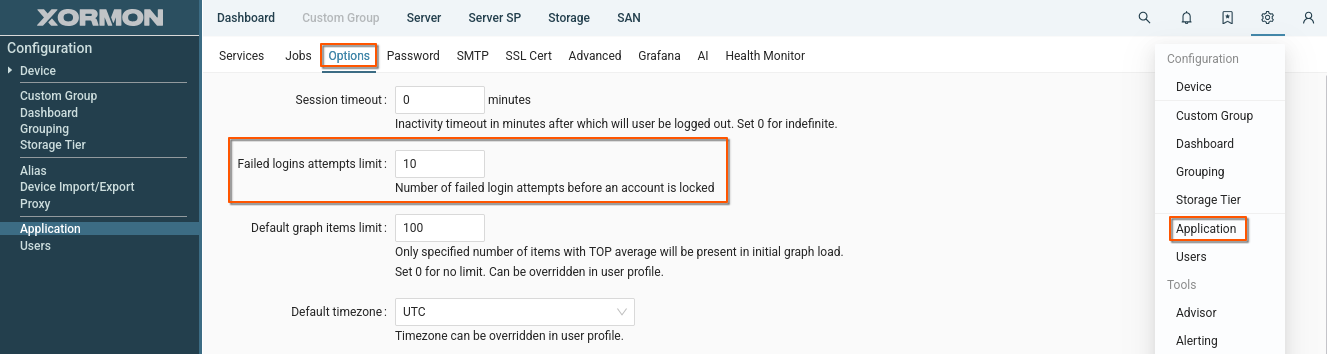
User locking
Users will be locked after 10 unsucessfull attempts.Unlock:
- CLI (under xormon user)
su - xormon
cd /home/xormon/xormon-ng
./xormon.sh unlock <user name>
- Application UI
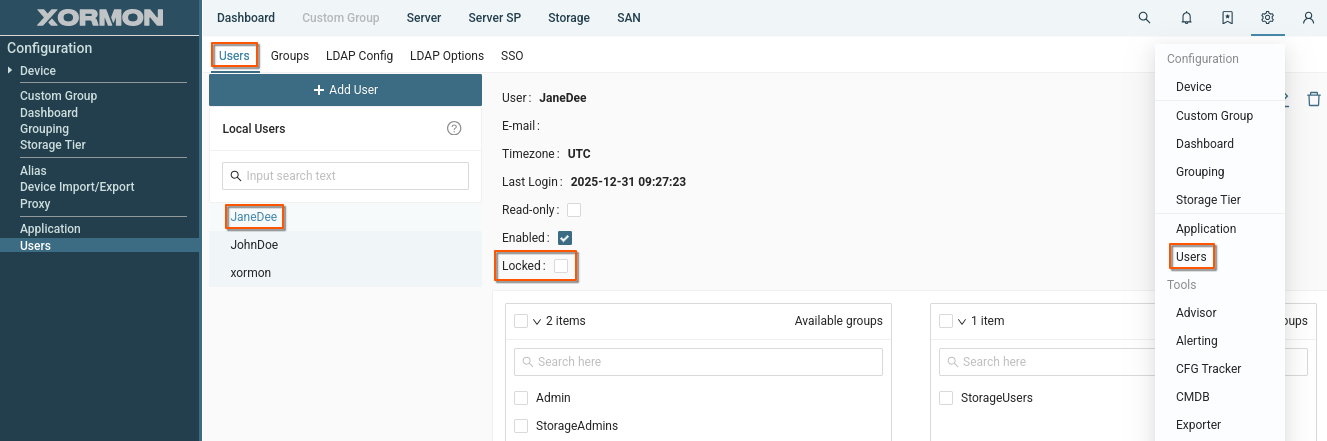
Number of failed attempts can be changed globaly
 |
Password policy
The XorMon administrator can set a global policy for user passwords. |
AD / LDAP
XorMon natively supports AD and LDAP authorisation.Navigate to UI -> Settings -> Users -> LDAP
Click "Add Configuration" button and name the new configuration.
Multiple configurations can be in use with precedence from left to right.
Login service first tries to authenticate user against local account in XorMon.
If not successful, it continues with LDAP configurations when enabled.
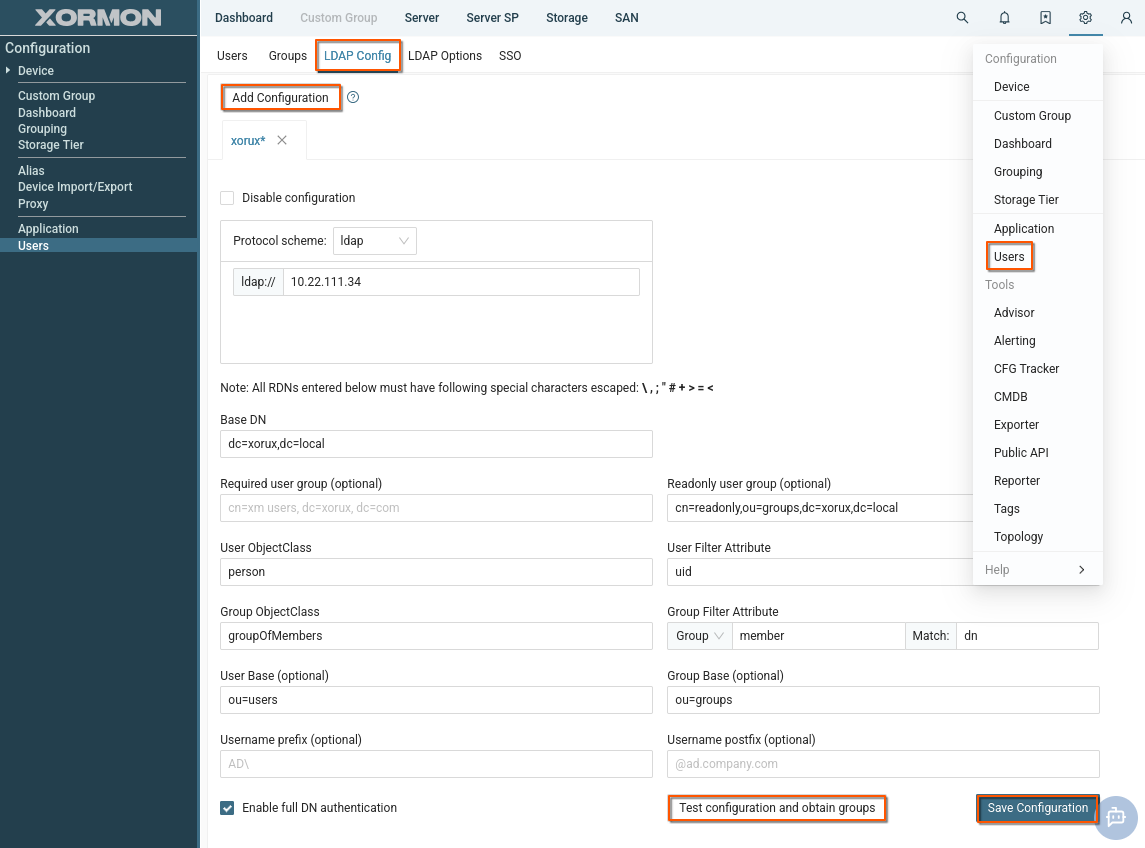 |
Directory Server
Enter LDAP URI with correct matching of protocol scheme and port number: e.g.ldaps:// for 636 (default if no port specified) or 3269 (preferred)
ldap:// for 389 (default if no port specified) or 3268 (preferred).
Attributes
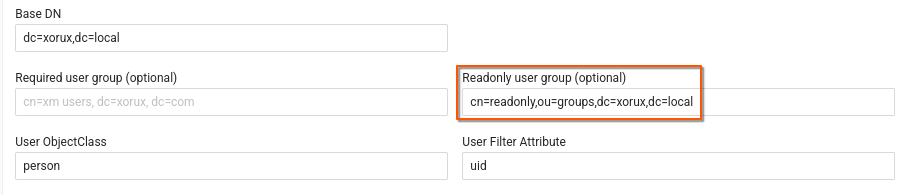
- Enter Base DN for all LDAP operations (e.g. dc=xorux,dc=local).
- Optionally enter Group Base to restrict group listing to only this subtree.
- Optionally enter User Base to restrict access to users only in this subtree.
- Optionally enter Required user group to allow login only to accounts with assigned group specified by this full DN.
-
Optionally enter Readonly user group.
Users from this LDAP group will have a read-only attribute set in XorMon. - Specify User ObjectClass value identifying user objects (e.g. user).
-
Specify User Filter Attribute name corresponding to login username (e.g.
userPrincipalNamefor usernames like user@ad.xorux.com orsAMAccountNamefor Windows NT 4.0 logon names like ad\user) - Specify Group ObjectClass value identifying group objects (e.g. group)
-
Set Group Filter Attribute to specify how to check user group membership
-
select Group and provide group's object attribute name for assigned users e.g. member
- for nested AD groups add extended match operator to the filter attribute e.g. member:1.2.840.113556.1.4.1941:
- or select User and provide user's object attribute name for assigned groups e.g. memberOf
- user's attribute to match group membership e.g. dn or uid
- filter will then match groups with e.g. member=dn
-
select Group and provide group's object attribute name for assigned users e.g. member
- Username prefix/postfix allows you to skip domain part of username in login fields.
UserPrincipalName can be found from sAMAccountName logon name by:
ldapsearch -LLL -H ldap://your.ad.hostname -D 'yourdomain\yourusername' -W -x -b 'dc=your,dc=ad,dc=base' '(&(objectClass=user)(sAMAccountName=yourusername))' userPrincipalNameIf command is not found then install openldap-clients as root
Group Mapping and ACL
You can create user groups, assign ACLs, and map LDAP groups to XorMon gropus.This way, you can set access rights for LDAP users.
- Navigate to Settings -> Users -> Groups
- Select the group you wish to map
- Click "LDAP groups" tab
- Select LDAP group(s) you want to map to the Xormon group
- Save group configuration
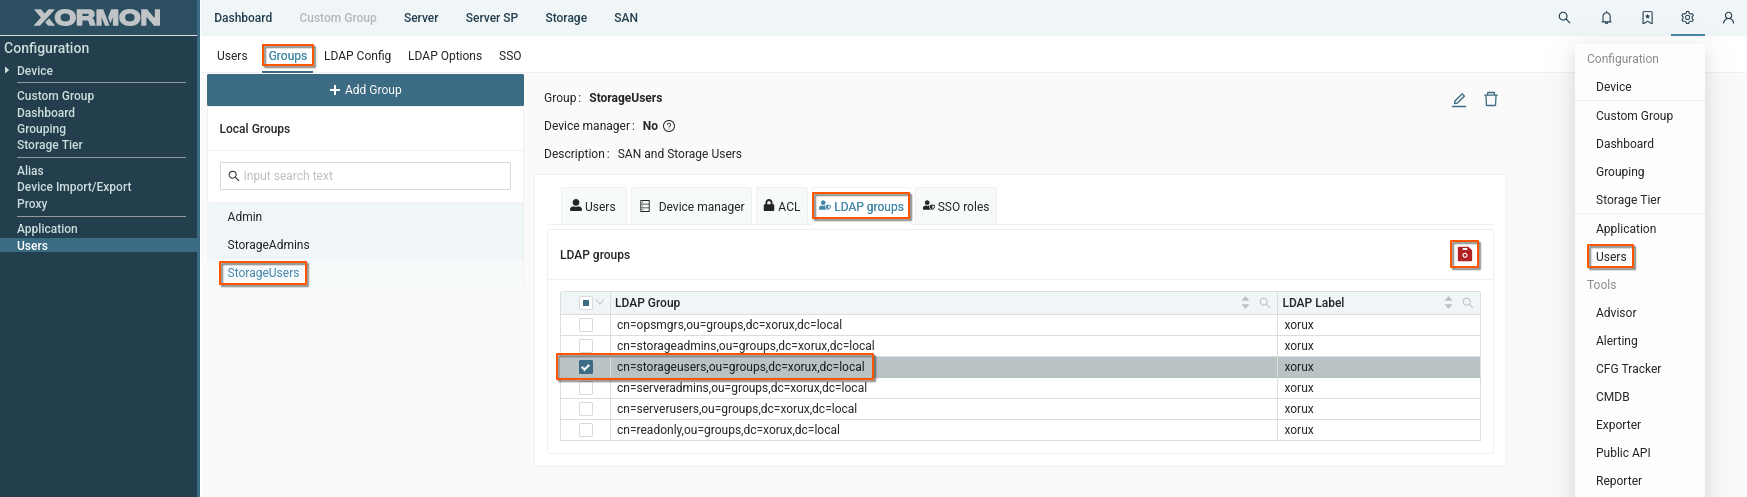
- Configure ACLs as needed and save changes
- Log in as LDAP user and check you have the right access rights
Read-only users
Read-only users have limited access to XorMon tools.They can only view other content created by regular users and shared with them within the group.
To set read-only attribute to LDAP users:
- Create a "read-only" group in your LDAP and assign users to it
- Add your "read-only" LDAP group to "Readonly user group" field in XorMon LDAP configuration.
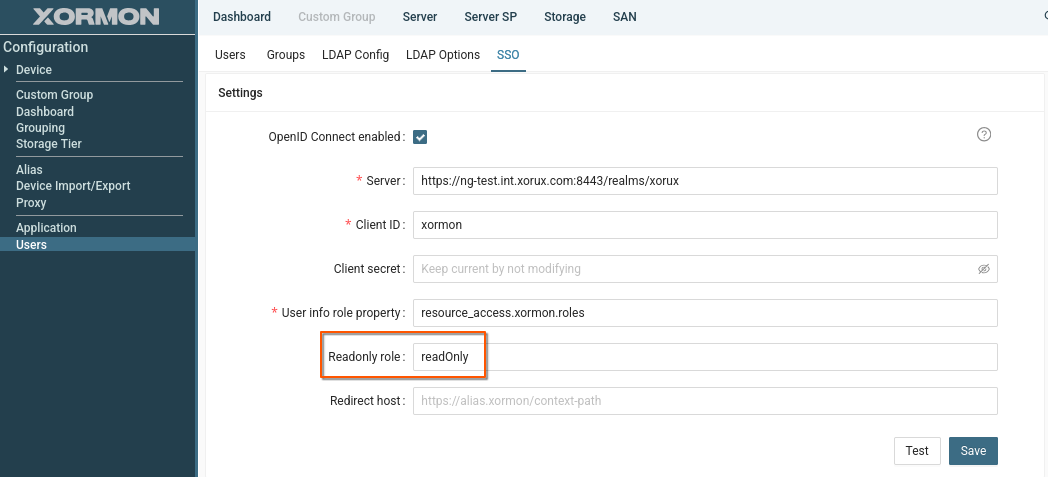
Single Sign On
Tested/supported SSOs- Keycloak
- Okta
- Authentik
- PingID
- MS Entra
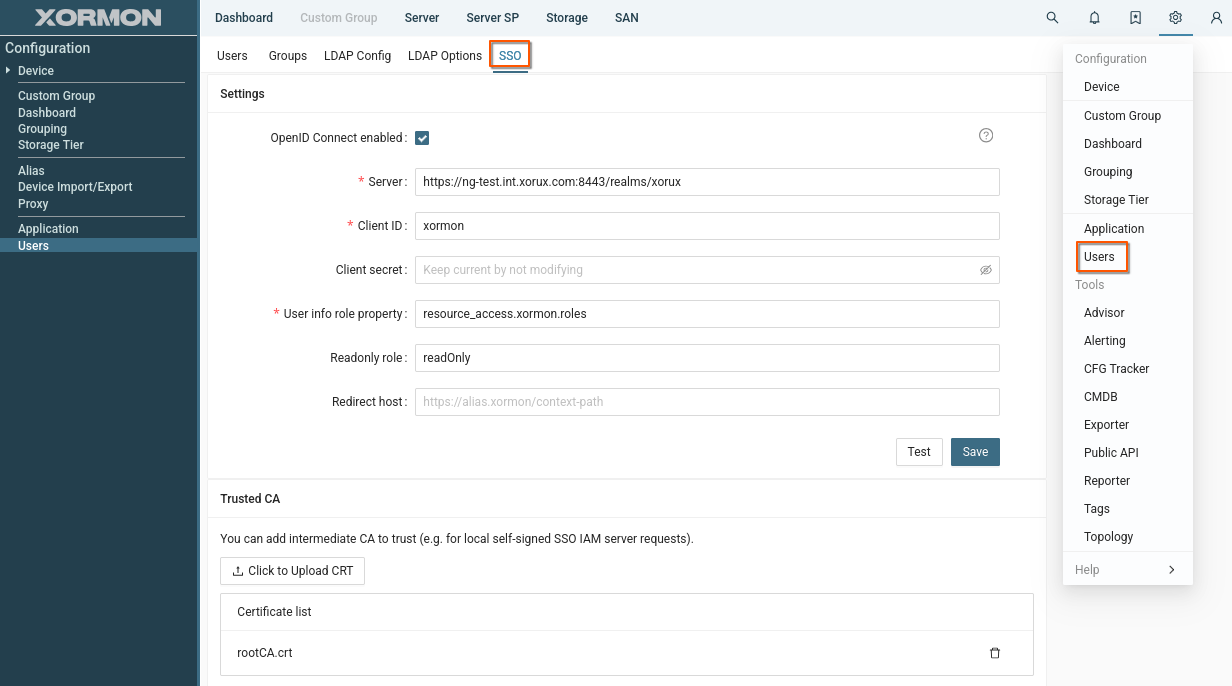 |
Parameters
- Server:
Enter the base URL of your OpenID Connect Identity Access Manager (IAM).
This is usually your Keycloak, Okta, or another OIDC IdP server endpoint.
- Client ID:
The identifier registered with your IdP for XorMon.
It allows the IdP to recognize XorMon as a valid client.
- Client Secret:
A secret (password) associated with the Client ID.
- User Info Role Property:
Defines where in the IdP user claims the role information is located.
XorMon uses this to assign roles/permissions to authenticated users.
- Readonly role:
Defines which role is used to assign the read-only attribute.
Users who have this role assigned will be marked as read-only in XorMon.
- Test:
After a configuration is saved, the test button will perform OIDC login and display user info.
- Trusted CA (Certificate Authority):
Allows you to upload intermediate CA certificates.
This is required if your IAM uses a self-signed or private CA certificate.
- Redirect host:
The hostname part of redirect URL registered at the Authorization Server.
Can leave blank if your proxy is configured to preserve host of Xormon external URL.
For SSO to work, the IAM must be configured properly before XorMon can connect:
- In your IdP admin console, register a new OIDC client/application for XorMon
- Provide Redirect URI / Callback URL → this must point back to XorMon
- https://<xormon-server>/api/oidc/v1/* if wildcards are allowed
- Otherwise https://<xormon-server>/api/oidc/v1/roles for test and https://<xormon-server>/api/oidc/v1/login for login
- Ensure the IdP exposes a UserInfo endpoint
- Define which roles or groups will be passed to XorMon in User Info, these will be looked up by above "User Info Role Property" path from JWT
Group Mapping and ACL
You can create user groups, assign ACLs, and map SSO roles to XorMon gropus.This way, you can set access rights for SSO users.
- Navigate to Settings -> Users -> Groups
- Select the group you wish to map
- Click "SSO roles" tab
- Enter the name of the SSO role you want to map to the selected user group
- Click "Add"
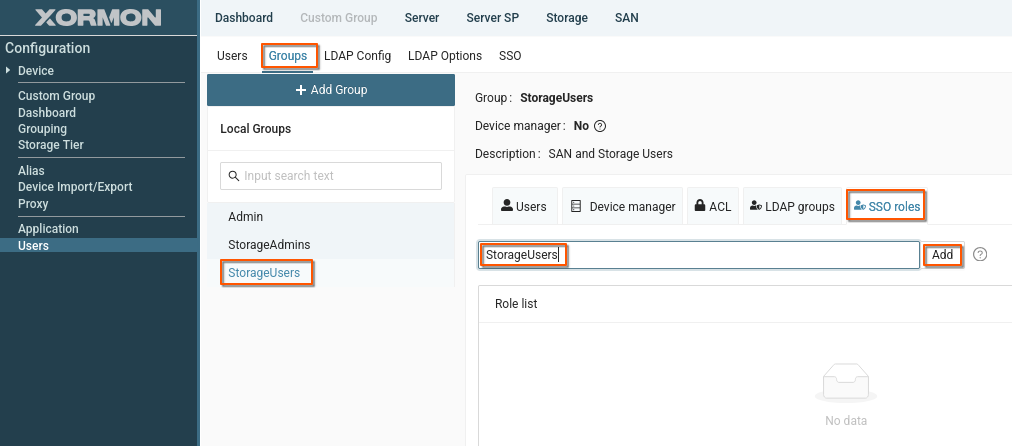
- Configure ACLs as needed and save changes
- Log in using SSO and check you have the right access rights
Read-only users
Read-only users have limited access to XorMon tools.They can only view other content created by regular users and shared with them within the group.
To set read-only attribute to SSO users:
- Create a "read-only" role in your SSO and assign users it to users
- Add your "read-only" SSO role to "Readonly role" field in XorMon SSO configuration.