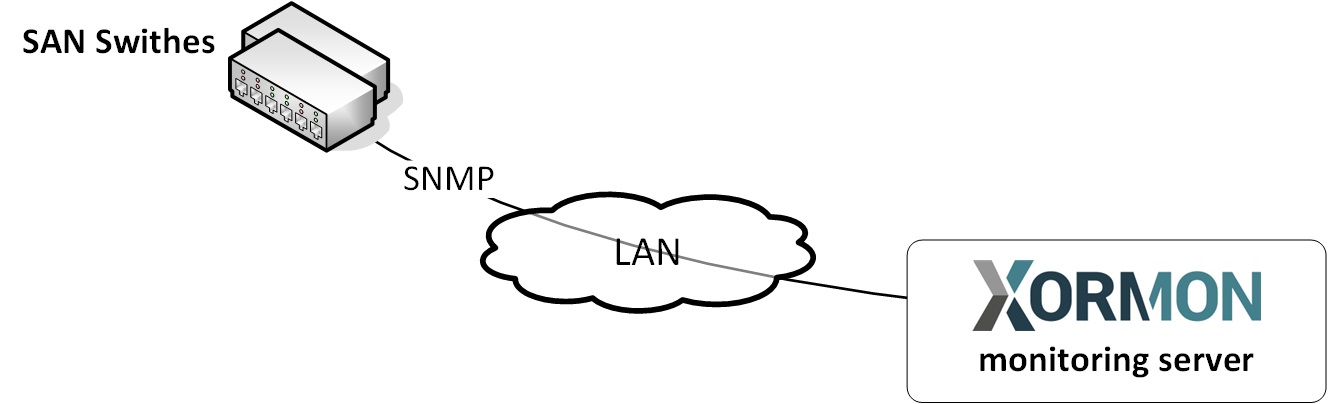
Network
How to change SNMP to REST API.
Configuration on the switch side
- Enabling and Disabling the Fabric OS REST Interface
The Fabric OS REST interface is enabled by default.
To disable the Fabric OS REST interface, enter mgmtapp --disable REST.
To re-enable the Fabric OS REST interface, enter mgmtapp --enable REST.
Check the status by this command:switch:admin> mgmtapp --show REST Configuration: Interface State: Enabled Effective Protocol: HTTP only HTTP State: Enabled Session Count: 3 HTTPS Configuration: KeepAlive : Disabled KeepAliveTimeout : 15sec - Enabling and Disabling Keepalive Mode
The keepalive mode is disabled by default. For HTTPS mode, it is recommended that you enable keepalive mode.
NOTE: Keepalive mode is only supported with HTTPS mode.
To disable the keepalive mode, enter mgmtapp --disable keepalive.
To re-enable the Fabric OS REST interface, enter mgmtapp --enable keepalive.
- Create new user
ssh admin@<ip_switch>
switch:admin> userconfig --add xormon -r user
switch:admin> userconfig --change xormon -r user -e yes
-e yes | no
Enables or disables an account. Specify "yes" to enable or "no" to disable an account.
Once an account is disabled, the CLI sessions associated with the account are terminated.
If you are using the Logical or Virtual Fabrics:
switch:admin> userconfig --add xormon -r user -l 1,128
switch:admin> userconfig --change xormon -r user -l 1,128 -h 128 -e yes
Parameter -l 1,128 defines virtual fabrics visible for this user.
Parameter -h 128 defines home virtual fabrics.
Example above allows virtual fabrics 1 and 128 for user xormon.
- -l LF_ID_list
For each Logical Fabric in the LF_ID_list, this option displays a list of users that include
that Logical Fabric in their Logical Fabrics permissions. Specify a range (1-5), or a list of
Logical Fabric IDs separated by a comma (1,2,3), or a combination of both (1-5,7). Only
users with access permissions compatible with the SecurityAdmin or Admin role may execute this command. - -l LF_ID_list
Specifies the Virtual Fabrics that the user is authorized to access. The Logical Fabrics in
LF_ID_list and the existing Logical Fabric permissions for username must be a subset of
the Logical Fabric permissions of the account that executes this command. This operand
is required with the --add option. It is optional with the --change option.
- -h LF_ID
Specifies the home Logical Fabric depending on the environment. This operand is
optional. If no Logical Fabric is specified with the --add option, the system assigns the
lowest numbered Logical Fabric that the user is authorized to access.
- -r role
The user role must be “User”.
- -l LF_ID_list
XorMon switch configuration
- Add storage into configuration from the UI:
Settings icon ➡ Device ➡ Network ➡ SAN ➡ New ➡ Vendor:device ➡ Brocade REST API
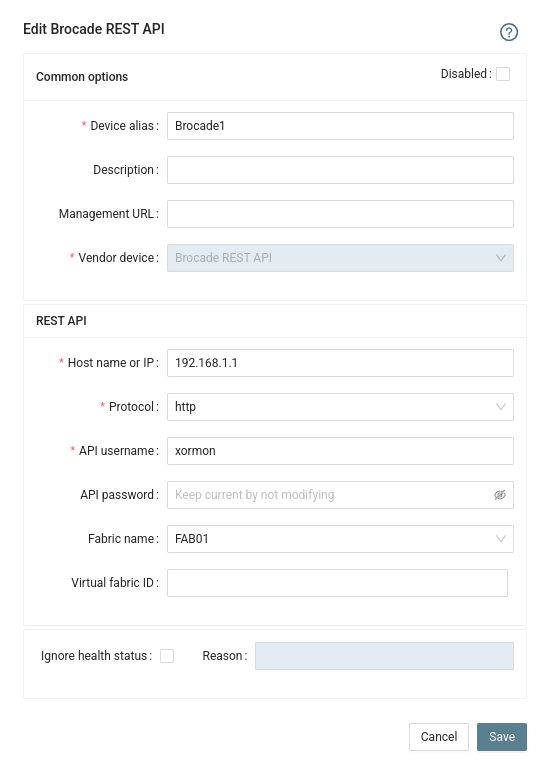
- Run "Test" for configured device, it must show "OK"
-
Wait about 1 hour, then reload the web browser, you should see it in XorMon UI
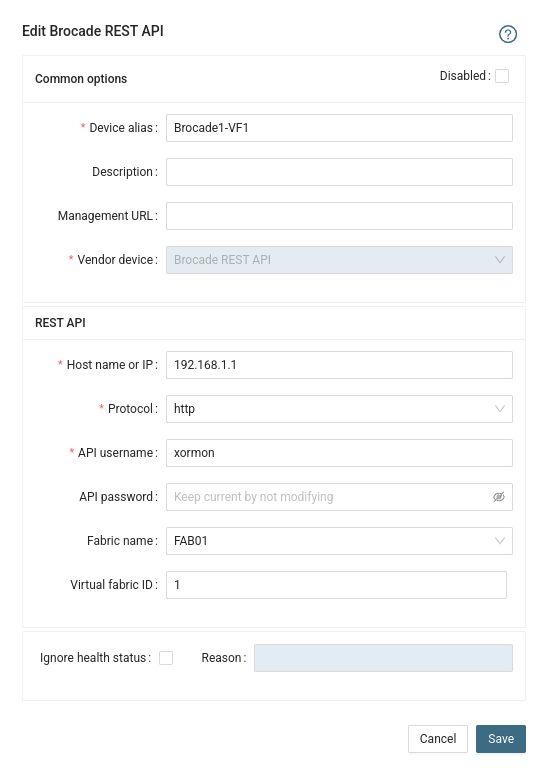
Virtual Fabrics
Each Virtual Fabric is monitored separately as a new switch.It is necessary to configure each single VF:ID as a new device in the device configuration
 |
Troubleshooting
- Test the connection to your switch from XorMon side by the following curl commands.
- login
curl -i -X POST -u <user>:<password> -H "Accept: application/yang-data+json" "http://192.168.1.1/rest/login"
- collect basic info
curl -i -X GET -H "Authorization: Custom_Basic <authorization_key>" -H "Accept: application/yang-data+json" "http://192.168.1.1/rest/running/brocade-fabric/fabric-switch/
(get a session authorization key from the login output)
- Example with authorization_key
curl -i -X GET -H "Authorization: Custom_Basic eG9ybW9uOnh4eDoyNDU3Y2M5YzNhOWI4YmFhNTg3YjUwOWJiY2QzNjA3ZjdkNDQwYWYxZDg0ZWE2YzU4ZjNmOGI5MzY3YmQxYzFj" -H "Accept: application/yang-data+json" "http://192.168.1.1/rest/running/brocade-fabric/fabric-switch/
- If you are using the Virtual Fabrics
curl -i -X GET -H "Authorization: Custom_Basic <authorization_key>" -H "Accept: application/yang-data+json" "http://192.168.1.1/rest/running/brocade-fabric/fabric-switch/?vf-id=1
(set VF:ID)
- logout
curl -i -X POST -H "Authorization: Custom_Basic <authorization_key>" -H "Accept: application/yang-data+json" "http://192.168.1.1/rest/logout"
- login
- Error message: Max limit for REST sessions reached
  "errors": {
    "error": [
    {
      "error-type": "application",
        "error-tag": "operation-failed",
        "error-app-tag": "Error",
        "error-message": "Max limit for REST sessions reached",
        "error-info": {
          "error-code": 14,
          "error-module": "rest"
        }
    }
    ]
  }
}
Try to change the maximum number of REST sessions:
switch:admin> mgmtapp --config -maxrestsession 5
-maxrestsession rest_session_count
Configures the maximum REST sessions allowed. The concurrent sessions are limited
to config db and validates whenever a new REST login is processed. An error is reported
if the login count has reached its maximum limit. The minimum and maximum numbers
are 1 and 10 sessions respectively and the default is 3 sessions.
Terminate running REST sessions:
switch:admin> mgmtapp --terminate
  df5e6d2495d366c172816ce165193510feed81efc2677ed9dccfa40d85535762
  Rest session terminated successfully.
--terminate session_id
Terminates the REST session for the specified session ID as defined in appLoginHistory.
This option also removes all the session parameters from the backend database.
So far you might use STOR2RRD for its monitoring.
Do you want to let us know your priorities? Vote for your missing features and device support. More votes, bigger priority for us.
Contact us if you have SANnav v3 in place, we would need little help to make it working support@xorux.com.
Table of Contents
- Prerequisites
- SANnav Northbound Streaming
- Install Python3 and modules
- SANnav configuration in XorMon
- (Optional) Kafka deployment in docker container
 |
Prerequisites
- SANnav v2.2.0.2+ configured to stream performance data to a Kafka cluster
- Ability to install additional software packages to XorMon host
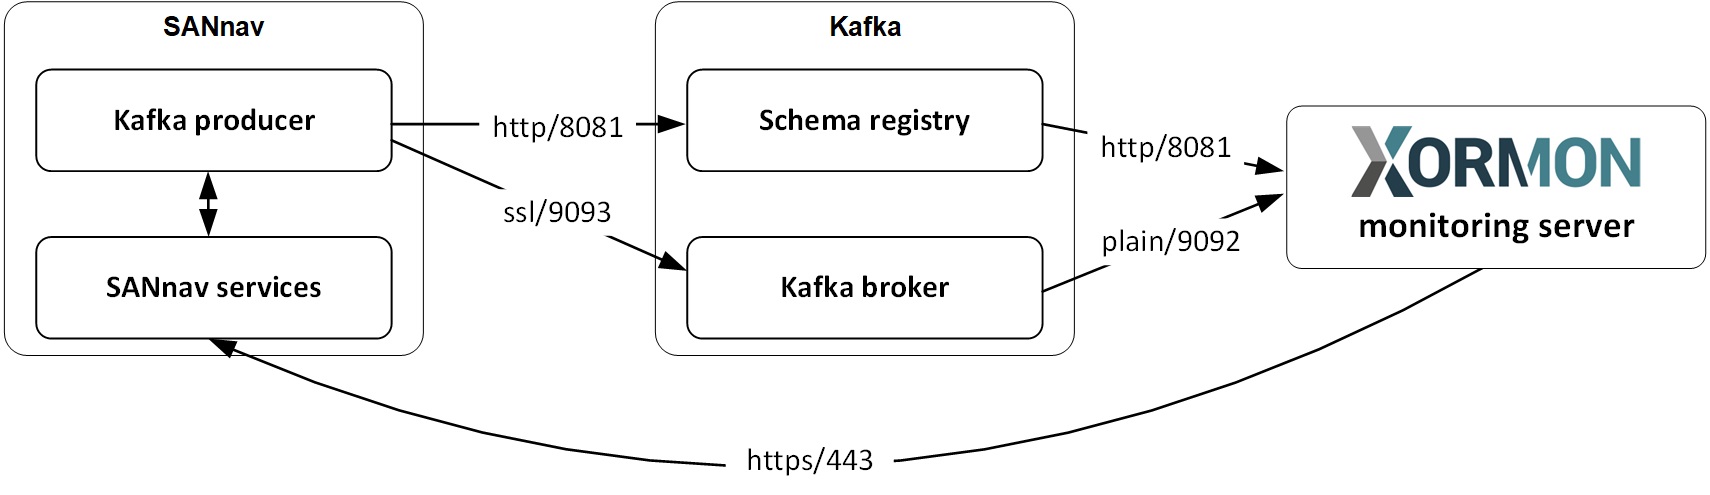
- Network connectivity:
- SANnav ➡ Kafka Registry:8081 TCP
- SANnav ➡ Kafka Broker:9093 TCP
- XorMon ➡ Kafka Registry:8081 TCP
- XorMon ➡ Kafka Broker:9092 TCP
- XorMon ➡ SANnav:443 TCP
SANnav Northbound Streaming
XorMon collects data from SANnav using the Northbound Streaming feature.
Northbound Streaming provides support to securely stream performance and flow metrics from the switch to an external Kafka cluster (the northbound server).
Kafka cluster with schema registry must be configured in the customer's environment.
SANnav must be configured to stream data to the Kafka cluster.
SANnav NorthBound streaming is configured using SANnav REST API.
SANnav REST API documentation is available on https://support.broadcom.com/
Search for: "sannav rest api"
- You must have the Northbound Streaming privilege with read/write permission and the All Fabrics area of responsibility (AOR). Refer to the Brocade SANnav Management Portal User Guide for details.
- Historic data collection must be enabled on the SANnav server (it is enabled by default).
- The switch must be discovered with proper SNMPv3 credentials.
- For a northbound server environment with HTTPS access for the schema registry, the northbound Kafka cluster must be configured with the same public certificate as the northbound server.
- Only one northbound server is supported.
- Streaming is only through a secure channel (TLS).
- IPv6 is not supported. SANnav-to-northbound-server communication uses IPv4.
Install Python3 and modules
Ubuntu / Debian- install additional packages (as root)
apt update && apt install python3 python3-pip python3-dev python3-requests gcc
- add Confluent repository (as root)
https://docs.confluent.io/platform/current/installation/installing_cp/deb-ubuntu.html
wget -qO - https://packages.confluent.io/deb/7.7/archive.key | apt-key add -

cat > /etc/apt/sources.list.d/confluent.list << EOF
deb [arch=amd64] https://packages.confluent.io/deb/7.7 stable main
deb https://packages.confluent.io/clients/deb $(lsb_release -cs) main
EOF
- install 'librdkafka-dev' (as root)
apt update && apt install librdkafka-dev
- install Python modules in a virtual environment (as xormon)
su - xormon
cd ~/xormon-ng/server-nest/
python3 -m venv venv-sannav
venv-sannav/bin/python3 -m ensurepip --upgrade
venv-sannav/bin/python3 -m pip install --upgrade pip

venv-sannav/bin/python3 -m pip install kafkian==0.13.0 confluent-kafka==2.4.0 requests
In case you need to use a proxy for installation, modify cmds like:venv/bin/python3 -m pip --proxy http://<username>:<password>@<hostname>:<port> install --upgrade pip venv/bin/python3 -m pip --proxy http://<username>:<password>@<hostname>:<port> install kafkian==0.13.0 confluent-kafka==2.4.0 requests
- In case you are on the Virtual Appliance and have no access to the Internet repos then use this procedure
- Install Python3 packages as root
yum install python3 python3-pip python3-devel python3-requests gcc
-
Import Confluent repository as root
rpm --import https://packages.confluent.io/rpm/7.7/archive.key

cat > /etc/yum.repos.d/confluent.repo << EOF
[Confluent]
name=Confluent repository
baseurl=https://packages.confluent.io/rpm/7.7
gpgcheck=1
gpgkey=https://packages.confluent.io/rpm/7.7/archive.key
enabled=1

[Confluent-Clients]
name=Confluent Clients repository
baseurl=https://packages.confluent.io/clients/rpm/centos/\$releasever/\$basearch
gpgcheck=1
gpgkey=https://packages.confluent.io/clients/rpm/archive.key
enabled=1
EOF
-
Install librdkafka as root
yum clean all && yum install librdkafka-devel
-
install kafkian module as stor2rrd
(lpar2rrd in case of Virtual Appliance)pip3 install --user kafkian==0.13.0 confluent-kafka==2.4.0
When it ends with this error:/tmp/pip-build-ka_v989g/confluent-kafka/src/confluent_kafka/src/confluent_kafka.c:1633:17: note: use option -std=c99 or -std=gnu99 to compile your code error: command 'gcc' failed with exit status 1Then use this cmd instead of above one:CFLAGS=-std=c99 pip3 install --user kafkian==0.13.0 confluent-kafka==2.4.0
SANnav configuration in XorMon
Note: SANnav can only be monitored from one XorMon instance at a time
-
Create SANnav user for XorMon
- Login to SANnav GUI
Navigate to User Management
SANnav ➡ Security ➡ SANnav User ManagementCreate new user with Operator role
-
Add SANnav in the XorMon UI ➡ Settings icon ➡ Device ➡ Network ➡ SAN ➡ New ➡ SANnav
-
REST API: SANnav IP address, port and XorMon user credentials
-
KAFKA: Kafka NB server IP address and ports - this should be the IP address of your XorMon host
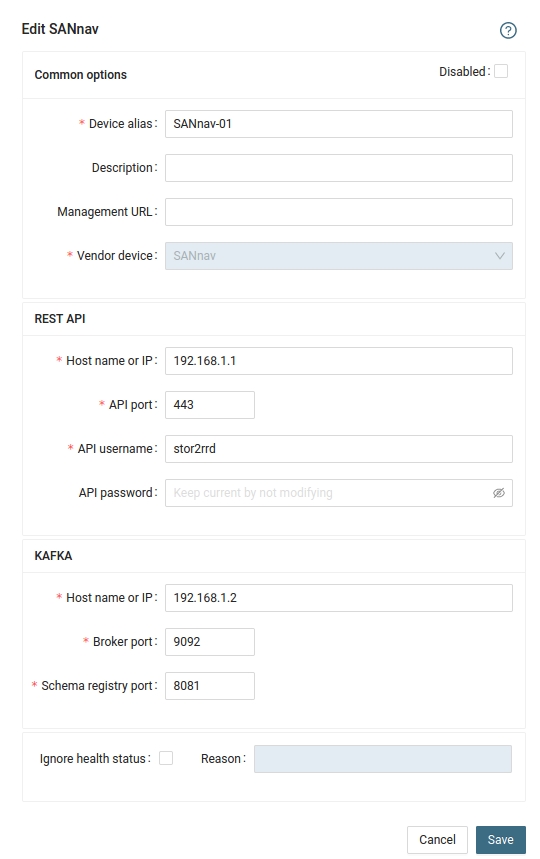
-
 |
SAN switch access summary
| Vendor | Storage type | User role | Interface | Used ports |
|---|---|---|---|---|
| Brocade | SAN switch | read-only | SNMP v1,2,3 | 161 UDP |
| QLogic | SAN switch | read-only | SNMP v1,2,3 | 161 UDP |
| Cisco | MDS and Nexus | read-only | SNMP v1,2 | 161 UDP |
Installation procedure is same for Cisco, Brocade and QLogic switches.
Only in case of usage Brocade/QLogic Virtual Fabric you have to do special access configuration.
Cisco VSAN support works automatically.
Brocade note: SNMP v2 is not supported in FOS v9.0.1a but is not blocked. SNMP v2 is blocked beginning with FOS v9.1.0.
Perl SNMP v3 compatibility Auth & Priv support matrix
Configure access to switches
- Allow SNMP communication from XorMon host to all SAN switches on port 161, UDP
SNMP v3 setup
Test SNMP communication from cmd line
Follow that in case connection test does not work only.-
replace switch_IP for your one in below examples
- Make sure there is SNMP allowed on the SAN switch with public read only role (Community 4)
-
Brocade/QLogic:
Change community string to whatever you need via "snmpConfig --set snmpv1"
# ssh <Switch_IP> -l admin SAN:admin> snmpconfig --show snmpv1 ... Community 4: public (ro) ...
-
Cisco:
When there is other community string than public then use it in test snmpwalk cmds above
# ssh <Switch_IP> -l admin switch# show snmp community Community Access --------- ------ private rw public ro
and use that community string in switch cfg.
-
Brocade/QLogic:
- Make sure that Access Host list contains XorMon host:
SAN:admin> snmpconfig --show accessControl

-
Make sure you have enabled all listed MIBs below:
SAN:admin> snmpconfig --show mibCapability FE-MIB: YES SW-MIB: YES FA-MIB: YES FICON-MIB: YES HA-MIB: YES FCIP-MIB: YES ISCSI-MIB: YES IF-MIB: YES BD-MIB: YES BROCADE-MAPS-MIB: YES
Enable all missing MIBs each by each::SAN:admin> snmpconfig --enable mibCapability -mib_name FICON-MIB
-
set SNMP GET security level to 0
SAN:admin> snmpconfig --show seclevel SAN:admin> snmpconfig --set seclevel Select SNMP GET Security Level (0 = No security, 1 = Authentication only, 2 = Authentication and Privacy, 3 = No Access): (0..3) [3] 0
- Do you have some other switch which works fine, is there any configuration difference?
# export PATH=$PATH:/opt/freeware/bin
# snmpwalk -v 2c -c public  <Switch_IP> 1.3.6.1.2.1.1.5
  SNMPv2-MIB::sysName.0 = STRING: SAN_switch_name
When the command fails, times out or return whatever like this:
Timeout: No Response from <Switch_IP>
Brocade/QLogic Virtual Fabric support
-
You have to use create new user, assign virtual fabrics and configure SNMP v3 access
- Configure new user on the switch and assign virtual fabrics (as admin):
Parameter -r user assigns role "user" to the new user.
userconfig --add xormon -r user -l 1,128
userconfig --change xormon -r user -l 1,128 -h 128
userconfig --show xormon
Parameter -l 1,128 defines virtual fabrics visible for this user.
Parameter -h 128 defines home virtual fabrics.
Example above allows virtual fabrics 1 and 128 for user xormon.
- Add the new user to SNMP v3 configuration
Rename one of the preconfigured SNMP users "snmpuserX"
Configre Auth and Priv protocols as needed
Changes are indicated by '<==='
Check SNMP v3 configuration:snmpconfig --set snmpv3 SNMP Informs Enabled (true, t, false, f): [false] SNMPV3 Password Encryption Enabled (true, t, false, f): [false] SNMPv3 user configuration(snmp user not configured in FOS user database will have default VF context and admin role as the default): User (rw): [snmpadmin1] Auth Protocol [MD5(1)/SHA(2)/noAuth(3)]: (1..3) [3] Priv Protocol [DES(1)/noPriv(2)/AES128(3)/AES256(4)]): (2..2) [2] User (rw): [snmpadmin2] Auth Protocol [MD5(1)/SHA(2)/noAuth(3)]: (1..3) [3] Priv Protocol [DES(1)/noPriv(2)/AES128(3)/AES256(4)]): (2..2) [2] User (rw): [snmpadmin3] Auth Protocol [MD5(1)/SHA(2)/noAuth(3)]: (1..3) [3] Priv Protocol [DES(1)/noPriv(2)/AES128(3)/AES256(4)]): (2..2) [2] User (ro): [snmpuser1] xormon <=== Auth Protocol [MD5(1)/SHA(2)/noAuth(3)]: (1..3) [3] 2 <=== New Auth Passwd: <=== Verify Auth Passwd: <=== Priv Protocol [DES(1)/noPriv(2)/AES128(3)/AES256(4)]): (1..4) [2] 3 <=== New Priv Passwd: <=== Verify Priv Passwd: <=== User (ro): [snmpuser2] Auth Protocol [MD5(1)/SHA(2)/noAuth(3)]: (1..3) [3] Priv Protocol [DES(1)/noPriv(2)/AES128(3)/AES256(4)]): (2..2) [2] User (ro): [snmpuser3] Auth Protocol [MD5(1)/SHA(2)/noAuth(3)]: (1..3) [3] Priv Protocol [DES(1)/noPriv(2)/AES128(3)/AES256(4)]): (2..2) [2] SNMPv3 trap/inform recipient configuration: Trap Recipient's IP address : [0.0.0.0] Trap Recipient's IP address : [0.0.0.0] Trap Recipient's IP address : [0.0.0.0] Trap Recipient's IP address : [0.0.0.0] Trap Recipient's IP address : [0.0.0.0] Trap Recipient's IP address : [0.0.0.0] Committing configuration.....done.
snmpconfig --show snmpv3
- Test access from XorMon host
You should see ports configured for your specific VF (Virtual Fabric)The user is not configured properly if you get one of the following errors:snmpwalk -v 3 -u xormon -n VF:<your_virtual_fabric_ID> <Switch_IP> 1.3.6.1.2.1.1.5 SNMPv2-MIB::sysName.0 = STRING: SAN_switch_name snmpwalk -v 3 -u xormon -n VF:<your_virtual_fabric_ID> -l authPriv -A <Auth_Passwd> -X <Priv_Passwd> -a SHA -x AES <Switch_IP> 1.3.6.1.2.1.1.5 SNMPv2-MIB::sysName.0 = STRING: SAN_switch_name
Error in packet.
Reason: noAccess
snmpwalk: Unknown user name
Switch configuration
- Add switches into configuration from the UI:
XorMon UI ➡ Device ➡ Network ➡ SAN switches ➡ New ➡ Vendor:device ...
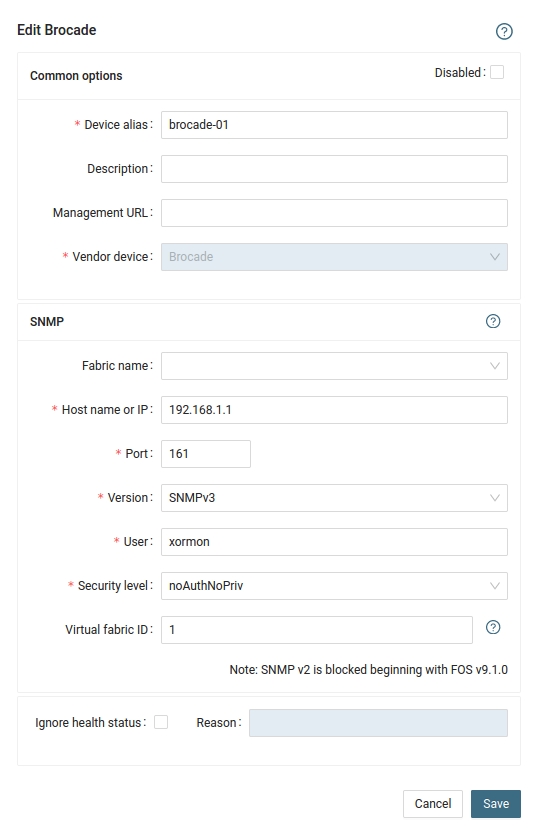
- Run "Test" for configured switch, it must show "OK"
-
Wait about 1 hour, then refresh the web browser cache by Ctrl-F5
Troubleshoting
- Color change for Port Operation status reason for SAN Cisco switches can use changed, follow this docu
- If you use SNMP v3 and have several virtual fabrics then monitoring might cause unwanted CPU peaks every 5 minutes on monitored switches
To decrease such CPU peaks into acceptable level configure SAN microservices like that- Increase data fetch from default 5 minutes into 10 or 15 minutes
- Increase default timeout between SNMP queries from default 1 sec to 5 secs
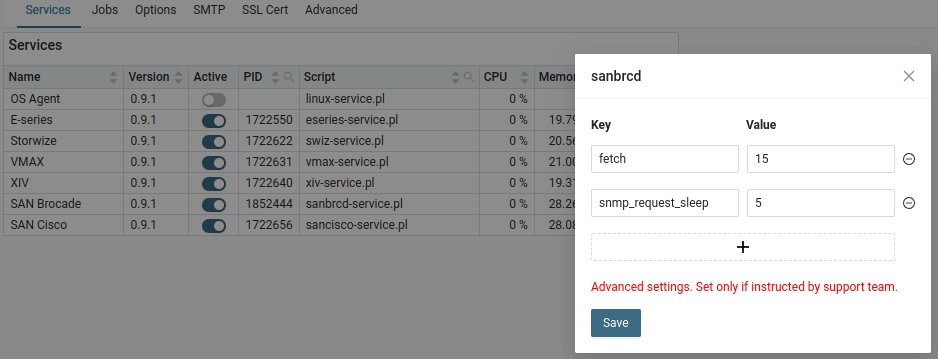
- Increase data fetch from default 5 minutes into 10 or 15 minutes
-
SAN troubleshooting