VMware / Hyper-V image
It contains installed and configured XorMon product with all its prerequisites.
Note: this is a different appliance than Xorux Virtual Appliance we use for the first generation of our tools (XorMon Original / LPAR2RRD / STOR2RRD).
- Deploy Virtual Appliance as per technology below
- Log to the XorMon UI: https://<machine hostname or IP>/
Default login: xormon / xormon
- Upgrade to the latest available XorMon version (just in case the appliance does not contain the latest one)
Upgrade docu
- Download XorMon-NG-<ver>-OVF.zip and unzip it
- Deploy the image as OVF template
- Start up the VM
- Open the console, it will print out the IP acquired by DHCP once it is up
- When you want to set IP manually then log in as root (for password check attached pdf) and follow the Static IP setup
- Open: https://<appliance IP>/ (https is required)
- Use "xormon" user with "xormon" password to reach the product UI
- User credentials and further installation advices.
- Download the latest XorMon tar package (xormon-ng-2.X.XX.tar.gz) if there is a newer version than the appliance version and upgrade the appliance to it, it is easy and fast
In case you need more disk space for XorMon application than default 500GB, increase it as per this procedure
NTP setup
Download VMware appliance XorMon-NG-<ver>-OVF.zip and load it as per below
NTP setup
- Unzip downloaded ZIP archive
- Open Nutanix Prism UI
- Find Image Configuration in Settings
- Create image named xormon-vmdk with image type DISK and appropriate Storage Container
- Upload *.vmdk file extracted from ZIP archive
- Wait until import operations are complete and create new VM using imported image as primary disk (Add Disk, select Operation Clone from Image Service and select xormon-vmdk as Image)
- Size it as per readme docu which contains also user access.
- Change Boot Configuration of created VM to use DISK instead of CD-ROM (you can remove CD-ROM safely, you don't need it), don't forget to add Network adapter
- When you want to set IP manually then log in as root (for password check attached pdf) and follow the Static IP setup
- Download the latest XorMon tar package (xormon-ng-2.X.XX.tar.gz) if there is a newer version than the appliance version and upgrade the appliance to it, it is easy and fast
NTP setup
Download the latest version of XorMon Appliance OVF and import it into Proxmox following the steps below.
- Unzip the compressed file XorMon-NG-<ver>-OVF.zip into a separate folder
- Upload the folder containg uncomperssed OVF to a Proxmox node as root
- Change into the folder
- Import OVF
qm importovf <vmid> <manifest> <storage> [OPTIONS]
Example:qm importovf 103 XorMon-NG-2.1.14.ovf datastore01
- Wait until import operations are complete
- Edit the new VM properties in Proxmox UI
- Add network interface
- Adjust sizing according to documentation
- Enable Qemu guest agent
- Start the VM
- Configure XorMon appliance
- To configure a static IP address follow Static IP setup
- Upgrade XorMon to the latest version Upgrade guide
- Configure NTP
- Download XorMon-NG-<ver>-HyperV.zip and unzip it
- Deploy it in Microsoft Hyper-V.
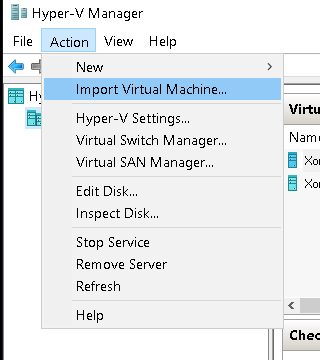
- Start up the VM
- Open the console, it will print out the IP acquired by DHCP once it is up
- When you want to set IP manually then log in as root (for password check attached pdf) and follow the Static IP setup
- Open: https://<appliance IP>/ (https is required)
- Use "xormon" user with "xormon" password to reach the product UI
- User credentials and further installation advices.
- Download the latest XorMon tar package (xormon-ng-2.X.XX.tar.gz) if there is a newer version than the appliance version and upgrade the appliance to it, it is easy and fast
NTP setup