Cloud
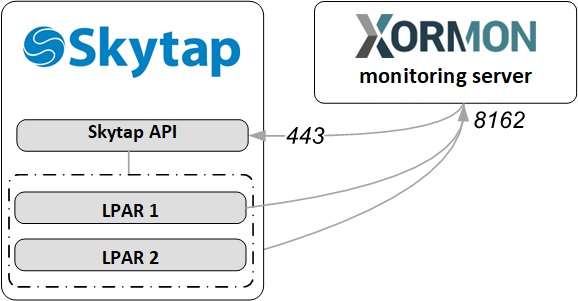
Our solution uses 2 data sources to get complete picture of Skytap configuration and its resource utilization.
Supported operating systems:
- Skytap REST API (for configuration and mapping purposes)
- OS agent (for performance data)
 |
Supported operating systems:
- AIX
- Linux on Power - not yet, it will be supported in future releases
- IBMi - not yet, it will be supported in future releases
OS agent
-
Use our AIX / Linux OS agent, refer here for its installation on all AIX based LPARs.
The agent version must be 8.10-0 and newer.
Skytap REST API
- Log in to Skytap
Go to cloud.skytap.com and log in with your user credentials.
- Access Account Settings
In the top-right corner, click on your username/avatar
Select "My Account" from the dropdown menu
- Generate API Token
Scroll down to the Account information section
There will be API security token part
Click "Add token"
Copy and store the token somewhere safe. This is your API key equivalent
- Use the API Token for Authentication
Skytap uses your username and the API token for API authorization
XorMon configuration
-
Add device into configuration from the UI:
XorMon UI ➡ Settings icon ➡ Device ➡ Cloud ➡ Skytap ➡ New
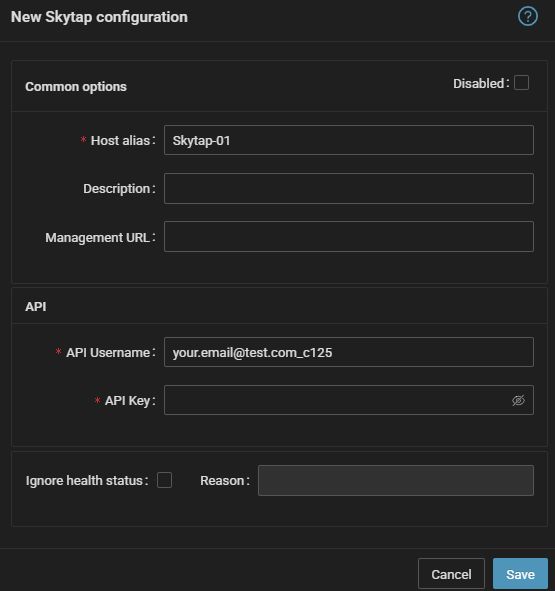
API Username: your Skytap username
API Key: the generated API token
- Run "Test" for configured storage device, it must show "OK"
-
Wait about 1 hour, then reload the web browser, you should see it in XorMon UI
Apache CloudStack monitoring is not implemented yet in XorMon.
So far you might use LPAR2RRD for its monitoring.
Do you want to let us know your priorities? Vote for your missing features and device support. More votes, bigger priority for us.
So far you might use LPAR2RRD for its monitoring.
Do you want to let us know your priorities? Vote for your missing features and device support. More votes, bigger priority for us.
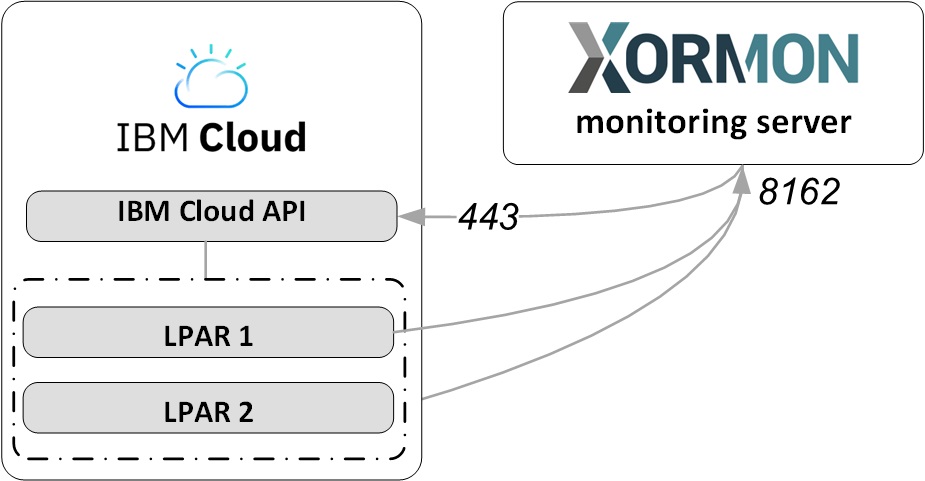
Our solution uses 2 data sources to get complete picture of IBM Cloud configuration and its resource utilization:
Supported operating systems:
Firewall needs
- IBM Cloud REST API (for configuration and mapping purposes)
- OS agent (for performance data)
 |
Supported operating systems:
- AIX
- Linux
- Linux on Power
- IBMi - not yet, it will be supported in future releases
OS agent
-
Use our AIX / Linux OS agent, refer here for its installation on all AIX based LPARs.
The agent version must be 7.90-3 and newer.
Firewall needs
IBM Cloud REST API
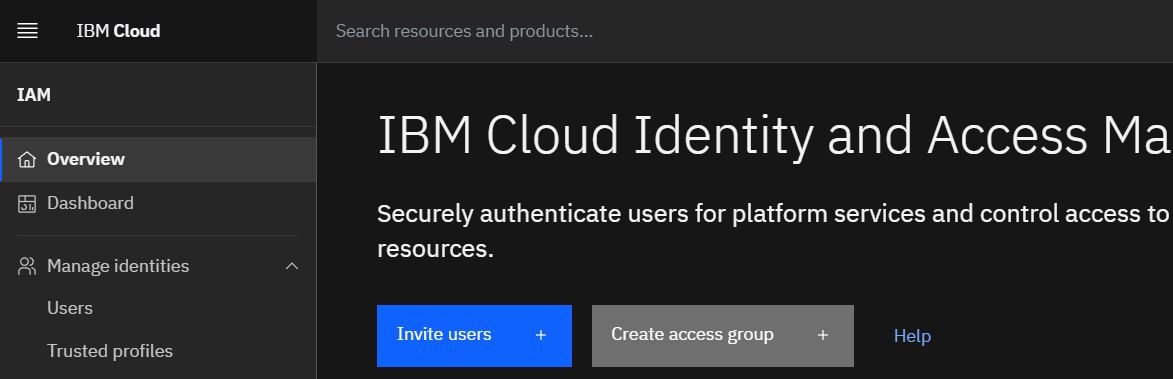
- It requires Viewer and Reader user rights on the IBM Cloud:

- Create user access in the IBM Cloud
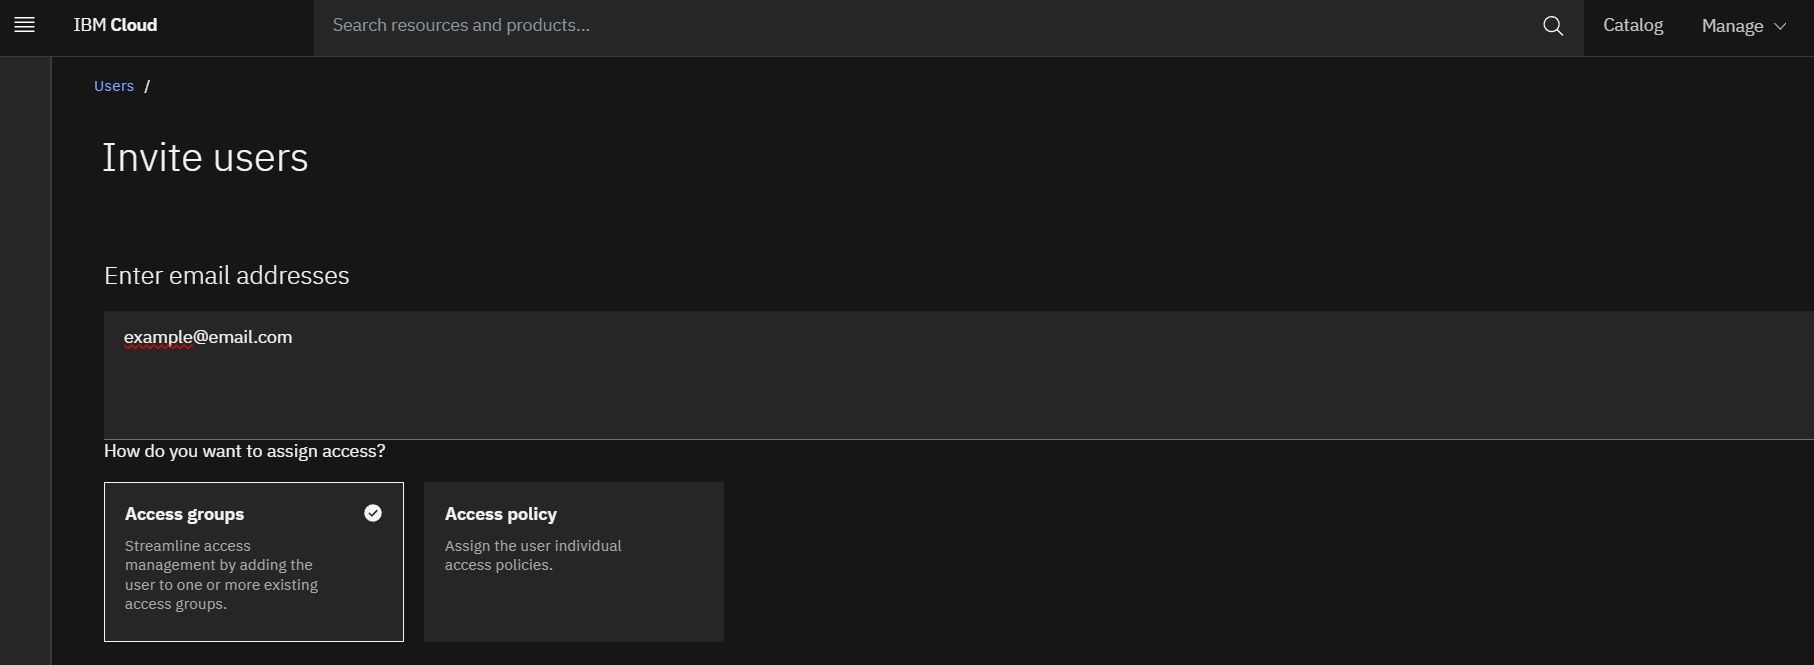
Go to IAM settings:

- Invite User:
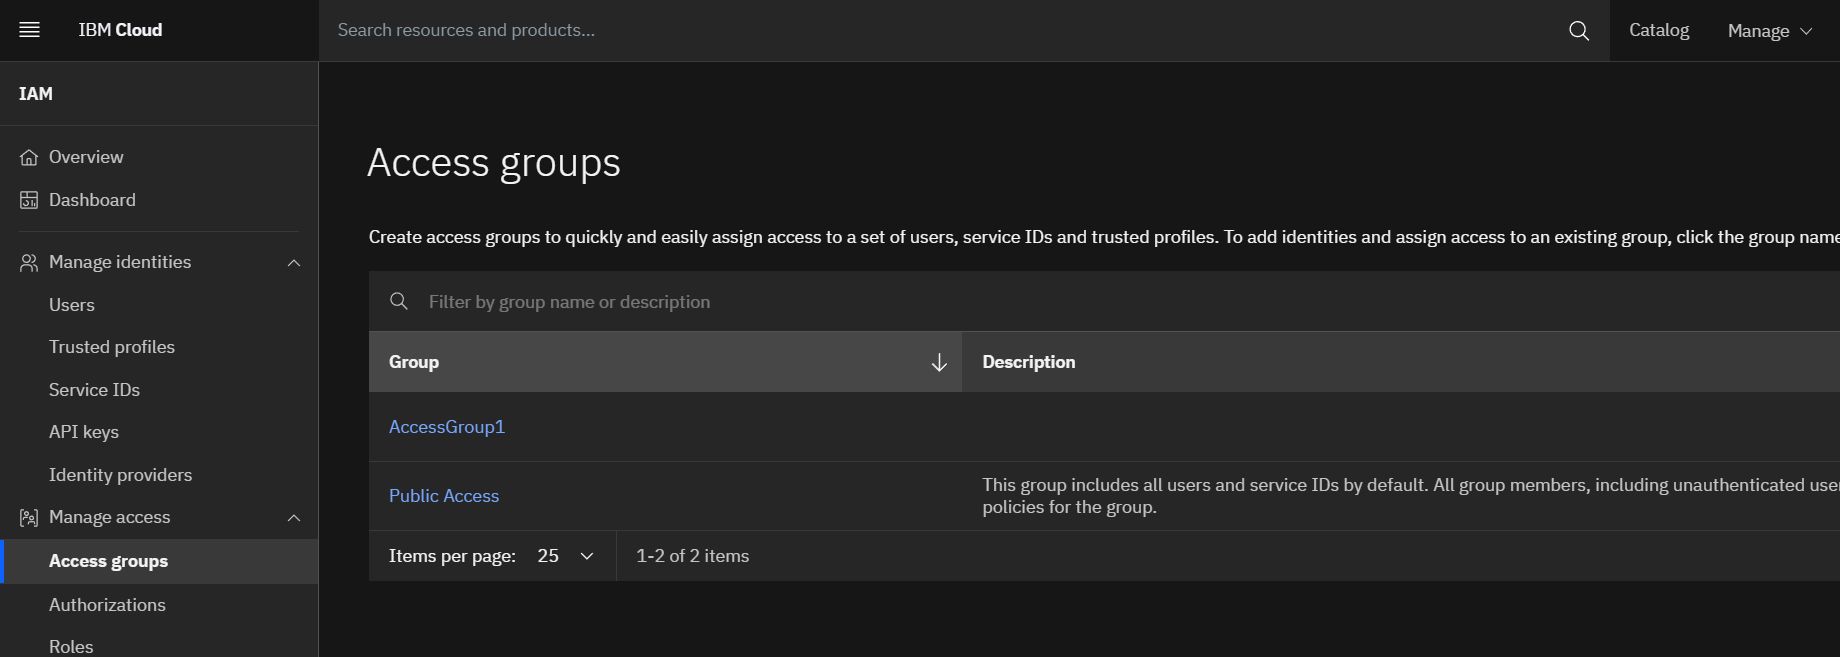
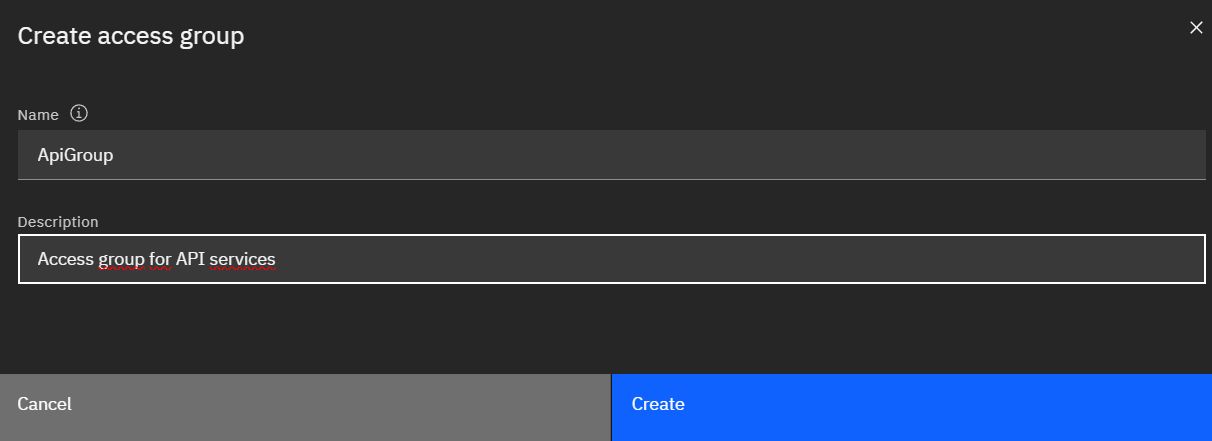
- Create access Group:
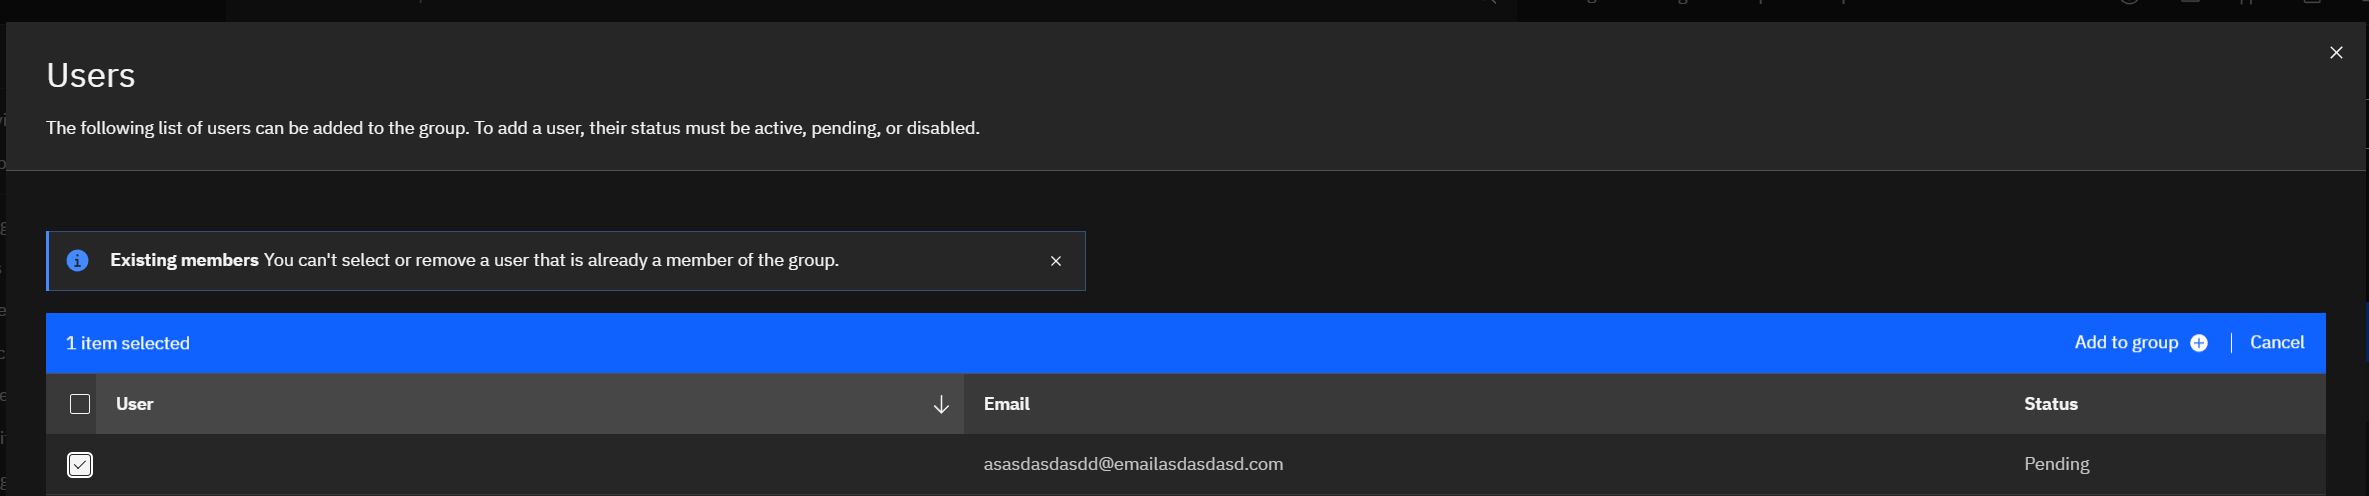
- Add inivited user to access group:
- Assign access rules:

- Assign specific policies:
- Wokrspace for Power Virtual Server
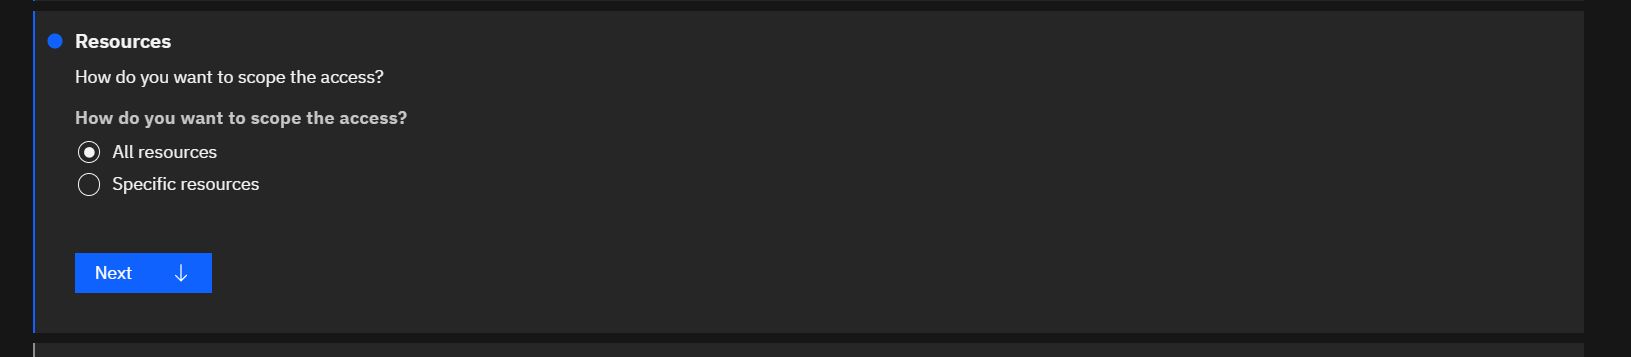
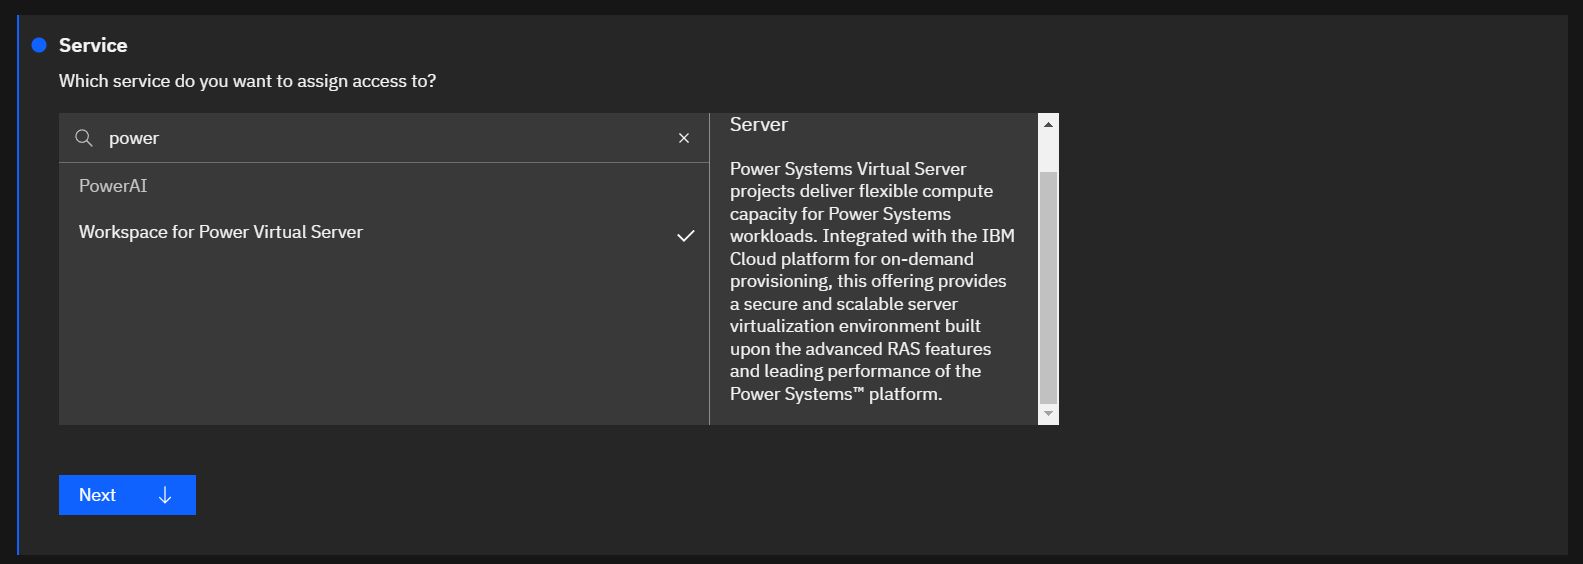 Assing the policy to resources you want:
Set reader viewer roles and actions and add the access rule: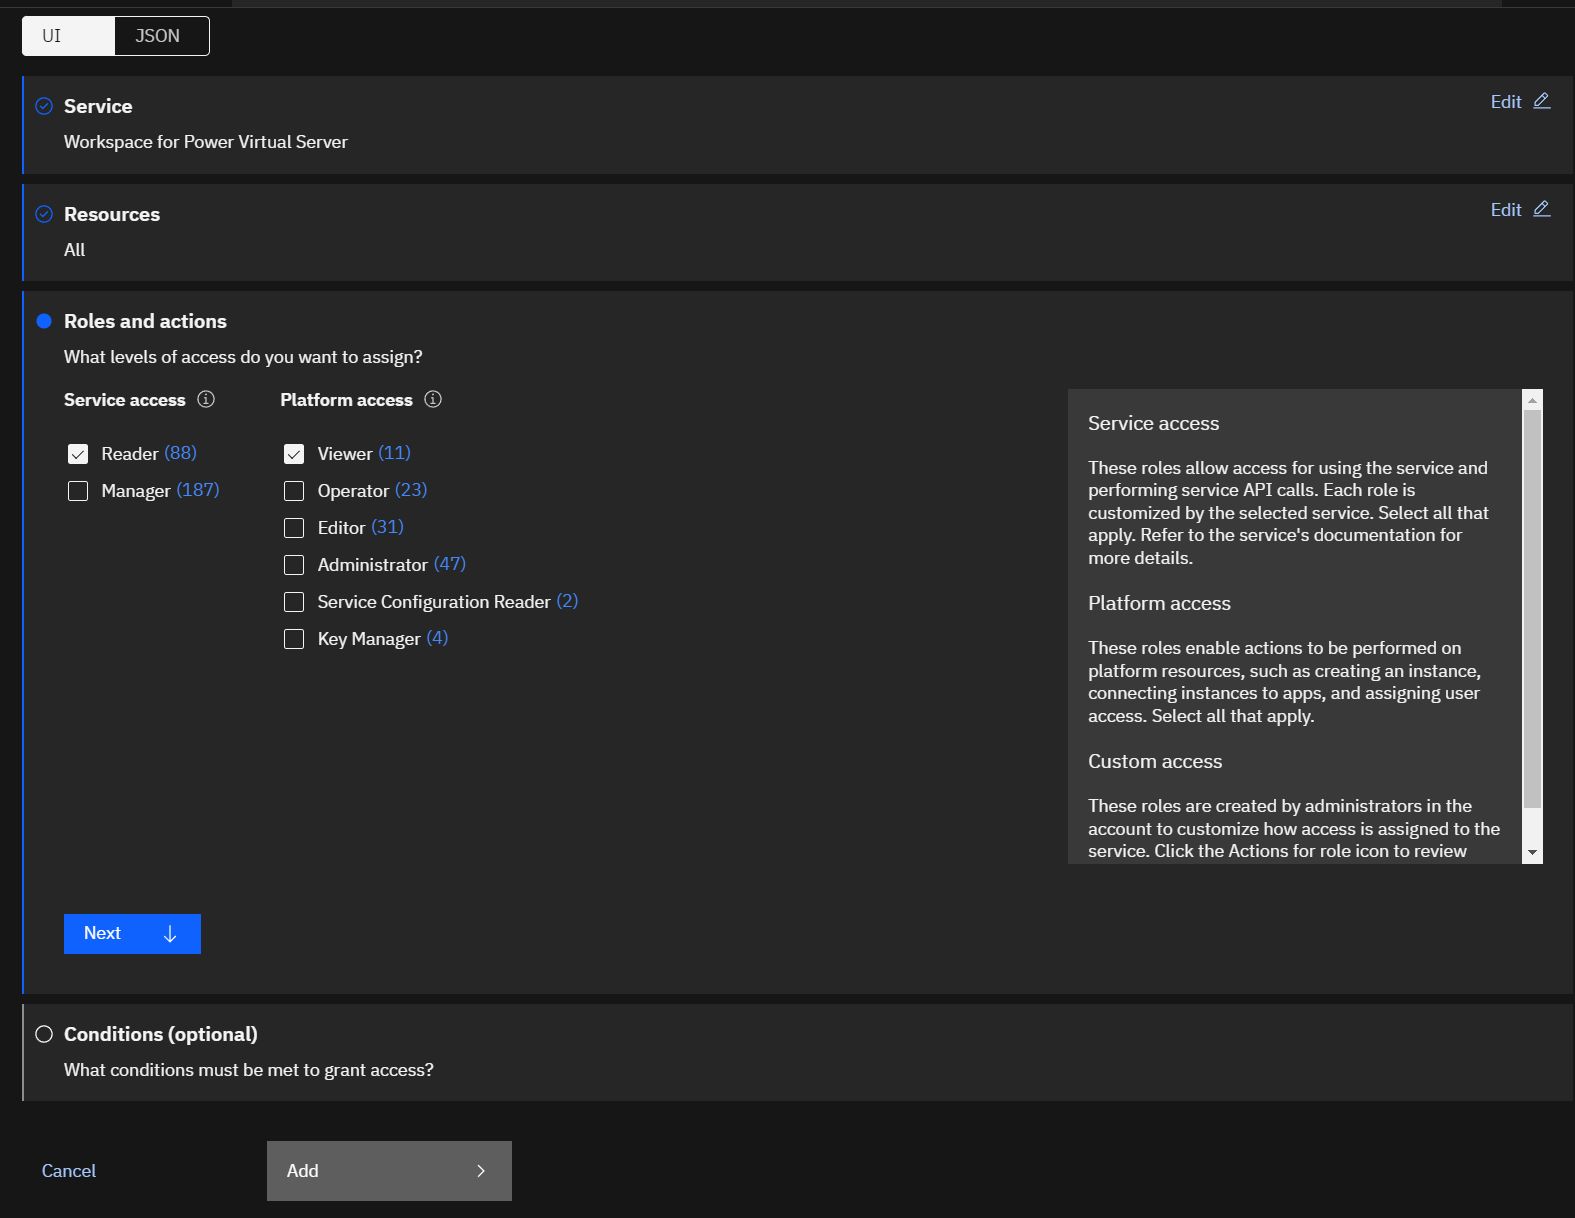
- Wokrspace for Power Virtual Server
- VPC infrastructure for vpc monitoring

- Reader and viewer roles and actions:

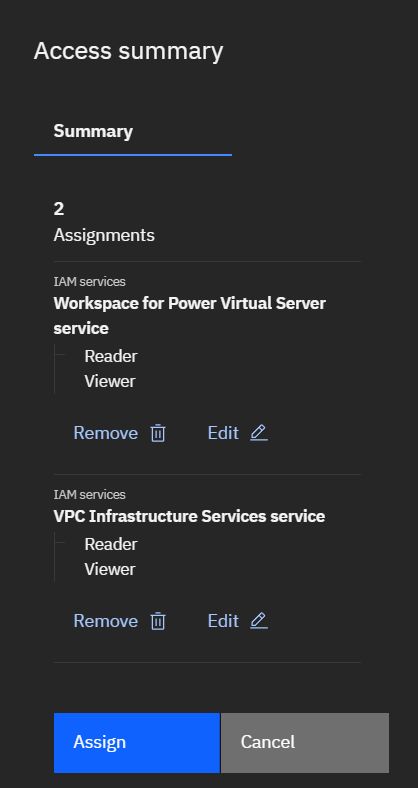
- Finally assign access:
- Create an API Key that is used for xormon monitoring:
- Create it with your prefered privacy options:
- Copy key to xormon device configuration:
Configure IBM Cloud
-
XorMon UI ➡ Settings icon ➡ Device ➡ Cloud ➡ IBM ➡ New
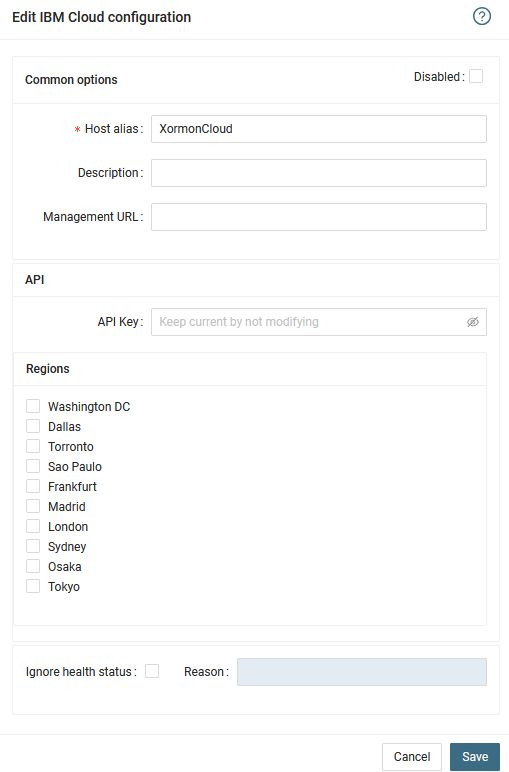
- Run "Test" for configured IBM Cloud host, it must show "OK"
-
Wait about 1 hour, then refresh the web browser cache by Ctrl-F5
Data is obtained from Azure Monitor API.
Create application under Azure Active Directory
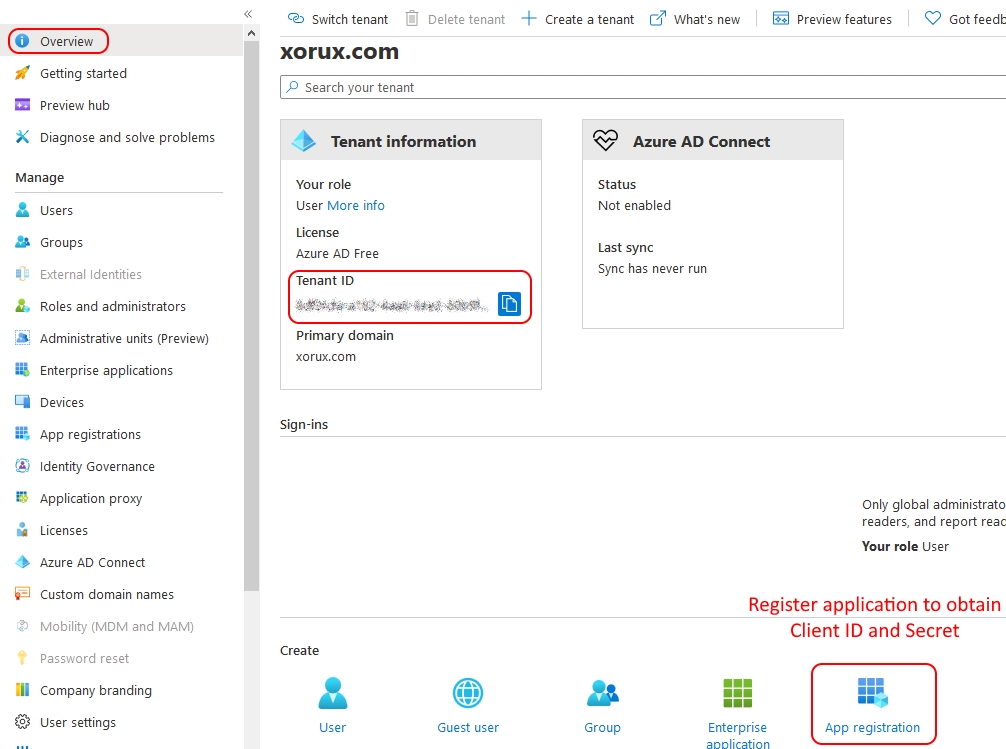
- Log in to Microsoft Azure Portal
Switch to Azure Active Directory service
Note down your Tennant ID
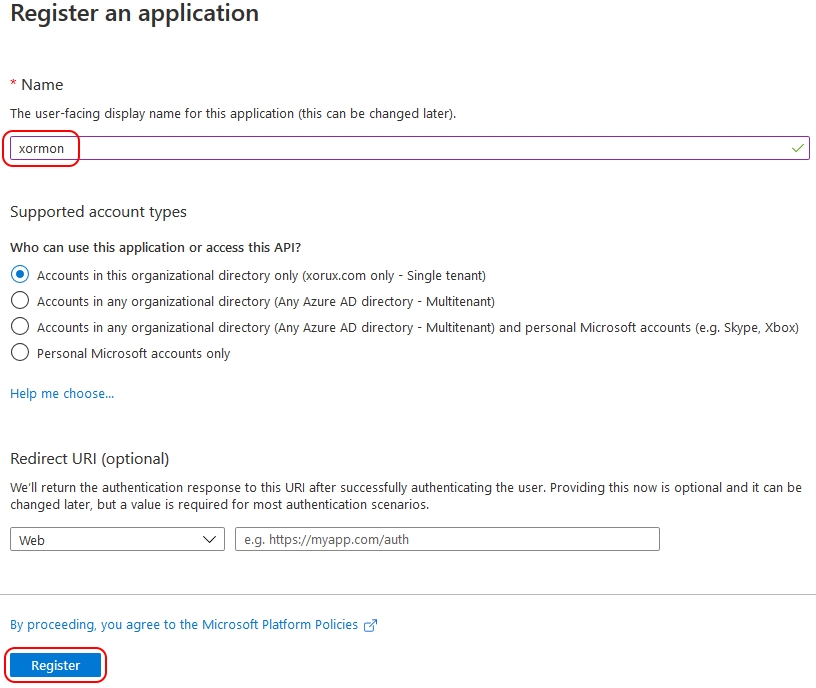
- Register a new application
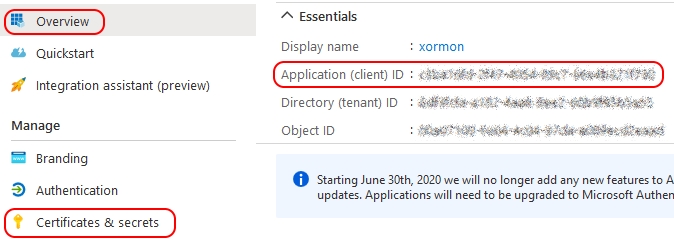
- Note down "Application (client) ID"
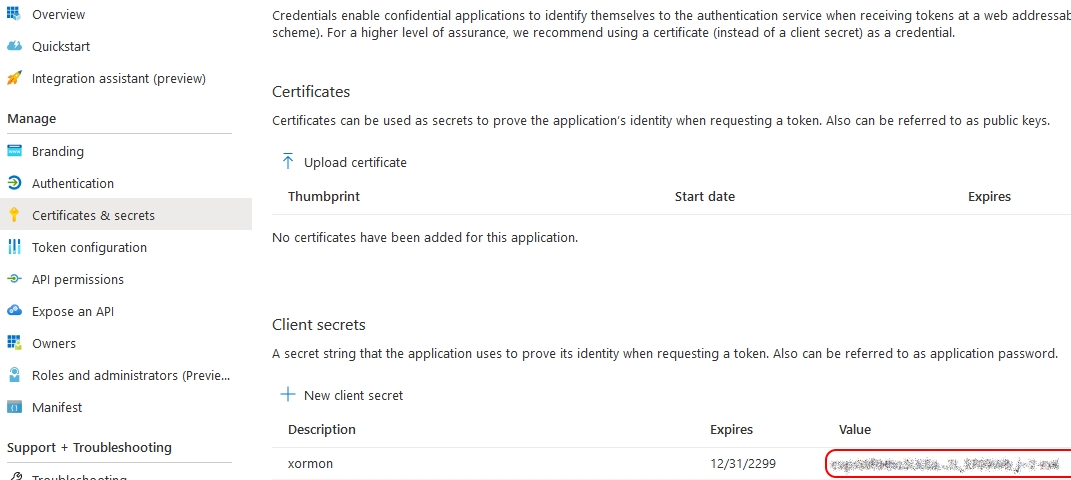
Go to "Certificates & secretes"
- Add "New client secret"
Note: you will have to repeat this process if you select expiration date
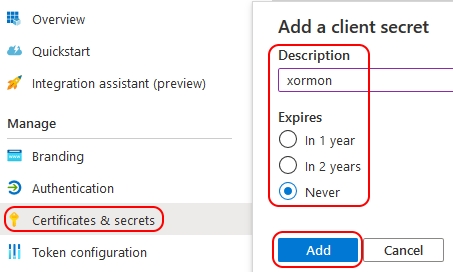
- Note down the Client secret
Add resources to application
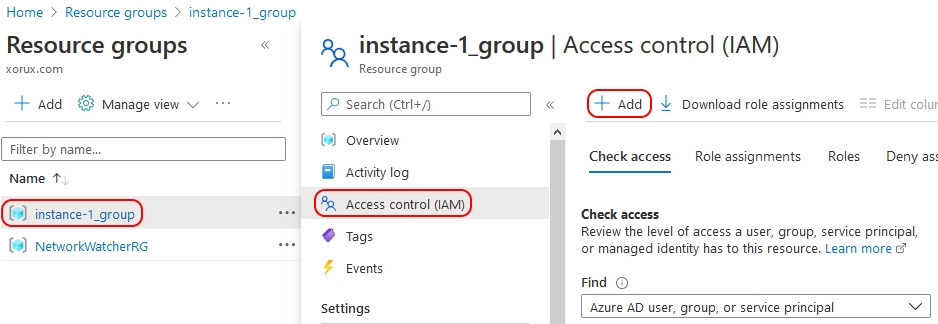
- Switch to Resource groups
Select your resource group
Note down resource group name and "Subscription ID" in the overview
Go to "Access control (IAM)"
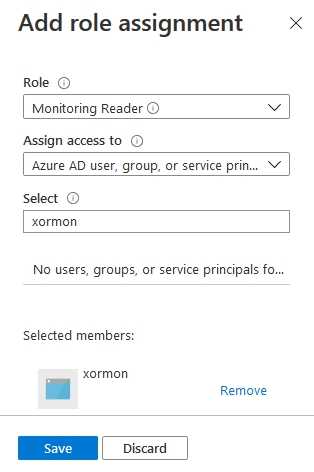
Add role to the resource group
- Select "Monitoring Reader" role for the newly registered application and save
- Azure Data Collection Rule (DCR) Setup for Memory Metrics
Configure Microsoft Azure
-
XorMon UI ➡ Settings icon ➡ Device ➡ Cloud ➡ Azure ➡ New
Enter Host Alias, Tenant ID, Client ID, Client Secret, Resource name, Subscription ID
Save and run Connection Test

- Run "Test" for configured Azure host, it must show "OK"
-
Wait about 1 hour, then refresh the web browser cache by Ctrl-F5
Data is obtained from Google Cloud API with Authorization token from Google SDK.
Install Google Cloud SDK
- Install as root
Note that XorMon Virtual Appliance is shipped with pre-installed Google Cloud SDK.
Follow installation guide, RHEL 7 / CentOS 7 packages
- Initialize after installation
# gcloud init
- Login to cloud account with provided link
You must log in to continue. Would you like to log in (Y/n)? Y
Go to the following link in your browser: https://accounts.google.com/o/oauth1/auth?code_challenge=...Enter verification code: Select the project to be monitored Pick cloud project to use: [1] ... [2] ... [3] Create a new project Please enter numeric choice or text value (must exactly match list item): Default zone is not required Do you want to configure a default Compute Region and Zone? (Y/n)? n
Create Service account and download credentials file
-
Note: you need propper priviledges to create a new service account in the project.
-
Login to google cloud console
Select the project to be monitored
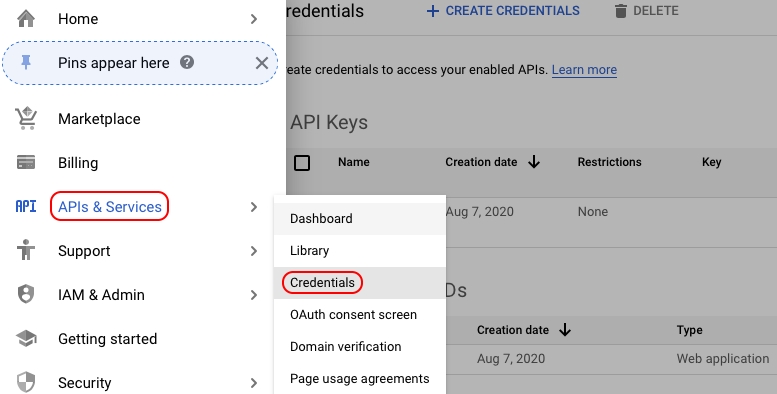
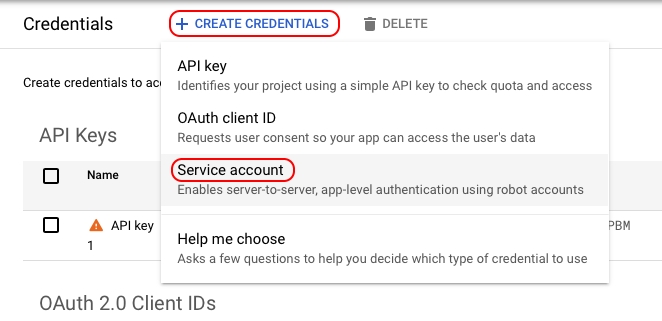
Go to APIs & Services -> Credentials
- Click on "Create Credentials" and select "Service Account"
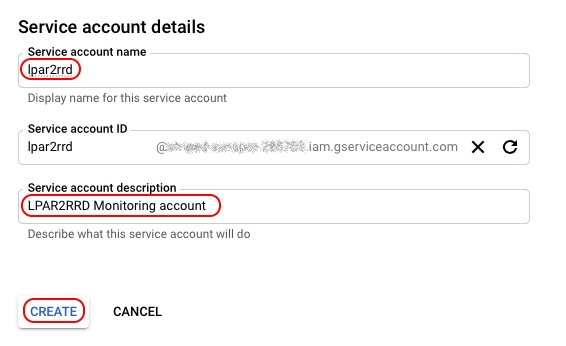
- Enter service account name and description, Create
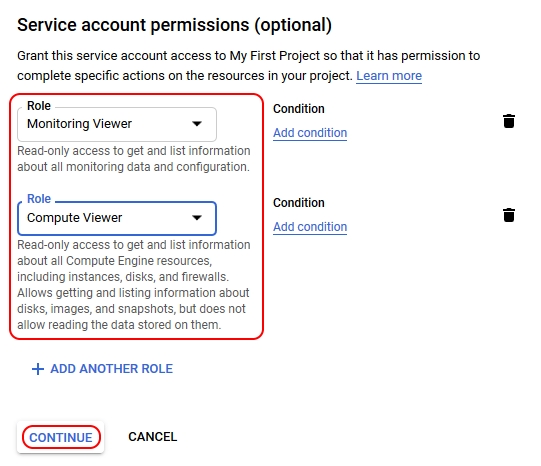
- Add "Monitoring Viewer" and "Compute Viewer" roles
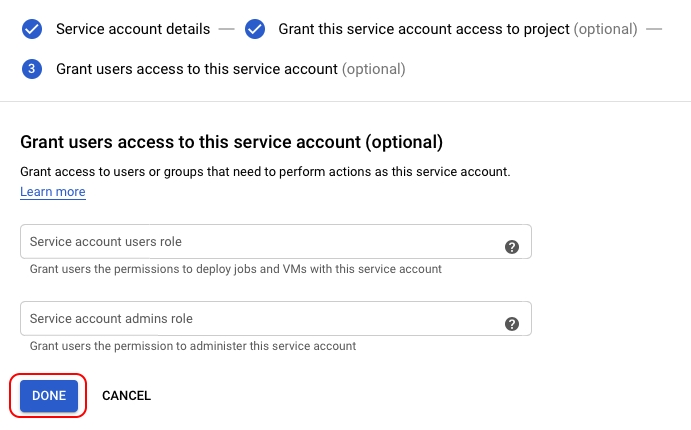
- Click on "Done"
- Edit the new account
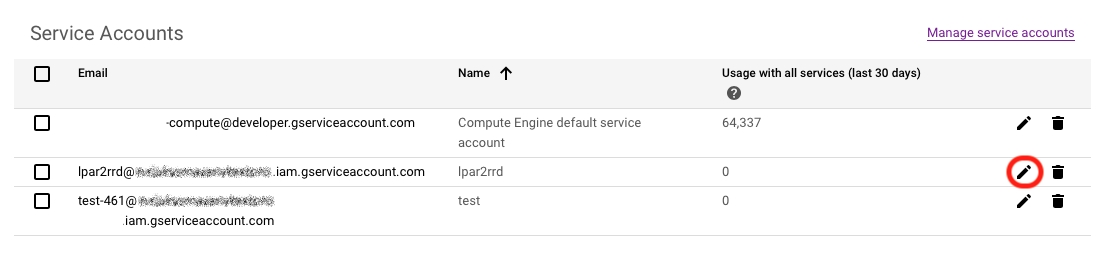
- Click on "Add Key" and select "Create new key"
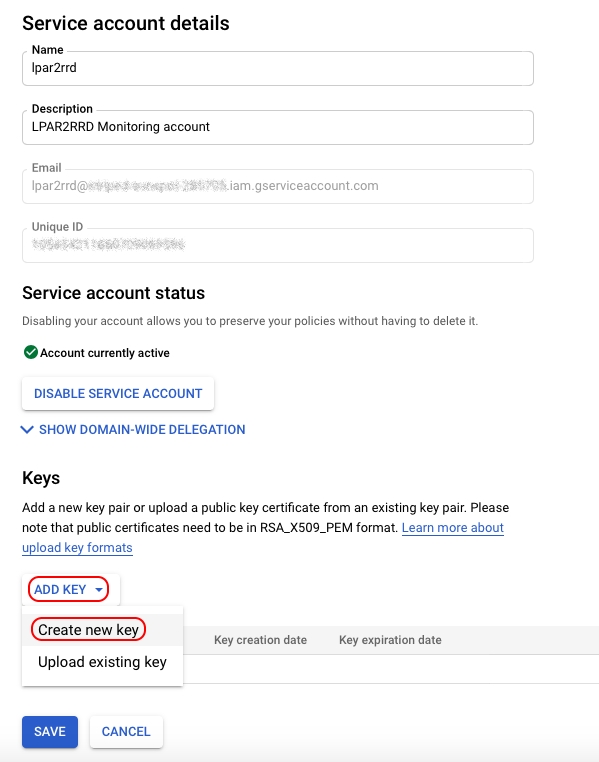
- Select key type "JSON"
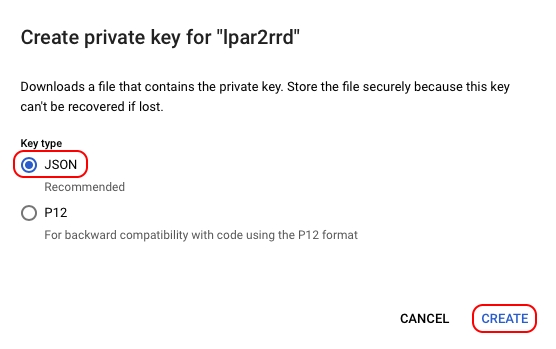
- Save the credentials file.
Configure Google Cloud in XorMon
-
XorMon UI ➡ Device ➡ Cloud ➡ Google Cloud ➡ New
Enter Host alias
Select the credentials file (json)
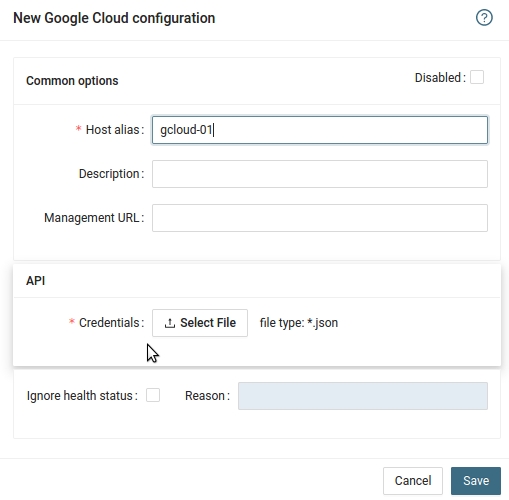
- Run "Test" for configured GCloud host, it must show "OK"
-
Wait about 1 hour, then refresh the web browser cache by Ctrl-F5
Data is obtained from Amazon Web Services via AWS CLI.
Install AWS CLI
-
Install AWS CLI on your XorMon server: general install docu, Linux installation
Note that XorMon Virtual Appliance is shipped with pre-installed AWS CLI.
Create monitoring user
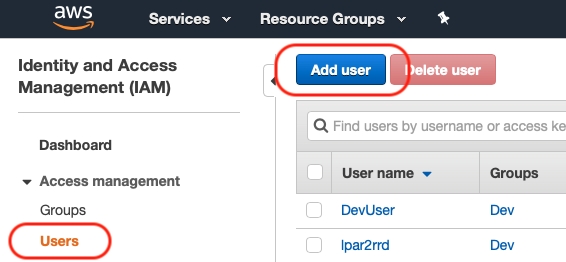
- Log in to Amazon Web Services Console and switch to IAM

- Go to "Users" and add new user
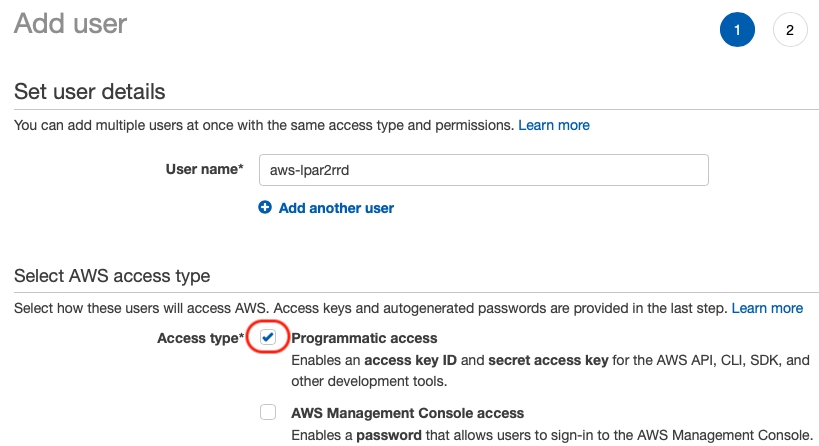
- Enter a user name and select a "Programmatic access" as a access type
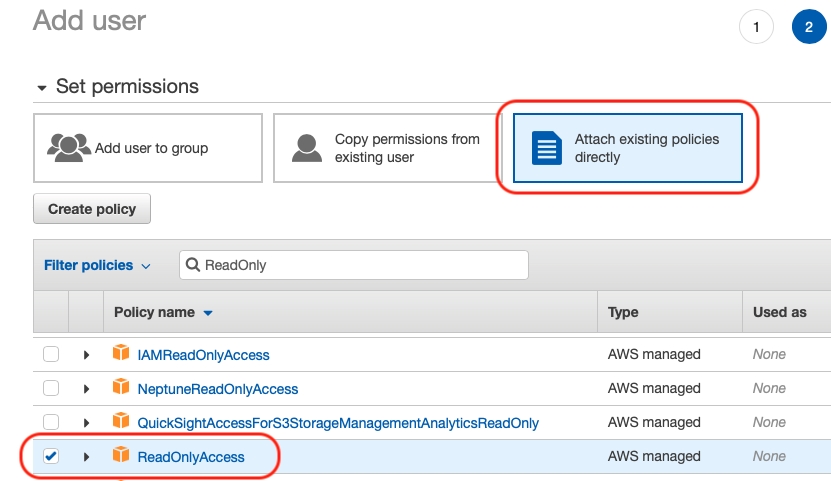
- Select "ReadOnlyAccess" role in the permission section
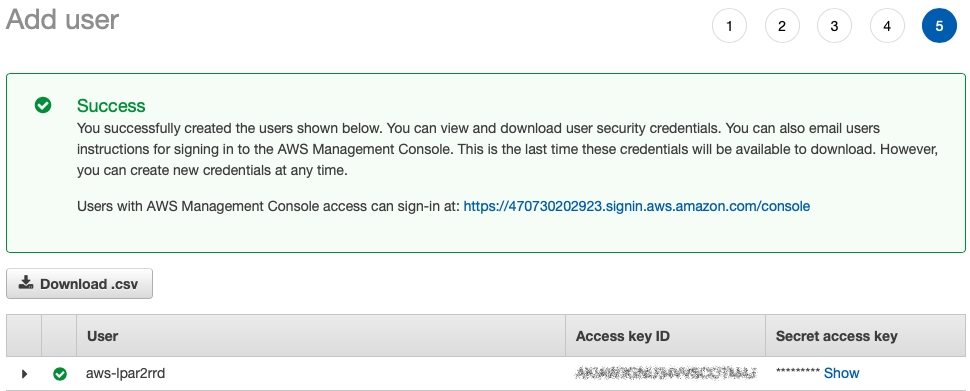
- Create user
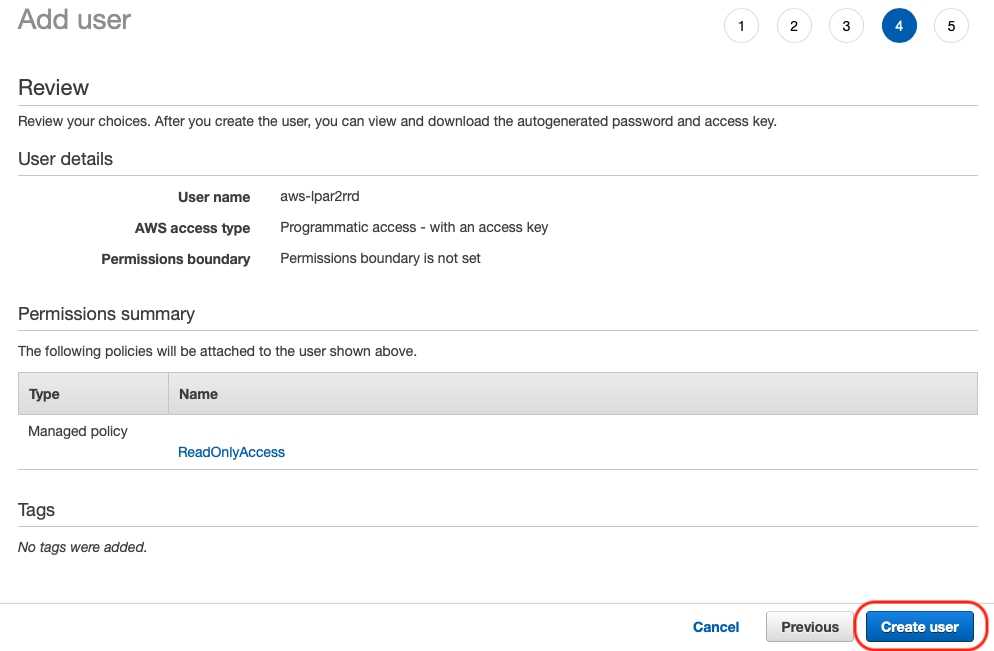
- Note down "Access key ID" and "Access key secret"
Configure AWS in XorMon
-
XorMon UI ➡ Device ➡ Cloud ➡ AWS ➡ New
Enter Access key, Secret key
Select Interval- 5 minutes for Basic monitoring
- 1 minute for Detailed monitoring
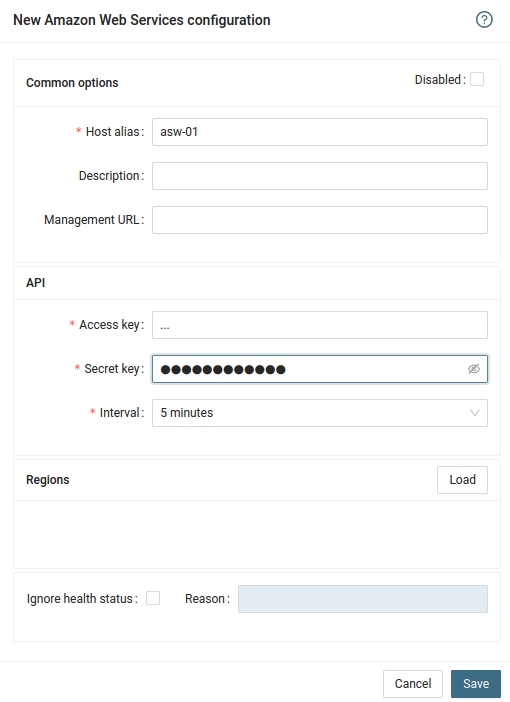
Select monitored regions and save configuration
- Run "Test" for configured AWS host, it must show "OK"
-
Wait about 1 hour, then refresh the web browser cache by Ctrl-F5