RHV / oVirt / OLVM
XorMon retrieves data from:
- The "ovirt_engine_history" database, which is part of the oVirt/RHV Virtualization Manager and contains only historical performance data
- The oVirt/RHV Virtualization Manager REST API (optional)
Increases monitoring data set and enables Topology for oVirt, see REST API
OS Prerequisites
-
Open network connection to the RedHat Virtualization Manager on port 5432
- Make sure you have installed perl modules: perl-DBI and perl-DBD-Pg on XorMon server
Skip that on the Virtual Appliance
Install them if they are missing under root user# RedHat / Rocky Linux rpm -q perl-DBD-Pg perl-DBD-Pg-2.19.3-4.el7.x86_64 # Debian / Ubuntu dpkg-query -W libdbd-pg-perl libdbd-pg-perl 3.18.0-1.pgdg120+1
- Linux RedHat, CentOS
yum install perl-DBD-Pg
- Linux Debian, Ubuntu
apt-get install libdbd-pg-perl
- Linux RedHat, CentOS
Database access
-
By default, only an administrator account is available in ovirt_engine_history.
- Log in as root on the server where ovirt_engine_history is running
(usually the oVirt Engine VM)
- Switch to the 'postgres' user
su - postgres
- Connect to the database
psql -d ovirt_engine_history
You should see the following prompt:
ovirt_engine_history=#
- Create a user 'xormon_ro'
CREATE ROLE xormon_ro LOGIN NOSUPERUSER NOCREATEDB NOCREATEROLE NOREPLICATION; - Set user password
\password xormon_ro
- Configure database access
GRANT CONNECT ON DATABASE ovirt_engine_history TO xormon_ro; GRANT USAGE ON SCHEMA public TO xormon_ro; GRANT SELECT ON ALL TABLES IN SCHEMA public TO xormon_ro;
- Get location of 'pg_hba.conf'
This will be needed in a later step
SHOW hba_file;
- Quit from psql
\q
- Logout
exit
- Allow access for 'xormon_ro' from XorMon appliance in 'pg_hba.conf'
vi /var/lib/pgsql/data/pg_hba.conf
Add the following line to the end of the file
host ovirt_engine_history xormon_ro <XorMon IP>/32 md5
e.g.
host ovirt_engine_history xormon_ro 192.168.1.12/32 md5
- Restart the database
systemctl reload postgresql.service
Each Virtualization Manager has its own randomly generated password for ovirt_engine_history database.
To get the database password, you have to connect to your RHV / oVirt engine via SSH and run this command:
# grep DWH_DB_PASSWORD /etc/ovirt-engine-dwh/ovirt-engine-dwhd.conf.d/10-setup-database.conf
# grep DWH_DB_USER /etc/ovirt-engine-dwh/ovirt-engine-dwhd.conf.d/10-setup-database.conf
ovirt_engine_history
There is no tool for creating read-only users in the UI or CLI.
Creating a read-only user in the 'ovirt_engine_history' database
REST API access
-
oVirt 4.5.1 and later include bundled Keycloak SSO.
- Log in to the Keycloak management console
-
https://<oVirt-engine-IP>/ovirt-engine-auth/admin
- Go to Manage -> Users, click Add user
- Set the username "xormon" and save
- Go to Credentials tab and set permanent password
- Log in to the oVirt Administration Portal
-
https://<oVirt-engine-IP>/ovirt-engine/webadmin/
- Go to Administration -> Configure
- Select Roles and then New
-
Name: "MonitoringReadOnly"
Account Type: Admin - Under Permissions, check only:
-
System -> Configure System -> Login Permissions
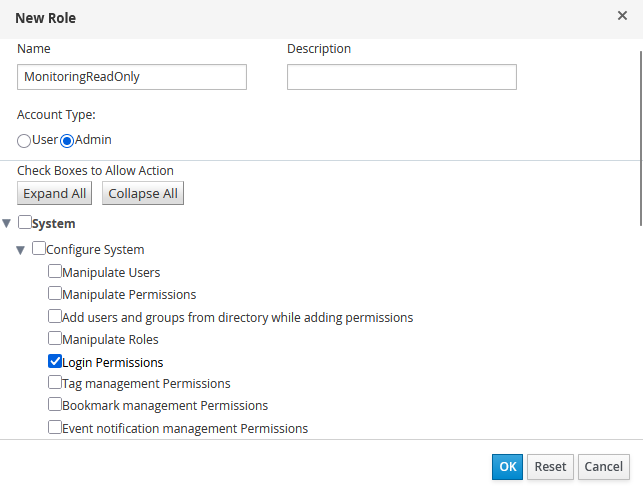
- Go to Administration -> Configure
- Select System Permissions and click Add
-
Search: internalsso
User: xormon
Role to assign: MonitoringReadOnly
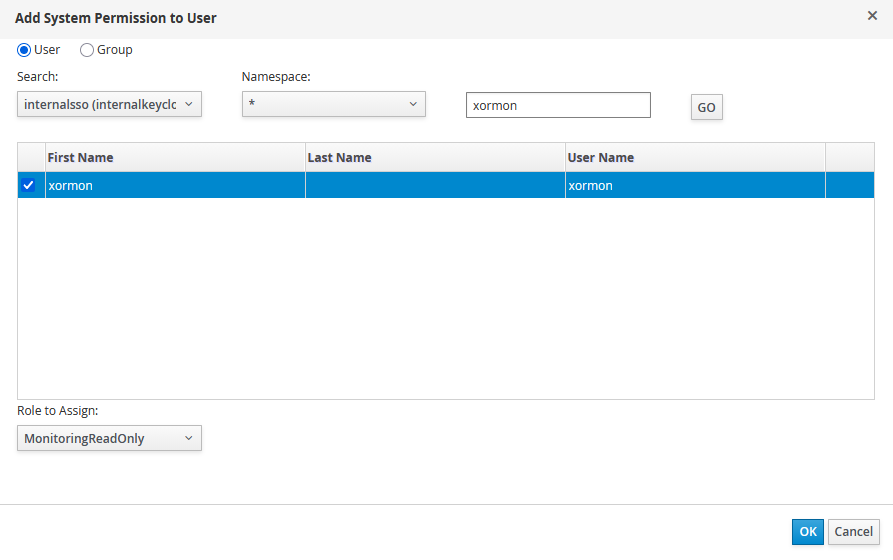
Keycloak will be used only for user authentication.
Read-only permissions will be configured as a custom Admin role directly in oVirt Engine.
Creating a User in Keycloak
Creating and Assigning a Role in the Administration Portal
XorMon storage configuration
-
Add oVrit / RHV / OLVM from the UI:
XorMon UI -> Settings icon -> Device ->; Server Virtualization -> RHV/oVirt -> New
Enter the username for the REST API in the following format: "username@internalsso"
In our case, "xormon@internalsso"
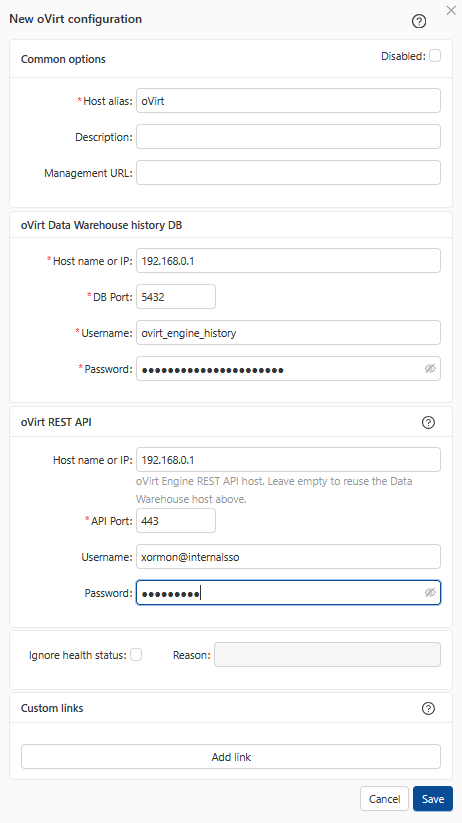
- Run "Test" for configured storage device, it must show "OK"
- If you get this error:
FATAL: no pg_hba.conf entry for host XY user "ovirt_engine_history" database "ovirt_engine_history"ssl encryption", SSL off
Add this line to pg_hba.conf on the oVirt database host:host all xormon <monitoring machine IP/hostname>/32 <md5>/<scram-sha-256>
Running this command on your DB can help you locate pg_hba.confSHOW hba_file;
-
Wait about 1 hour, then reload the web browser, you should see it in XorMon UI