LAN Network
Anyone willing to test it? Contact us at [email protected].
XorMon collects data from F5 via the iControl REST API.
F5 Big-IP connectivity
-
Allow access from the XorMon host to the F5 Big-IP management on port 443 (https)
- Create user 'xormon' with read-only role from the UI:
- Go to System ➡ Users ➡ User List ➡ Create.
- Fill in User Name and Password.
- Under Partition Access, select All with role Auditor and click Add.
- Set Terminal Access to Disabled.
- Click Finished.
XorMon device configuration
-
Add F5 Big-IP into configuration from the UI:
XorMon UI ➡ Settings icon ➡ Device ➡ Network ➡ LAN ➡ New ➡ Vendor:device ➡ F5 Big-IP
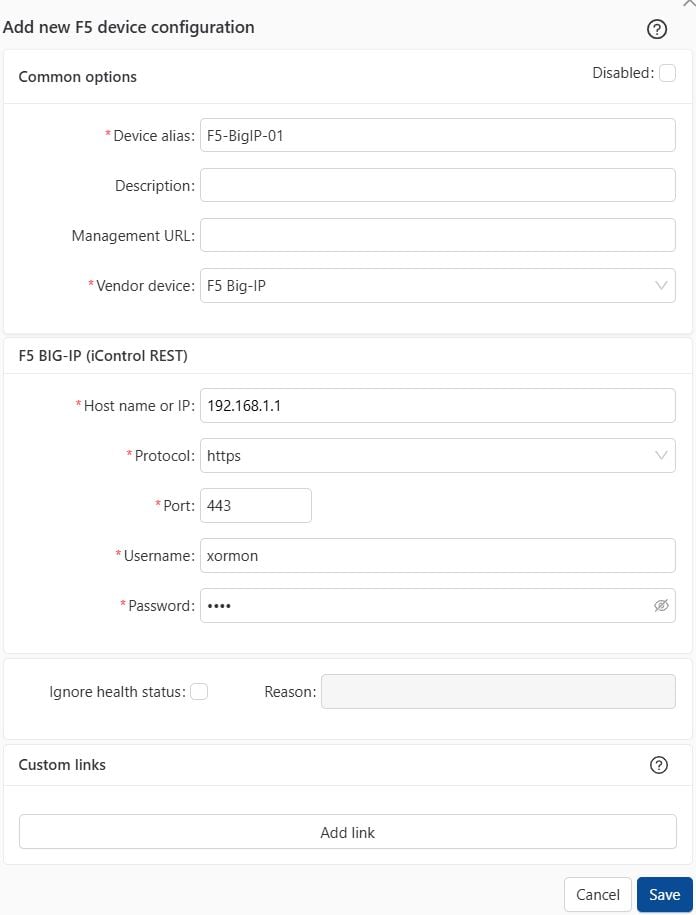
- Run "Test" for configured device, it must show "OK"
-
Wait about 1 hour, then reload the web browser, you should see it in XorMon UI
Anyone willing to test it? Contact us at [email protected].
XorMon monitors Palo Alto firewall through the REST API.
Palo Alto connectivity
-
Allow access from the XorMon host to the Palo Alto on port 9443 (https)
-
Create user 'xormon' with read-only role via the management UI:
- Open Device → Administrators
- Select Add
- Enter a name such as 'xormon'
- Set password
- At the 'Administrator Type' select 'Dynamic'
- Select role Device administrator (read-only)
- Save the role
You can even create your own read-only role, more restricted, without UI access for example.
XorMon device configuration
-
Add Palo Alto firewall into configuration from the UI:
XorMon UI ➡ Settings icon ➡ Device ➡ Network ➡ LAN ➡ New ➡ Vendor:device ➡ Palo Alto Firewall
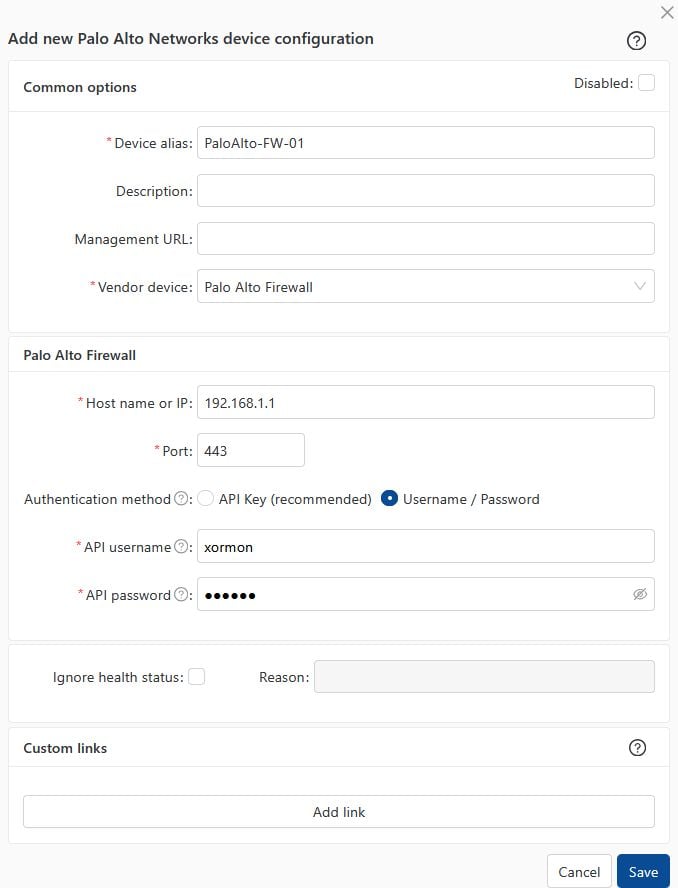
- Run "Test" for configured device, it must show "OK"
-
Wait about 1 hour, then reload the web browser, you should see it in XorMon UI
Anyone willing to test it? Contact us at [email protected].
XorMon monitors HPE Juniper switches and firewall through the REST API.
HPE Juniper connectivity
-
Allow access from the XorMon host to the HPE Juniper on port 3443 (https)
-
Create user xormon with role read-only via CLI:
root@juniper01> configure
root@juniper01# edit system login
root@juniper01# edit user xormon
root@juniper01# set full-name "XorMon"
root@juniper01# set class read-only
root@juniper01# set authentication plain-text-password
   ➡ type in password
root@juniper01# commit
root@juniper01# top
root@juniper01# exit
- Optionally configure REST API as per HPE Juniper docu
set system services rest control allowed-sources [<XorMon host and others IP adsdresses separated by a space>]
set system services rest control connection-limit 100
set system services rest http port 3000
set system services rest http addresses [<switch IP adsdresses separated by a space>]
set system services rest https port 3443
set system services rest https addresses [203.0.113.2 203.0.113.3]
set system services rest https server-certificate testcert
set system services rest https cipher-list rsa-with-3des-ede-cbc-sha
set system services rest https mutual-authentication certificate-authority testca
set system services rest traceoptions flag all
set system services rest enable-explorer
XorMon device configuration
-
Add HPE Juniper into configuration from the UI:
XorMon UI ➡ Settings icon ➡ Device ➡ Network ➡ LAN ➡ New ➡ Vendor:device ➡ HPE Juniper
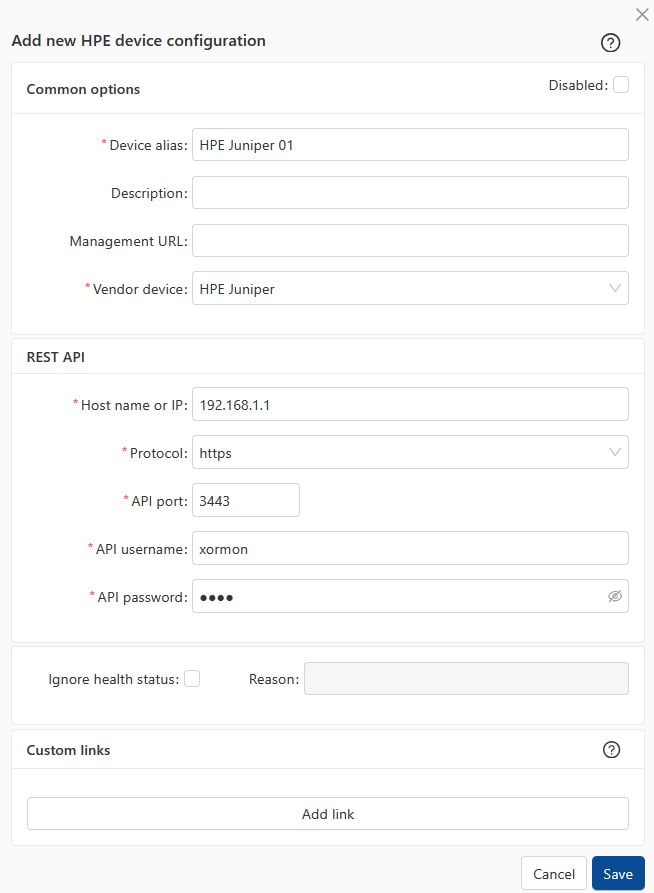
- Run "Test" for configured device, it must show "OK"
-
Wait about 1 hour, then reload the web browser, you should see it in XorMon UI
Generally majority of network switch devices should work.
Switch configuration
- Enable SNMP communication from XorMon server to all LAN switches on port 161, UDP
Connections are always initiated from XorMon server side
- SNMP v3 setup:
Perl SNMP v3 compatibility Auth & Priv support matrix
snmp-server contact "<contact>" location "<location>"
snmpv3 enable
snmpv3 only
snmpv3 user xormon auth sha <AuthPass> priv aes <PrivPass>
snmpv3 group managerpriv user "xormon" sec-model ver3
- To monitor VLAN must be enabled on the switch this:
$ interface vlan { vlan-id | vlan-range}
Add a switch into XorMon
-
Settings icon ➡ Devices ➡ Network ➡ LAN ➡ New ➡ Vendor:device : Cisco incompatible
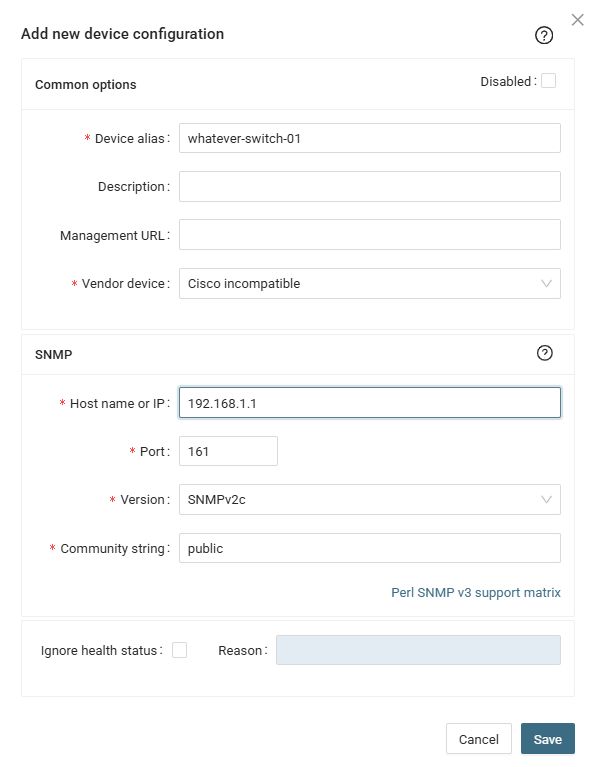 |
If you switch has a management IP and an inband IP, then use inband IP in XorMon configuration.
Troubleshooting
-
This must work from cmd line, it must provide name of the switch (place your IP and community string)
snmpwalk -v 2c -c public 192.168.1.1 1.3.6.1.2.1.1.5
Supported models
- Cisco ASA 5500 Series
- Cisco ASA 5500-X Series
- Cisco Firepower 1000 Series (FPR1010, FPR1120, FPR1140, FPR1150, ...)
- Cisco Firepower 2100 Series
- Cisco Firepower 4100 Series
- Cisco Firepower 9300 Series
- Cisco Secure Firewall appliances
- Firepower Threat Defense (FTD) deployments
Switch configuration
- Enable SNMP communication from XorMon server to the Cisco firewall on port 161, UDP
Connections are always initiated from XorMon server side
- SNMP v3 setup:
Perl SNMP v3 compatibility Auth & Priv support matrix
Add a firewall into XorMon
-
Settings icon ➡ Devices ➡ Network ➡ LAN ➡ New ➡ Vendor:device : Cisco Secure Firewall
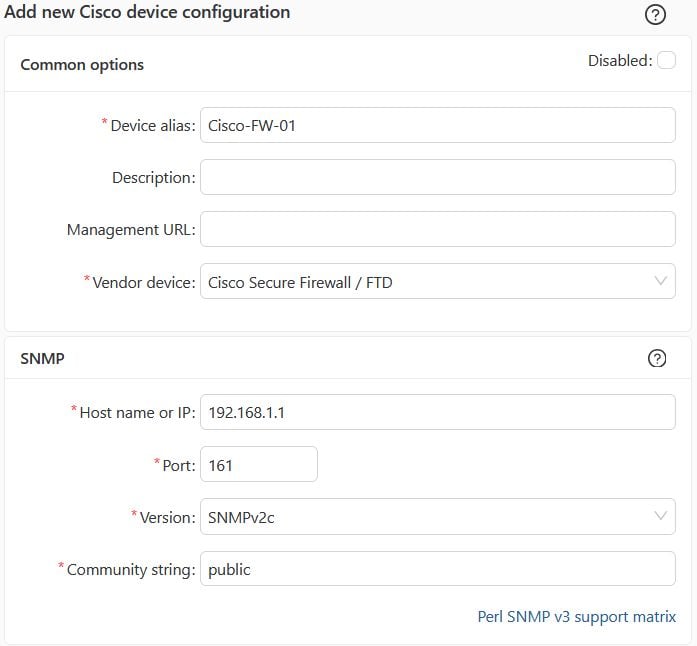 |
If your firewall has a management IP and an inband IP, then use inband IP in XorMon configuration.
Troubleshooting
-
This must work from cmd line, it must provide name of the switch (place your IP and community string)
snmpwalk -v 2c -c public 192.168.1.1 1.3.6.1.2.1.1.5
XorMon monitors FortiGate firewalls through the FortiOS REST API v2
(/api/v2/monitor/* and /api/v2/cmdb/*).
No SNMP is required. Managed FortiSwitch and FortiAP
devices are discovered through the FortiGate controller API.
Official Fortinet documentation (public):
- REST API administrator
- Administrator profiles
- Using APIs (token auth, Bearer header, security options)
Detailed API reference lives on Fortinet Developer Network (FNDN) and requires a Fortinet account. The steps below are taken from the public Administration Guide.
Supported FortiOS versions
- FortiOS 7.0 and later — supported target (XorMon UI: FortiOS REST API v2 / 7.0+).
- FortiOS 6.x is not supported.
- FortiADC is a different product — not covered here.
Authentication methods
XorMon supports both options in the device configuration dialog:
| Method | XorMon UI | FortiOS mechanism | Recommendation |
|---|---|---|---|
| API Token | API Token |
REST API Admin user; header
Authorization: Bearer <token>.
Fortinet recommends token authentication for automated API access
(Using APIs).
|
Recommended |
| Username / Password | Username / Password (session) |
Standard administrator account; session login via /logincheck
with session cookie reused for API requests.
Each login consumes a session slot until logout or timeout.
|
Fallback only |
Read-only only.
Fortinet recommends least privilege: avoid super_admin for monitoring.
Use a custom profile with Read permissions, or the built-in
super_admin_readonly profile
(REST API administrator).
XorMon must not use Read-Write or admin tokens for routine polling.
FortiGate connectivity
- Allow HTTPS from the XorMon host to the FortiGate management interface (default port 443).
- Fortinet enforces HTTPS for API token use — HTTP cannot be used (Using APIs).
- Configure Trusted Hosts on the REST API admin — multiple hosts/subnets supported;
0.0.0.0/0is not allowed. - Self-signed certificate: trust the FortiGate CA on the collector or use
curl --insecurewhen verifying the token.
FortiGate configuration
Only a super_admin can create REST API administrators
(REST API administrator).
1. Administrator profile (read-only)
GUI (from Administrator profiles):
- Log in as
super_admin. - Go to System → Admin Profiles → Create New.
- Name: e.g.
xormon_ro(remember the name for Step 2). - For each permission category required by monitoring, set access to Read (not Read-Write):
- System (
sysgrp) - Network (
netgrp) - Firewall (
fwgrp) - VPN (
vpngrp) - WiFi & Switch Controller (
wifi) — required for managed FortiSwitch/FortiAP - Log & Report (
loggrp) - Security Fabric (
secfabgrp) — if Security Fabric metrics are used
- System (
- Click OK.
Alternative: assign built-in profile super_admin_readonly instead of a custom profile (Fortinet documented option for generic read-only API access).
CLI (config system accprofile):
config system accprofile
    edit "xormon_ro"
        set secfabgrp read
        set ftviewgrp read
        set authgrp read
        set sysgrp read
        set netgrp read
        set loggrp read
        set fwgrp read
        set vpngrp read
        set utmgrp read
        set wanoptgrp read
        set wifi read
    next
end
2A. REST API Admin + API token (recommended)
GUI (from REST API administrator):
- Go to System → Administrators.
- Select Create New → REST API Admin.
- Username — e.g.
xormon_api. Do not use characters< > ( ) # " 'in the username (XSS risk per Fortinet). - Administrator Profile — select
xormon_rofrom Step 1 (minimum permissions required). - Trusted Hosts — add XorMon collector IP/subnet (e.g.
10.0.0.100/32). IPv6 supported. - PKI Group — leave disabled unless client-certificate auth is required.
- CORS Allow Origin — leave disabled for monitoring-only use.
- Click OK.
- Copy the API token immediately. Fortinet: “An API token is generated. Make note of the token, as it is only shown once.” It cannot be retrieved later — only regenerated (which invalidates the previous token).
CLI (config system api-user):
config system api-user
    edit "xormon_api"
        set accprofile "xormon_ro"
        set vdom "root"
        config trusthost
            edit 1
                set ipv4-trusthost 10.0.0.100/32
            next
        end
    next
end

execute api-user generate-key xormon_api
3. Verify token (Bearer header)
Fortinet recommended authentication (Using APIs):
curl --insecure \
  -H "Accept: application/json" \
  -H "Authorization: Bearer YOUR_TOKEN" \
  https://FORTIGATE_IP/api/v2/monitor/system/status
Expected: JSON with "status": "success".
Do not pass the token in the URL (?access_token=).
Fortinet strongly recommends the request header. XorMon uses Bearer header only.
URL query tokens require config system global → set rest-api-key-url-query enable and are discouraged.
2B. Standard administrator (username / password, session fallback)
Use only when REST API Admin cannot be created:
- Go to System → Administrators → Create New → Administrator.
- Assign read-only profile
xormon_roorsuper_admin_readonly. - Set trusted hosts if available.
Session auth consumes FortiGate login slots. Prefer API token where possible.
XorMon configuration
Add the FortiGate from the UI:
- Configuration → Device → Network → LAN → New — select vendor/device FortiGate.
- Device alias — display name.
- Host name or IP — management FQDN or IP.
- Port — FortiGate HTTPS port (default
443; use custom port if management HTTPS listens elsewhere). - Authentication method — API Token (recommended) or Username / Password (session).
- Paste API token or enter session credentials.
- Click Save, then run Test — must show OK.
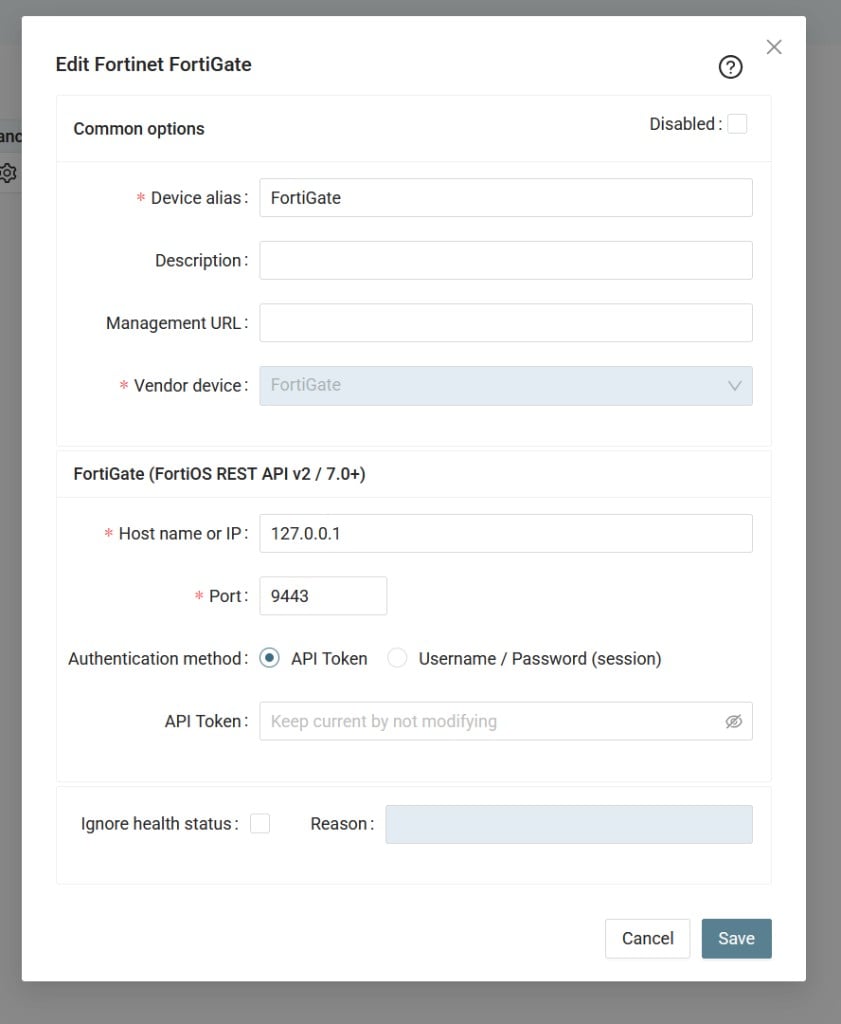
XorMon device dialog: FortiOS REST API v2 / 7.0+, API Token or Username/Password (session).
Verify connection
- Run Test on the configured device — result must be OK.
- Wait for the next collection cycle, then reload the UI.
- FortiGate metrics should appear: CPU, memory, interfaces, VPN, HA, etc.
Managed FortiSwitch and FortiAP
- Monitored through the FortiGate — no separate switch/AP credentials.
- Read-only profile must include WiFi → Read (switch-controller + wifi monitor APIs).
- API paths:
/api/v2/monitor/switch-controller/*,/api/v2/monitor/wifi/*.
HA cluster
- Point XorMon at the cluster management IP or VIP reachable from the collector.
- One XorMon device entry per logical cluster.
Troubleshooting
| Symptom | Likely cause | Action |
|---|---|---|
| HTTP 401 | Invalid/expired token; wrong credentials | Regenerate token; verify profile assignment |
| HTTP 403 on some endpoints | Missing Read on accprofile group | Add Read permissions on the relevant accprofile groups |
| Connection timeout | Firewall, trusted hosts, wrong port | Open HTTPS; add collector IP to trusted hosts |
| SSL error | Self-signed cert | Trust CA on the collector or use curl --insecure for verification |
| No switches/APs | Missing wifi read; devices not FortiLink-managed |
Check accprofile; verify FortiLink on FortiGate |
| Session limit (password auth) | Too many concurrent logins | Switch to API token |
References
Generally all network devices having SNMP MIBs compatible with Cisco should work.
XorMon preseting LAN Topology of interconnected switches (via LLDP & CDP) and attached devices to all switches (via MAC).
It works in 2 modes (both on L2):
LAN NetFlow setup.
Switch configuration
- Enable SNMP communication from XorMon server to all LAN switches on port 161, UDP
Connections are always initiated from XorMon server side
- SNMP v3 setup:
Perl SNMP v3 compatibility Auth & Priv support matrix
- Cisco: follow XorMon setup example or the Cisco official one
- HPE Aruba:
- AuthPriv and AuthPass passwords to be a minimum of 8 characters.
- User on the switch itself needs to be placed in a specific SNMPv3 group (see config below)
- SNMPv3 server on the switch might respond on the first IP address configured only on the switch.
(unsure whether this is a limitation, bug, or due to the actual management interface not being configured, use that IP or modify your DNS to point to it)
snmp-server contact "<contact>" location "<location>"
snmpv3 enable
snmpv3 only
snmpv3 user xormon auth sha <AuthPass> priv aes <PrivPass>
snmpv3 group managerpriv user "xormon" sec-model ver3
- Cisco: follow XorMon setup example or the Cisco official one
- To monitor VLAN must be enabled on the switch this:
$ interface vlan { vlan-id | vlan-range} - Enable LLDP and CDP protocols for LAN Topology feature.
Add a switch into XorMon
-
Add switches into configuration:
Settings icon ➡ Devices ➡ Network ➡ LAN ➡ New ➡ Vendor:device : Cisco
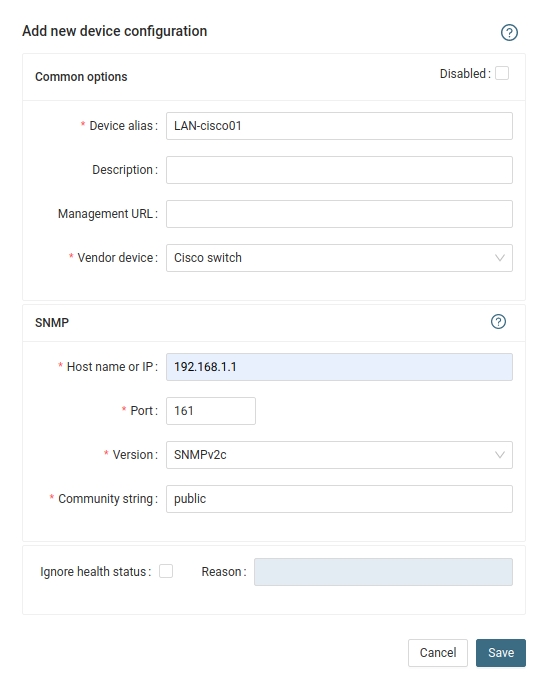 |
If you switch has a management IP and an inband IP, then use inband IP in XorMon configuration.
Troubleshooting
-
This must work from cmd line, it must provide name of the switch (place your IP and community string)
snmpwalk -v 2c -c public 192.168.1.1 1.3.6.1.2.1.1.5