Hitachi monitoring
HUS monitoring is supported by our first generation tool STOR2RRD only so far.
Do you want to let us know your priorities? Vote for your missing features and device support. More votes, bigger priority for us.
List of not supported technologies yet
Do you want to let us know your priorities? Vote for your missing features and device support. More votes, bigger priority for us.
List of not supported technologies yet
The product uses the HNAS File Storage Native REST API interface provided by the NAS File OS to retrieve all necessary data.
Acquiring the correct IP address:
All requests to the REST API server must be sent via a publicly accessible admin services IP address.
This will normally be the same address that the SMU or File Administrator uses to communicate with the system it is managing.
Any address associated with an EVS type of admin can be used, as long as it is accessible from the client that will be making REST requests.
Storage connectivity
Enable access from the XorMon host to the HNAS REST API server on port 8444.Acquiring the correct IP address:
All requests to the REST API server must be sent via a publicly accessible admin services IP address.
This will normally be the same address that the SMU or File Administrator uses to communicate with the system it is managing.
Any address associated with an EVS type of admin can be used, as long as it is accessible from the client that will be making REST requests.
- Hitachi NAS Platform
Either obtain the address from the Managed Server settings on the SMU associated with the system or using the HNAS CLI interface and use the evsipaddr -l command to obtain a list of all IP addresses.
- VSP One File
Either obtain the address from Managed Servers on the System Administrator associated with the system or using the VSP One File CLI interface and use the evsipaddr -l command to obtain a list of all IP addresses.
- VSP N series and VSP Gx00 and Fx00 with NAS modules
Any accessible admin services address can be used in the same way as for the NAS Platform and VSP One File, and additionally the controller addresses can also be used. The controller addresses can be obtained via the service processor (SVP) and are described as the GUM IP addresses or from the SMU associated with the system, from the IP Addresses page in the Network Configuration section. The addresses are at the top of the page, under the Unified Management IP Addresses heading.
Authenticating with the REST API server
Credentials can be either a user/password combination or an API key.- Access via API key is the preferred method, and keys can be generated as follows:
- Log in to the server CLI as an administrative user.
-
system1:$ apikey-create "xormon"
Please make a note of this new API Key, as it is not possible to display the full key again.
Only the prefix and description can be displayed in the future.
New key: xIAdbgTNVP.Nj2TOgxiOYgpTu2kjzEGS4QmIJIeLmF3aXKg6FhY9vC
- Configure an access apikey with read-only privileges
system1:$ apikey-update --description xormon --remove-access full-access
system1:$ apikey-update --description xormon --add-access native-rest-read
- Log in to the server CLI as an administrative user.
- Access via user/password
-
Create a new user xormon with read-only privileges
system1:$ user add xormon
USER
XorMon storage configuration
-
Add storage into configuration from the UI:
XorMon UI ➡ Settings icon ➡ Device ➡ Storage ➡ New ➡ Vendor:device ➡ Hitachi HNAS
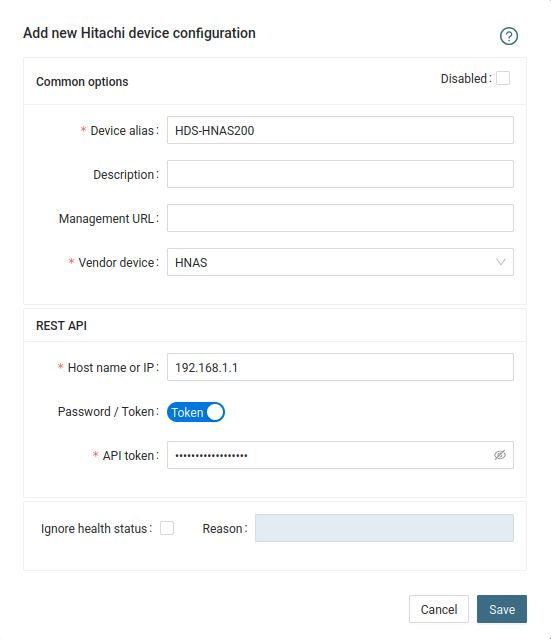
- Run "Test" for configured device, it must show "OK"
-
Wait about 1 hour, then reload the web browser, you should see it in XorMon UI
XorMon uses Hitachi HCP REST API interface natively provided by the storage to get configuration and performance data.
Event logs and health status is obtained via SNMP.
Event logs and health status is obtained via SNMP.
Storage connectivity
-
Allow access from the XorMon host to the Hitachi HCP storage on port 161 (UDP) and 9090 (API)
- Storage users
1. Create global user (stor2rrd in this case for example) for access to the storage with Monitor role.
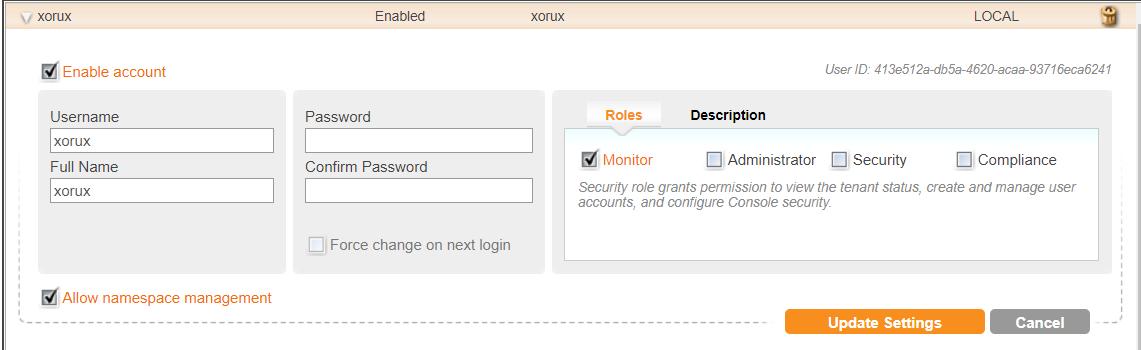
2. Create additional user in each monitored Tenant with Monitor role.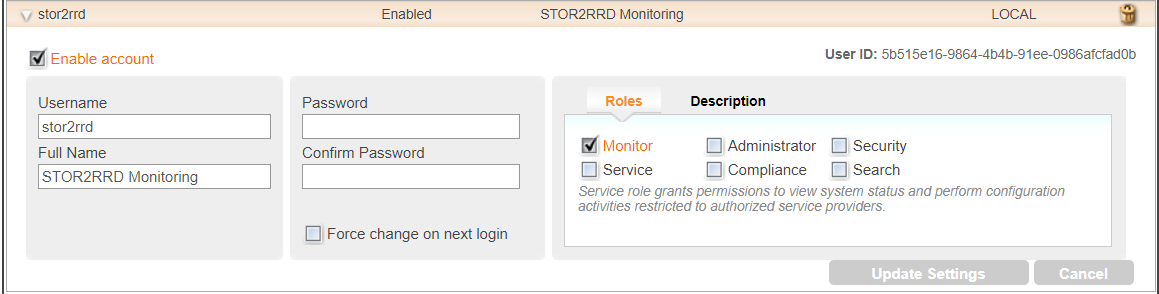
-
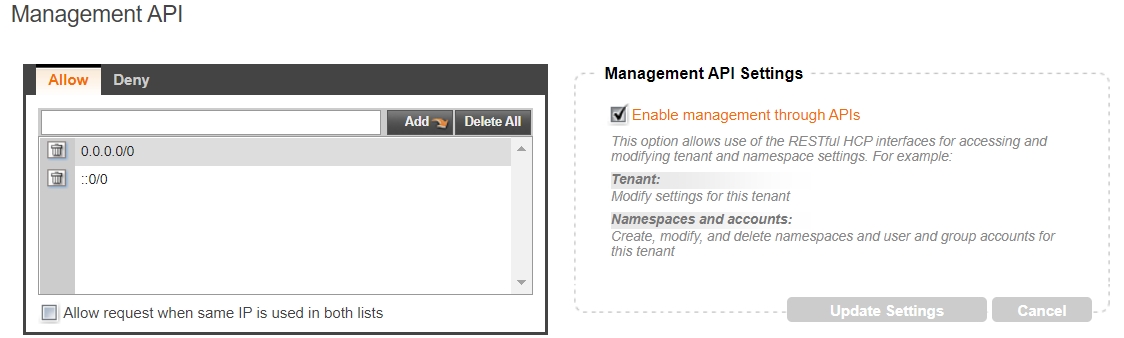
Allow Management API access from XorMon hosts/network/globaly for storage and each tenant
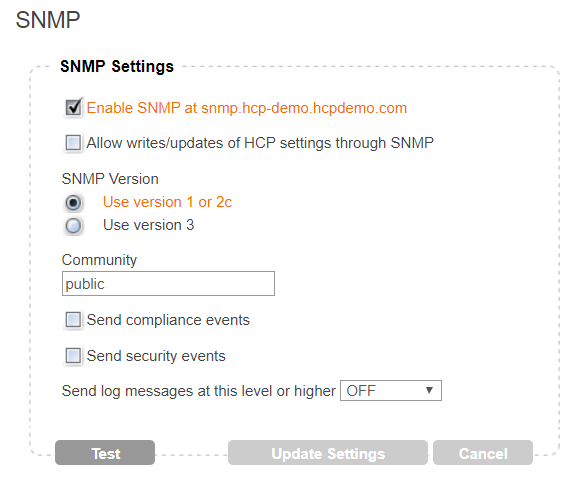
- Enable SNMP:
XorMon storage configuration
-
Add storage into configuration from the UI:
XorMon UI:Settings icon ➡ Device ➡ Storage ➡ New ➡ Vendor:device ➡ Hitachi ➡ HCP
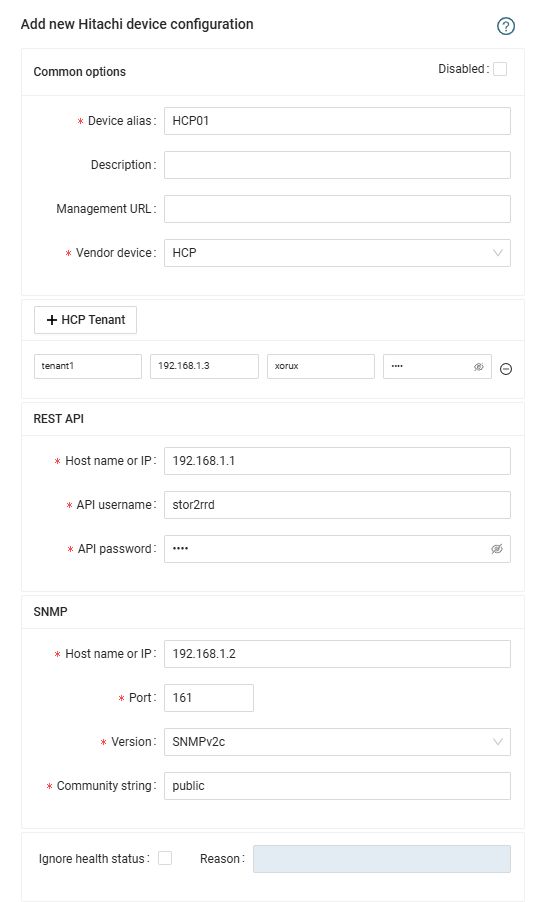
- Run "Test" for configured storage device, it must show "OK"
-
Wait about 1 hour, then reload the web browser, you should see it in XorMon UI
Hitachi VSP G/F/E/H/5000/one block, HUS-VM monitoring setups
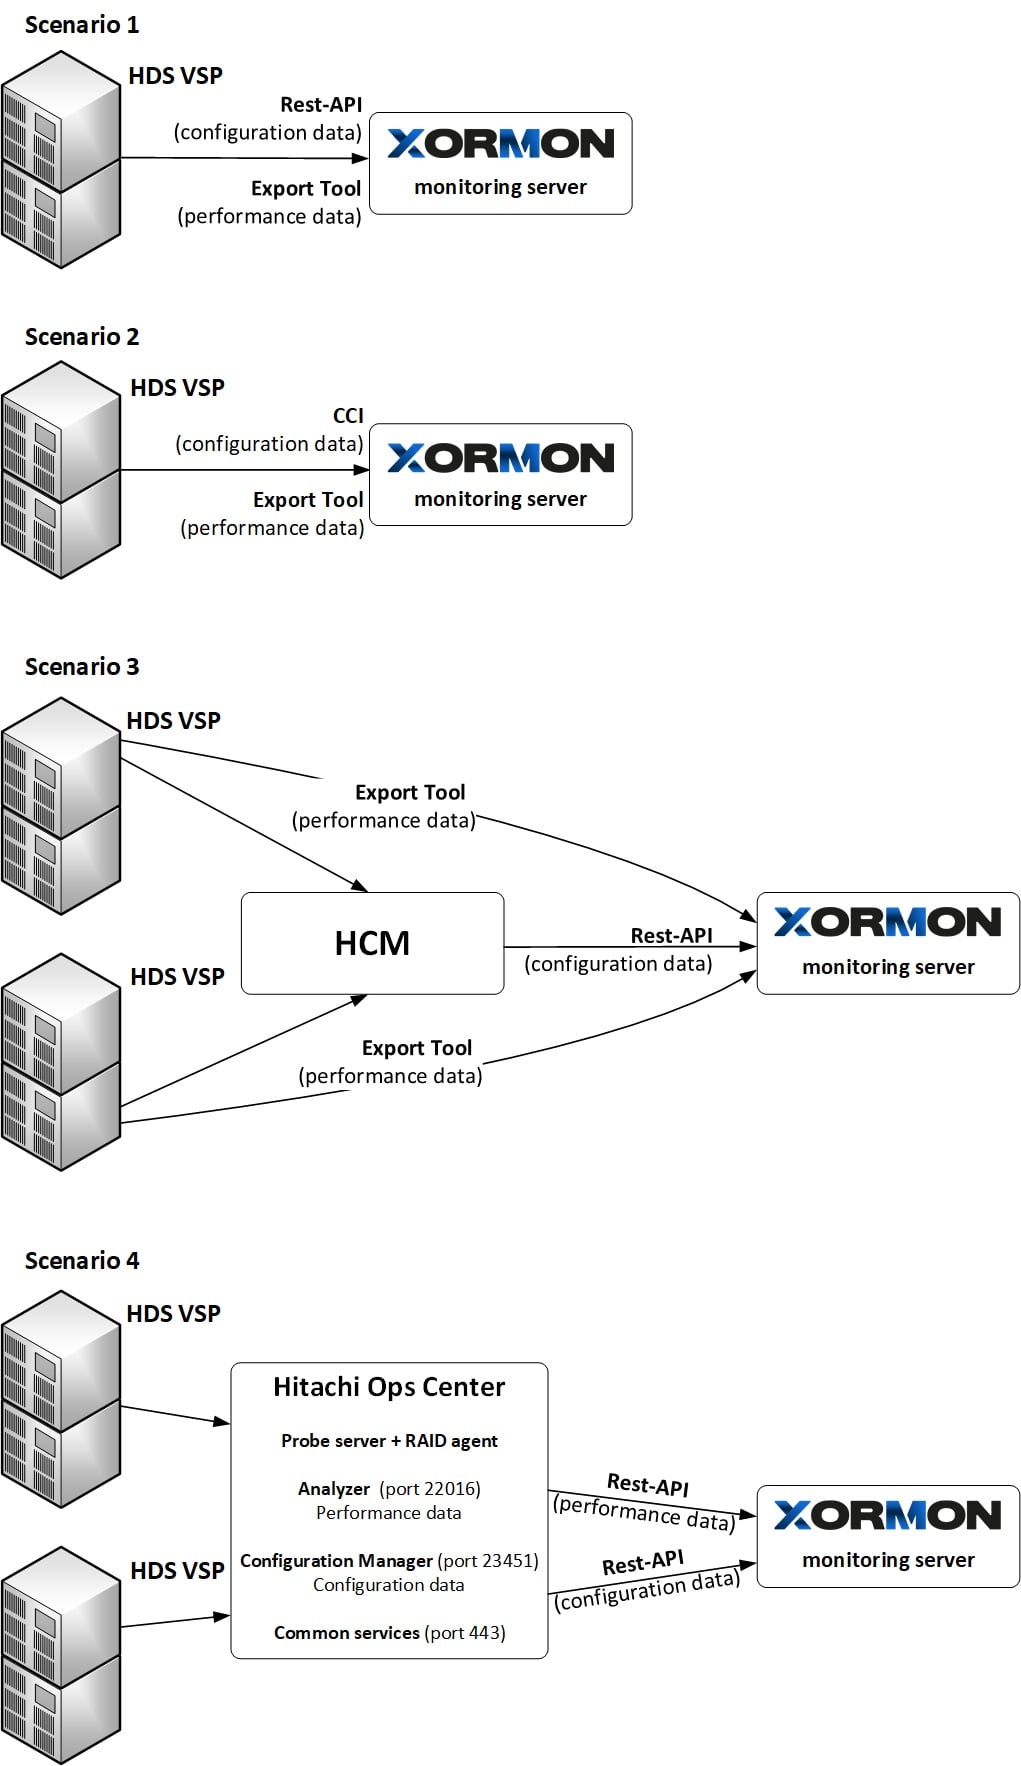
- REST API, Export Tool: use it on new models which support it, it has much easier setup
- CCI, SNMP, Export Tool: it works on all models (supported in STOR2RRD only)
- Hitachi Configuration Manager REST API / Export Tool
- Hitachi Ops Center
 |
1. Hitachi VSP REST API, Export Tool
Supported modelsPrerequisites
-
Allow communication from XorMon host to all Hitachi VSP storage SVP IP and nodes on TCP port 1099.
Nodes IP, allow TCP port 443.
At least VSP 5500 has not available Nodes, then use SVP IP instead and allow also TCP port 443.
New storage devices do not have SVP, put Node1 IP/hostname into SVP field.
- Storage configuration:
Create user xormon on the storage, read only access
For newer models (like Hitachi VSP One Block), the user role Storage Administrator (Performance Management) is required. Read more.
Do not use shell special characters like #!?|$*[]\{}`"'& in the password, use ;:.+-%@ instead.
You can also follow this docu to fully prepare storage for monitoring
Installation of Hitachi Export Tool
-
It is typically located on a CD that comes packaged with the Service Processor on the HDS USP Array. The Export Tool can also be obtained by contacting HDS support.
(CD location: /ToolsPack/ExportTool)
You can also download it from Hitachi web site
Hitachi produces a new Export Tool for each release of the firmware. So unless you make sure all of the storage are running on the same firmware version then you will need to obtain the appropriate version of the Export Tool to meet the firmware version you are running at the site.
Find our firmware release of your storage (like 83-01-28/00).
Export Tool version must match the SVP firmware version.
Install each version of the Export Tool into separate directory named as firmware of your storage (just 6 numbers like in this example firmware 83-01-28) under root user:
# mkdir /opt/hds
# mkdir /opt/hds/83-01-28
# cd /opt/hds/83-01-28
# tar xvf export-tool.tar
# chmod 755 runUnix.sh runUnix.bat # note one of these files exists only
# chown -R xormon /opt/hds
In this case you do not need to install older Export Tool, just make a symlink.
# cd /opt/hds/
# ls
  83-01-28
# ln -s 83-01-28 73-03-57
Test Export Tool 2
$ cd /opt/hds/<firmware level> # example /opt/hds/88-03-23
$ bash ./runUnix.sh show interval -ip <ip controller> -login <user> <password>
  Interval : 5 min
  show interval command success
Directory /opt/hds is optional, it is configurable in the storage properties
The HDS Performance Monitor License must exist for each array and monitoring must be enabled.
Storage configuration example
Java 11 is required by the Export Tool for new VSP 5500 boxes.
Using Java in Docker docu.
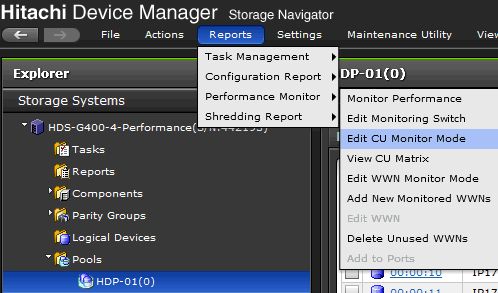
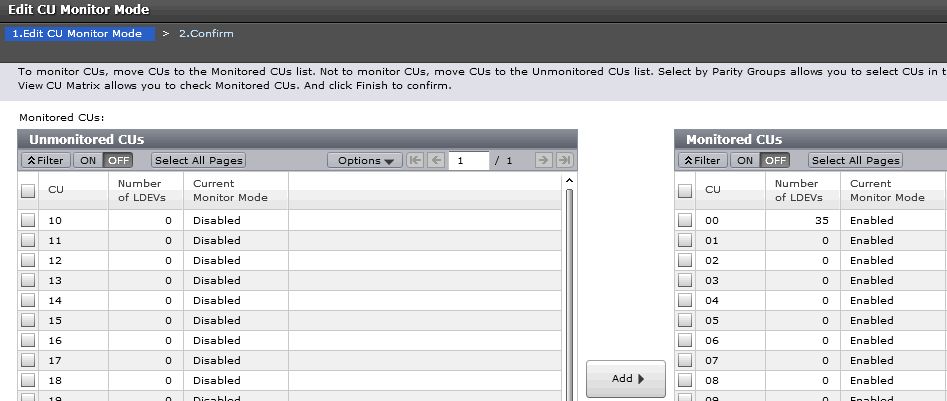
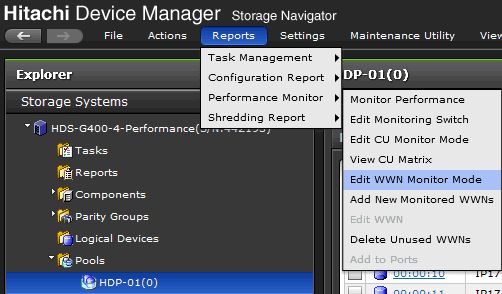
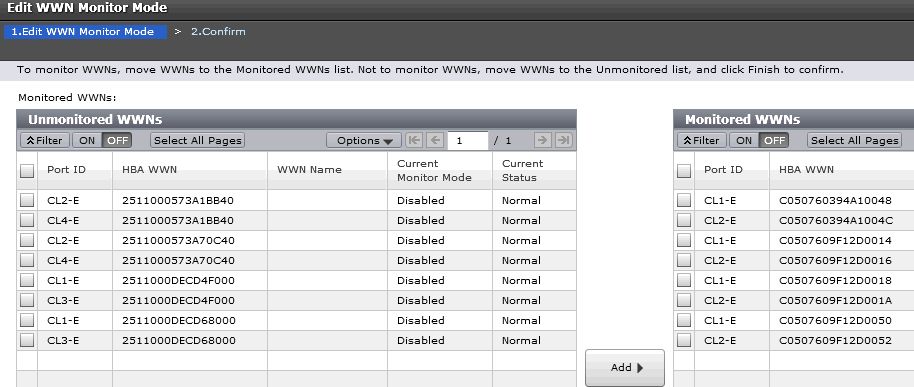
Allow monitoring of CU and WWN
-
Note this configuration option do not have to be in place on all modes or firmwares, you might ignore it if you do not find it on your storage.
- CU
- WWN
Note that monitoring apparently cannot be enabled when WWNs per Port exceeds the maximum of 32.
In this case you will not have direct per host data but host data will be aggregated from attached volumes (it might mislead when volumes have attached more hosts).
-
Set "Sample interval" to 5 minutes. XorMon will not work with anything longer like 10 or 15 minutes.

XorMon storage configuration
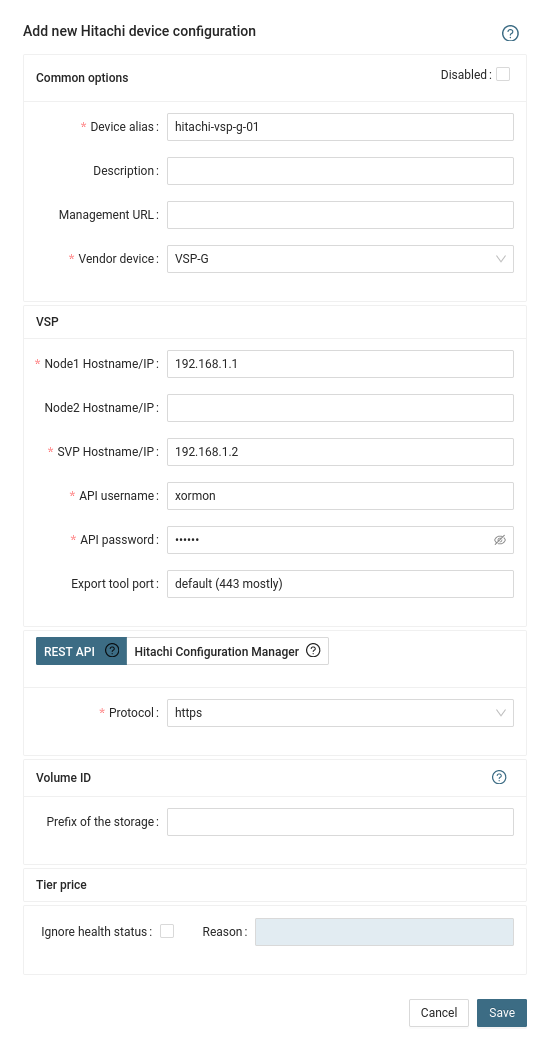
- Add storage into configuration from the UI:
XorMon UI: Settings icon ➡ Device ➡ Storage ➡ New ➡ Vendor:device ➡ Hitachi VSP-G ➡ REST API
New storage devices do not have SVP, put Node1 IP/hostname into SVP field.
- Run "Test" for configured storage device, it must show "OK"
-
Wait about 1 hour, then reload the web browser, you should see it in XorMon UI
3. Hitachi Configuration Manager, Export Tool
Hitachi Configuration Manager can be used as a replacement of Hitachi CCI, its configuration is much easier than CCI.Either use direct storage REST API instead of CCI, which is not however available on older systems like the VSP G1000 or VSP G200/400 which have no REST API support.
Therefore its implemented Hitachi Configuration Manager support to enable REST API access even for these storage devices.
Configuration is easy, create an account on Hitachi Configuration Manager and put its hostname and user credentials into XorMon configuration.
You have to define also device id of the storage.
Hitachi Configuration Manager is apparently free for Hitachi customers.
Prerequisities
- Open port to the HCP are 23450 (HTTP) or 23451 (HTTPS) from XorMon server
- It uses same user account which is used for Export Tool already created on the back-end storage
Configuration
Follow above chapters for setting up Export Tool and the storage- Installation of Hitachi Export Tool
- Allow monitoring of CU and WWN
Get Device ID of the storage
To get the Device ID, run the following command:curl -k -X GET https://<Ops_Center_IP>:23451/ConfigurationManager/v1/objects/storagesThe command returns information about the connected storage systems.
Find the storageDeviceId value in the response. Use this value as the Device ID when adding the Hitachi device configuration.
For example:
{
  "data": [
    {
      "storageDeviceId": "900000001234",
      "model": "VSP G200",
      "serialNumber": 123456,
      "svpIp": "192.168.1.1"
    },
    {
      "storageDeviceId": "900000005678",
      "model": "VSP E1090H",
      "serialNumber": 567890,
      "ctl1Ip": "192.168.1.2",
      "ctl2Ip": "192.168.1.3",
      "targetCtl": "CTL1"
    }
  ]
}
If the response contains an empty data array ("data": []), no storage systems are registered in Configuration Manager. In this case, register the storage system first using the procedure described below.Register a storage system in Configuration Manager
The following is a basic example for registering a storage system. The required parameters may differ depending on the storage model.
curl -k -u '<USERNAME>:<PASSWORD>' -H 'Accept: application/json' -H 'Content-Type: application/json' -X POST 'https://<OPS_CENTER_IP>:23451/ConfigurationManager/v1/objects/storages' -d '{"svpIp":"<SVP_IP>","serialNumber":<SERIAL_NUMBER>,"model":"<MODEL>","changeNotificationSetting":{"isNotifiable":true,"mappWebServerHttpsPort":443}}'
Replace the placeholders as follows:
- <USERNAME> / <PASSWORD>: Credentials for a Storage Administrator user account on the target storage system/SVP.
- <OPS_CENTER_IP>: IP address or hostname of the server running Hitachi Ops Center API Configuration Manager.
- <SVP_IP>: Management IP address of the Service Processor (SVP) for the storage system.
- <SERIAL_NUMBER>: Storage system serial number. Enter it as a numeric value, without quotation marks.
- <MODEL>: Exact storage model name, for example VSP G400, VSP F800, or VSP 5000.
For full details and supported input parameters, please refer to the Hitachi documentation.
Alternatively, you can register the storage using the Hitachi Ops Center Automator UI. Please see the Hitachi documentation for more information.
XorMon storage configuration
-
Add storage into configuration from the UI:
XorMon UI: Settings icon ➡ Device ➡ Storage ➡ New ➡ Vendor:device ➡ Hitachi VSP-G ➡ Hitachi Configuration Manager
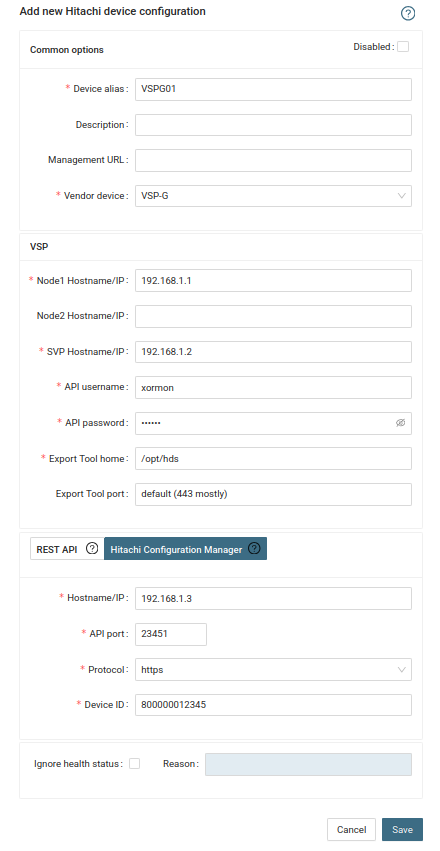
- Hitachi Ops Center version 10.8 or later
- The following Ops Center components must be installed and configured:
- Ops Center Common Services – authentication and SSO (port 443)
- Ops Center Analyzer – performance data collection via RAID Agent (port 22016)
- Ops Center Analyzer Probe server with RAID Agent – installed on a separate VM and collects data from the storage system
- The storage system must be registered and monitored in Ops Center Analyzer.
- Enable performance monitoring in Storage Navigator
- In OPS Center, create xormon user and add it to the opscenter-users group.

- In Ops Center Analyzer, verify that the opscenter-users group has at least the Modify permission.

- <USERNAME> / <PASSWORD>: Credentials for a Storage Administrator user account on the target storage system/SVP.
- <OPS_CENTER_IP>: IP address or hostname of the server running Hitachi Ops Center API Configuration Manager.
- <SVP_IP>: Management IP address of the Service Processor (SVP) for the storage system.
- <SERIAL_NUMBER>: Storage system serial number. Enter it as a numeric value, without quotation marks.
- <MODEL>: Exact storage model name, for example VSP G400, VSP F800, or VSP 5000.
- Add device into configuration from the UI:
Settings icon ➡ Device ➡ Storage ➡ New ➡ Vendor:device ➡ Hitachi ➡ Hitachi VSP
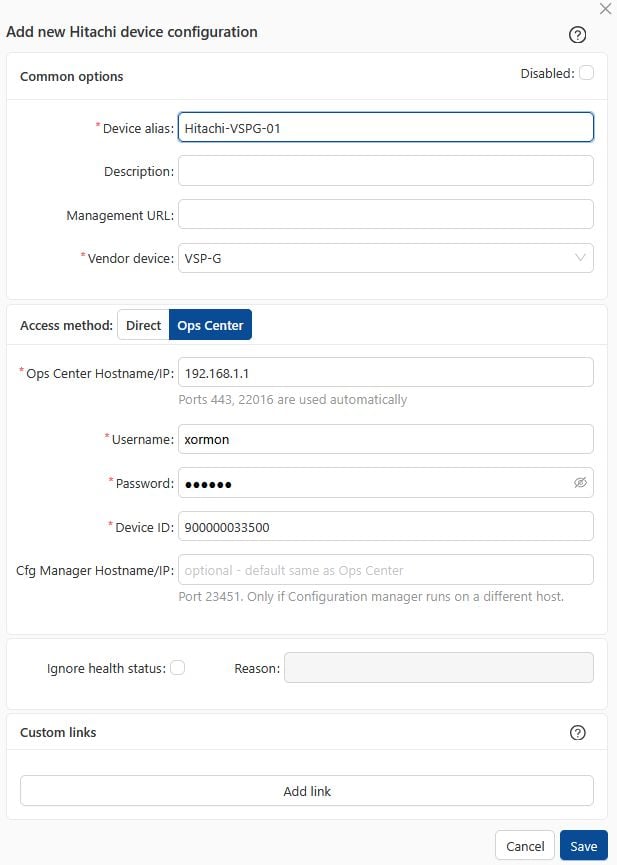
- Run "Test" for configured device, it must show "OK"
-
Wait about 1 hour, then reload the web browser, you should see it in XorMon UI
4. Hitachi Ops Center
This solution relies fully on Hitachi Ops Center APIs data. It does not need to install Hitachi Export Tool neither Hitachi CCI.When switching between Direct and Ops Center, all historical data is preserved. Both methods collect the same performance and configuration metrics, so the transition is seamless.
Hitachi Ops Center Analyzer
-
Use this method to collect performance and configuration data through the Hitachi Ops Center REST APIs instead of the Export Tool.
Supported models
-
All Hitachi VSP models supported by Ops Center Analyzer (VSP G/F/E/H series, VSP 5000, VSP One Block, HUS-VM).
Prerequisites
Ops Center user account
-
Create an Ops Center user account and add it to the opscenter-users group. The account must have at least the Modify permission in Analyzer.
Network connectivity
Allow access from the XorMon host to the Ops Center server on the following ports:| Port | Component | Purpose |
|---|---|---|
| 443 | Common Services | Bearer token authentication |
| 22016 | Analyzer | Performance data (RAID Agent REST API) |
| 23451 | Configuration Manager | Configuration data (ports, LDEVs, pools) |
Get Device ID of the storage
To get the Device ID, run the following command:curl -k -X GET https://<Ops_Center_IP>:23451/ConfigurationManager/v1/objects/storagesThe command returns information about the connected storage systems.
Find the storageDeviceId value in the response. Use this value as the Device ID when adding the Hitachi device configuration.
For example:
{
  "data": [
    {
      "storageDeviceId": "900000001234",
      "model": "VSP G200",
      "serialNumber": 123456,
      "svpIp": "192.168.1.1"
    },
    {
      "storageDeviceId": "900000005678",
      "model": "VSP E1090H",
      "serialNumber": 567890,
      "ctl1Ip": "192.168.1.2",
      "ctl2Ip": "192.168.1.3",
      "targetCtl": "CTL1"
    }
  ]
}
If the response contains an empty data array ("data": []), no storage systems are registered in Configuration Manager. In this case, register the storage system first using the procedure described below.Register a storage system in Configuration Manager
The following is a basic example for registering a storage system. The required parameters may differ depending on the storage model.
curl -k -u '<USERNAME>:<PASSWORD>' -H 'Accept: application/json' -H 'Content-Type: application/json' -X POST 'https://<OPS_CENTER_IP>:23451/ConfigurationManager/v1/objects/storages' -d '{"svpIp":"<SVP_IP>","serialNumber":<SERIAL_NUMBER>,"model":"<MODEL>","changeNotificationSetting":{"isNotifiable":true,"mappWebServerHttpsPort":443}}'
Replace the placeholders as follows:
For full details and supported input parameters, please refer to the Hitachi documentation.
Alternatively, you can register the storage using the Hitachi Ops Center Automator UI. Please see the Hitachi documentation for more information.