VMware / Hyper-V image
It contains installed and configured XorMon NG product with all its prerequisites.
Note: this is a different appliance than Xorux Virtual Appliance we use for the first generation of our tools (XorMon Original / LPAR2RRD / STOR2RRD).
- Deploy Virtual Appliance as per technology below
- Log to the XorMon NG UI: https://<machine hostname or IP>/
Default login: xormon / xormon
- Upgrade to the latest available XorMon NG version (just in case the appliance does not contain the latest one)
Upgrade docu
- Download XorMon-NG-<ver>-OVF.zip and unzip it
- Deploy the image as OVF template
- Start up the VM
- Open the console, it will print out the IP acquired by DHCP once it is up
- When you want to set IP manually then log in as root (for password check attached pdf) and follow the Static IP setup
- Open: https://<appliance IP>/ (https is required)
- Use "xormon" user with "xormon" password to reach the product UI
- User credentials and further installation advices.
- Download XorMon-NG-<ver>-OVF.zip
- Unzip downloaded ZIP archive
- Open Nutanix Prism UI
- Find Image Configuration in Settings
- Create image named xormon-vmdk with image type DISK and appropriate Storage Container
- Upload *.vmdk file extracted from ZIP archive
- Wait until import operations are complete and create new VM using imported image as primary disk (Add Disk, select Operation Clone from Image Service and select xormon-vmdk as Image)
- Size it as per readme docu which contains also user access.
- Change Boot Configuration of created VM to use DISK instead of CD-ROM (you can remove CD-ROM safely, you don't need it), don't forget to add Network adapter
- When you want to set IP manually then log in as root (for password check attached pdf) and follow the Static IP setup
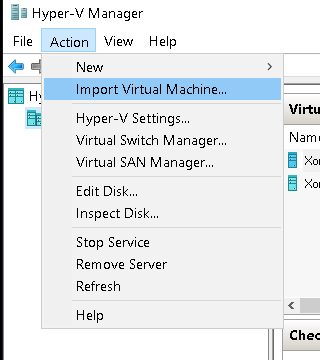
- Download XorMon-NG-<ver>-HyperV.zip and unzip it
- Deploy it in Microsoft Hyper-V.
- Start up the VM
- Open the console, it will print out the IP acquired by DHCP once it is up
- When you want to set IP manually then log in as root (for password check attached pdf) and follow the Static IP setup
- Open: https://<appliance IP>/ (https is required)
- Use "xormon" user with "xormon" password to reach the product UI
- User credentials and further installation advices.